Kubernetes Scheduling, Preemption, and Eviction
Supported Versions: Kubernetes 1.34 - 1.36 (Descheduler v0.36 example) Last Updated: September 17, 2026
In Kubernetes, scheduling is the process of placing pods on appropriate nodes. Preemption is the process of removing lower-priority pods to make room for higher-priority pods, and eviction terminates a Pod; its workload controller may create a replacement that the scheduler places separately. In this chapter, we will learn about Kubernetes scheduling mechanisms, node selection, preemption, eviction, and scheduling optimization methods in Amazon EKS.
Lab Environment Setup
To follow the examples in this document, you need the following tools and environment:
Required Tools
- kubectl within one minor version of the API server
- A working Kubernetes cluster (EKS, minikube, kind, etc.)
- A cluster with multiple nodes (for scheduling tests)
Scheduling Example Setup
# Create namespace
kubectl create namespace scheduling-demo

# Add labels to nodes (if you have multiple nodes)
kubectl label nodes <node-name> disktype=ssd
kubectl label nodes <node-name> gpu=true

# Create a pod using node affinity
kubectl -n scheduling-demo apply -f - <<EOF
apiVersion: v1
kind: Pod
metadata:
  name: nginx-ssd
  labels:
    app: nginx
spec:
  affinity:
    nodeAffinity:
      requiredDuringSchedulingIgnoredDuringExecution:
        nodeSelectorTerms:
        - matchExpressions:
          - key: disktype
            operator: In
            values:
            - ssd
  containers:
  - name: nginx
    image: nginx
EOF

# Create priority class
kubectl apply -f - <<EOF
apiVersion: scheduling.k8s.io/v1
kind: PriorityClass
metadata:
  name: high-priority
value: 1000000
globalDefault: false
description: "This priority class should be used for critical service pods only."
EOF

# Create Pod Disruption Budget (PDB)
kubectl -n scheduling-demo apply -f - <<EOF
apiVersion: policy/v1
kind: PodDisruptionBudget
metadata:
  name: nginx-pdb
spec:
  minAvailable: 1
  selector:
    matchLabels:
      app: nginx
EOF
Kubernetes Scheduling Architecture
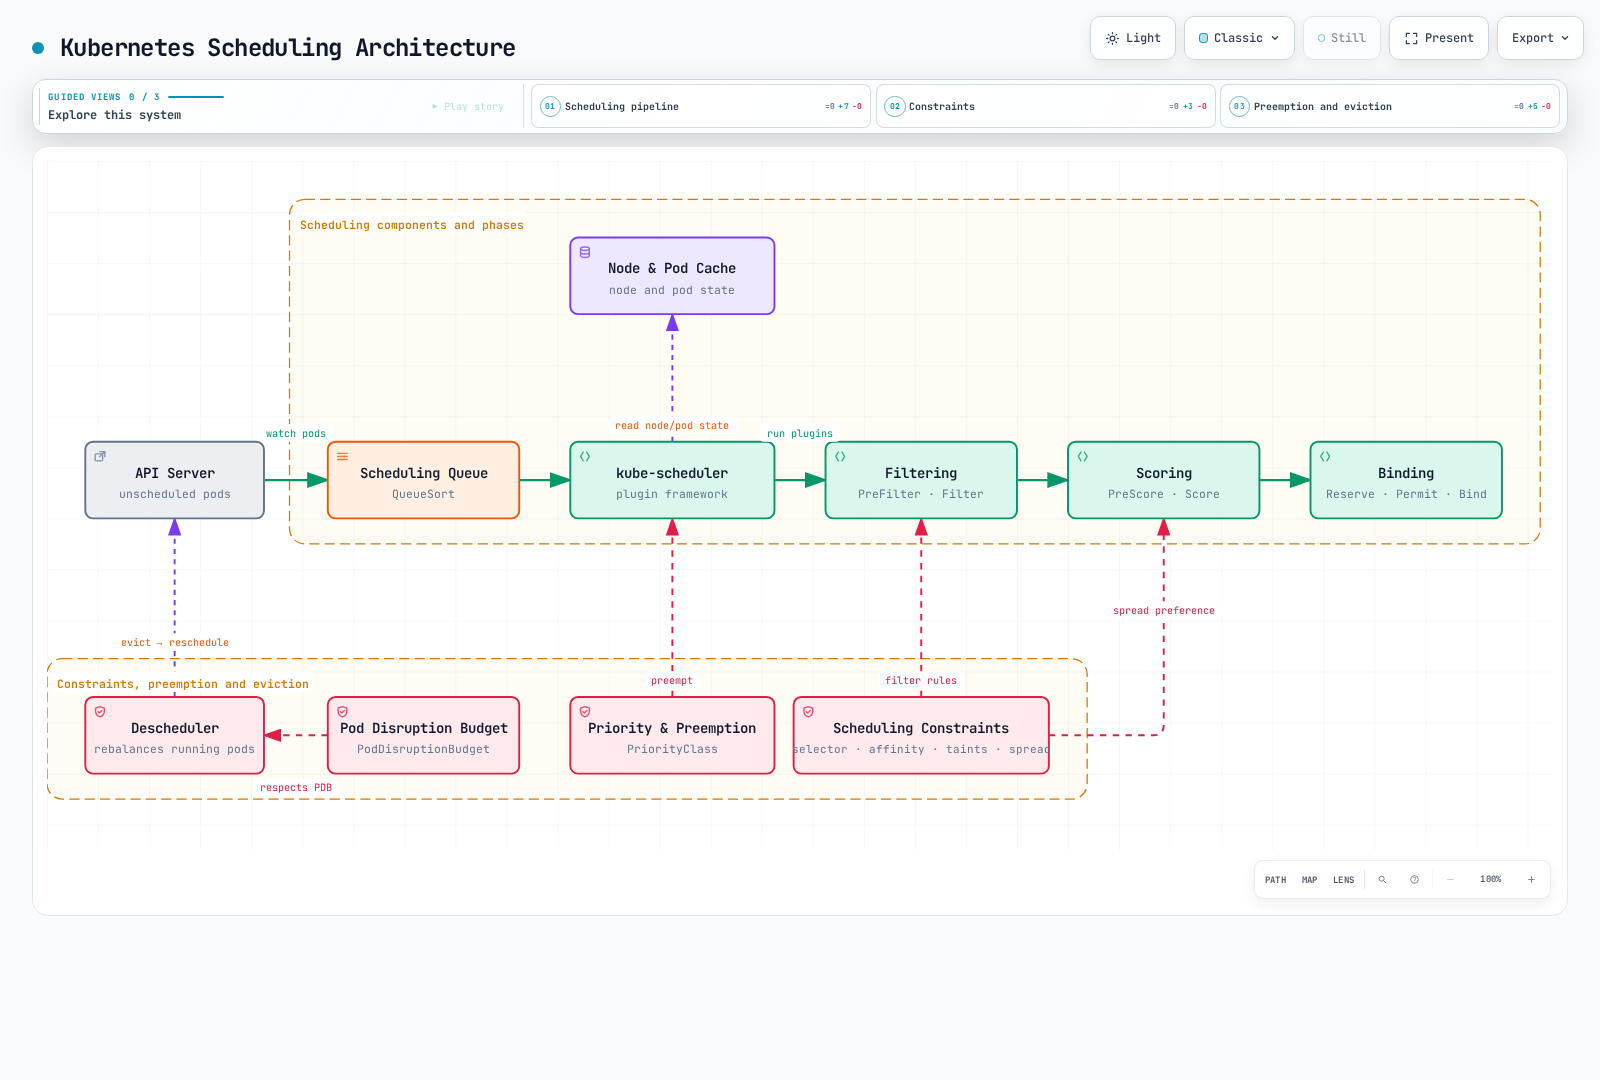
Scheduling Concept Comparison
| Concept | Purpose | Use Cases | Kubernetes Version |
|---|---|---|---|
| Node Selector | Place pods on nodes with specific labels | Simple node selection | All versions |
| Node Affinity | Define complex node selection rules | Advanced node selection | 1.6+ |
| Pod Affinity | Place pods close to other pods | Co-locating related services | 1.6+ |
| Pod Anti-Affinity | Place pods away from other pods | Ensuring high availability | 1.6+ |
| Taints and Tolerations | Allow only specific pods on nodes | Dedicated nodes, node isolation | 1.6+ |
| Topology Spread Constraints | Spread pods across topology domains | Distribution across availability zones | 1.16+ (GA in 1.19) |
| Priority and Preemption | Prioritize important workloads | Critical service guarantees | 1.8+ (GA in 1.11) |
| Pod Disruption Budget | Limit simultaneously disrupted pods | Ensuring high availability | 1.4+ (GA in 1.21) |
Basic Scheduling Concepts
Key Concept: The Kubernetes scheduler is a control plane component that selects the optimal node to run pods, operating in two phases: filtering and scoring.
Scheduling Process
Filtering Phase (Predicates)
- Identifies a suitable set of nodes that can run the pod
- Considers resource requirements, node selectors, affinity rules, taints/tolerations, etc.
- Excludes a node if any condition is not met
Scoring Phase (Priorities)
- Assigns scores to nodes that passed filtering
- Considers resource utilization, pod distribution, affinity preferences, etc.
- Selects the node with the highest score
Binding Phase
- Assigns the pod to the selected node
- Updates binding information to the API server
Table of Contents
- Scheduling Overview
- How the Scheduler Works
- Node Selection
- Pod Affinity and Anti-Affinity
- Taints and Tolerations
- Node Affinity
- Pod Priority and Preemption
- Pod Eviction
- Pod Disruption Budget (PDB)
- Node Pressure Eviction
- TopologySpreadConstraints
- Pod Deletion Cost
- Descheduler
- Scheduling Optimization in Amazon EKS
- Scheduling Best Practices
- Conclusion
Scheduling Overview
The Kubernetes scheduler is a control plane component that places pods on appropriate nodes. The scheduler considers various factors to determine the optimal node to place pods:
- Resource Requirements: CPU, memory, and other resources requested by the pod
- Hardware/Software/Policy Constraints: Node selectors, node affinity, taints, etc.
- Affinity/Anti-Affinity Specifications: Placement relationships with other pods
- Data Locality: Placing pods close to data
- Inter-Workload Interference: Minimizing interference between different workloads
- Custom objectives: Deadline-aware or workload-interference-aware scheduling requires suitable custom logic; the default scheduler does not infer application deadlines
Scheduling Process
The scheduling process is broadly divided into two phases:
Filtering: Identifies a set of nodes that can run the pod
- Checks whether resource requirements are met
- Checks constraints such as node selectors, affinity, taints
Scoring: Scores filtered nodes to select the optimal node
- Resource utilization balance
- Inter-pod affinity/anti-affinity
- Data locality
- Taints/tolerations
How the Scheduler Works
The Kubernetes scheduler operates through the following process:
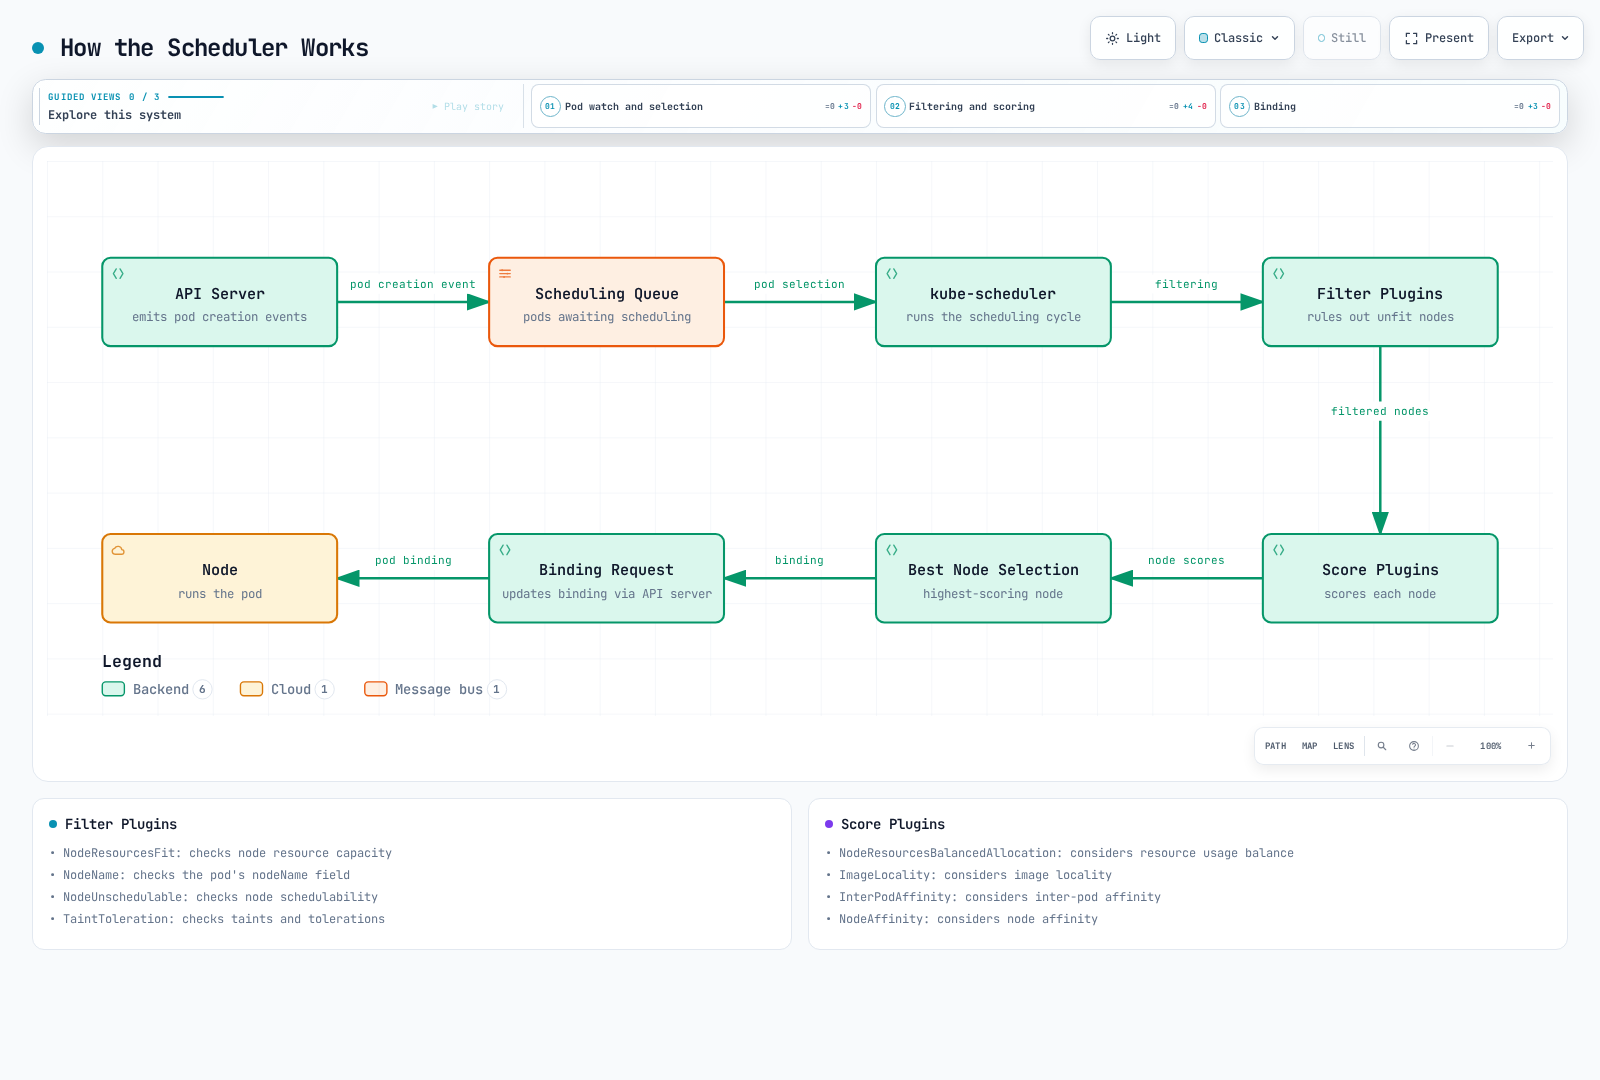
- Pod Queue Watching: The scheduler watches the API server for unscheduled pods.
- Node Filtering: Identifies a set of nodes that can run the pod.
- Node Scoring: Scores the filtered nodes.
- Node Selection: Selects the node with the highest score.
- Binding: Binds the pod to the selected node.
Scheduling Plugins
The Kubernetes scheduler is designed to be extensible using a plugin architecture. Various plugins operate at different stages of the scheduling process:
Filter Plugins: Filter out nodes where the pod cannot run
- NodeResourcesFit: Checks node resource capacity
- NodeName: Checks the pod's nodeName field
- NodeUnschedulable: Checks node schedulability
- TaintToleration: Checks taints and tolerations
Score Plugins: Assign scores to nodes
- NodeResourcesBalancedAllocation: Considers resource usage balance
- ImageLocality: Considers image locality
- InterPodAffinity: Considers inter-pod affinity
- NodeAffinity: Considers node affinity
NodeResourcesFit Scoring Strategy: LeastAllocated vs. MostAllocated
NodeResourcesFit is both a filter plugin (does the node have enough allocatable CPU/memory for the pod?) and a score plugin. Its score plugin behavior is controlled by scoringStrategy.type, configured through KubeSchedulerConfiguration:
LeastAllocated(default): scores nodes higher the less allocated they already are. New pods are pulled toward the emptiest nodes, spreading load evenly.MostAllocated: scores nodes higher the more allocated they already are (as long as the pod still fits). New pods are packed onto the busiest nodes first, leaving other nodes untouched or empty.RequestedToCapacityRatio: a configurable curve between the two, useful for extended resources like GPUs where you want a custom shape rather than a pure min/max.
apiVersion: kubescheduler.config.k8s.io/v1
kind: KubeSchedulerConfiguration
profiles:
- schedulerName: most-allocated-scheduler
  pluginConfig:
  - name: NodeResourcesFit
    args:
      scoringStrategy:
        type: MostAllocated
        resources:
        - name: cpu
          weight: 1
        - name: memory
          weight: 1
Amazon EKS's control plane is fully managed, so you cannot edit the default kube-scheduler's KubeSchedulerConfiguration directly. To use MostAllocated, run a second scheduler (a Deployment running the kube-scheduler binary with this config, bound to system:kube-scheduler/system:volume-scheduler via a dedicated ServiceAccount) and point specific pods at it with spec.schedulerName, as shown in Multiple Schedulers below — the same pattern used in Building a Custom Scheduler.
Verified test — spread vs. bin-packing behavior. To confirm the practical difference, a disposable 3-worker kind cluster (kubectl version v1.37.0, isolated, torn down after the test — no shared infrastructure was touched) was seeded with uneven baseline load using nodeName-pinned filler pods (16 CPU allocatable per node): worker=12 pods (75%), worker2=6 pods (37%), worker3=0 pods (0%). Six identical 1-CPU pods were then scheduled twice — once with the default scheduler (LeastAllocated) and once with a second scheduler configured with MostAllocated — against the same starting state:
| Scheduler / strategy | Where the 6 new pods landed | Final CPU utilization (worker / worker2 / worker3) |
|---|---|---|
Default (LeastAllocated) | All 6 on worker3 (the emptiest node) | 75% / 37% / 37% — all three nodes now occupied |
MostAllocated | 3 on worker, 3 on worker2 (the two busiest nodes) | 93% / 56% / 0% — worker3 stayed completely idle |
LeastAllocated leveled worker3 up until it matched worker2, so every node ends up partially used and none of them can be safely scaled down. MostAllocated kept concentrating load on the already-busy nodes and left worker3 untouched — exactly the node a cluster autoscaler or Karpenter consolidation pass would then terminate.
This is why MostAllocated is commonly recommended for batch/short-lived job workloads running alongside Karpenter or Cluster Autoscaler: bin-packing jobs onto fewer nodes maximizes the number of nodes that go fully idle and become eligible for consolidation, directly reducing compute cost. LeastAllocated remains the better default for long-running, latency-sensitive services, since spreading load leaves headroom on every node to absorb traffic bursts or a kubectl drain without cascading pressure onto a single packed node.
Reproduce this exact comparison yourself, step by step, in Scheduler Scoring Strategy Lab.
Multiple Schedulers
Kubernetes can run multiple schedulers simultaneously. This allows implementing custom scheduling logic for specific workloads.
apiVersion: v1
kind: Pod
metadata:
  name: custom-scheduled-pod
spec:
  schedulerName: my-custom-scheduler
  containers:
  - name: container
    image: nginx
In the example above, the schedulerName field specifies the scheduler to schedule the pod.
Node Selection
Kubernetes provides several mechanisms to place pods on specific nodes.
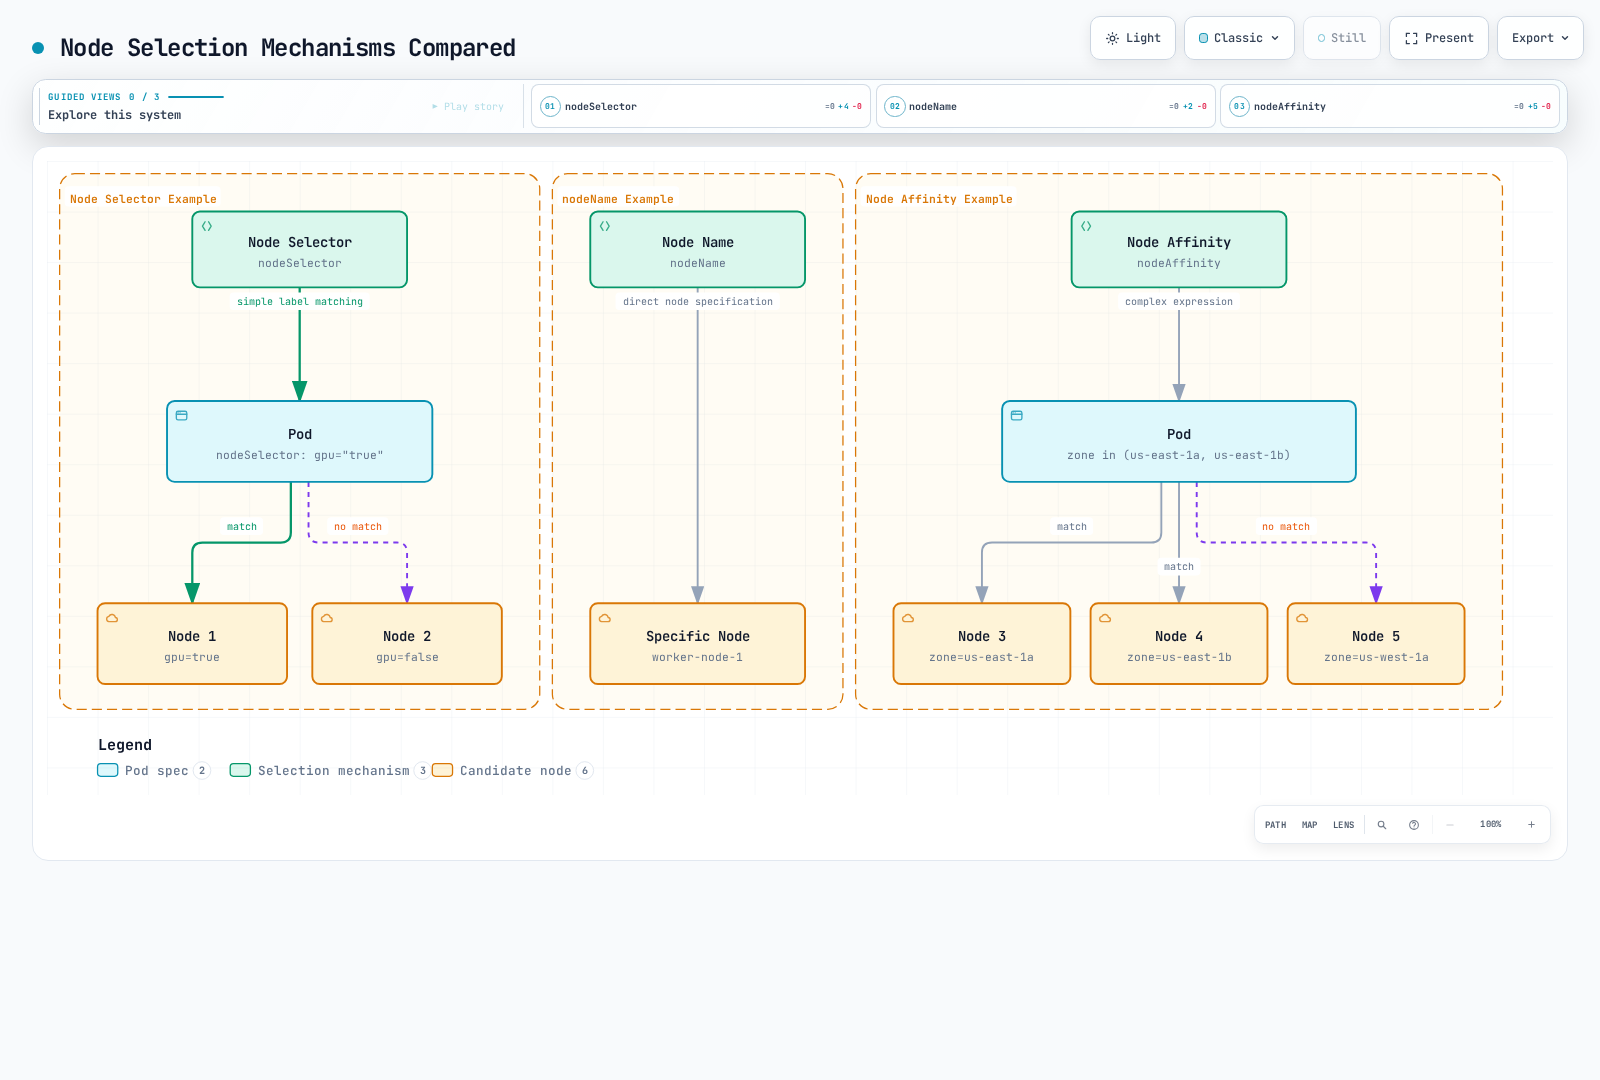
Node Selector
Node selector is the simplest way to restrict pods to only be placed on nodes with specific labels.
apiVersion: v1
kind: Pod
metadata:
  name: gpu-pod
spec:
  nodeSelector:
    gpu: "true"
  containers:
  - name: gpu-container
    image: busybox:1.36
    command: ["sh", "-c", "sleep 3600"]
    resources:
      limits:
        nvidia.com/gpu: 1
In the example above, the pod is only placed on nodes with the gpu=true label.
The GPU example tests scheduling only: the node must actually have a GPU and a working device plugin that advertises nvidia.com/gpu. A gpu=true label alone does not allocate GPU resources.
nodeName
You can use the nodeName field to directly place a pod on a specific node. This method bypasses the scheduler and is generally not recommended.
apiVersion: v1
kind: Pod
metadata:
  name: specific-node-pod
spec:
  nodeName: worker-node-1
  containers:
  - name: container
    image: nginx
In the example above, the pod is directly placed on the node named worker-node-1.
Pod Affinity and Anti-Affinity
Pod affinity and anti-affinity provide ways to place pods based on relationships between pods.
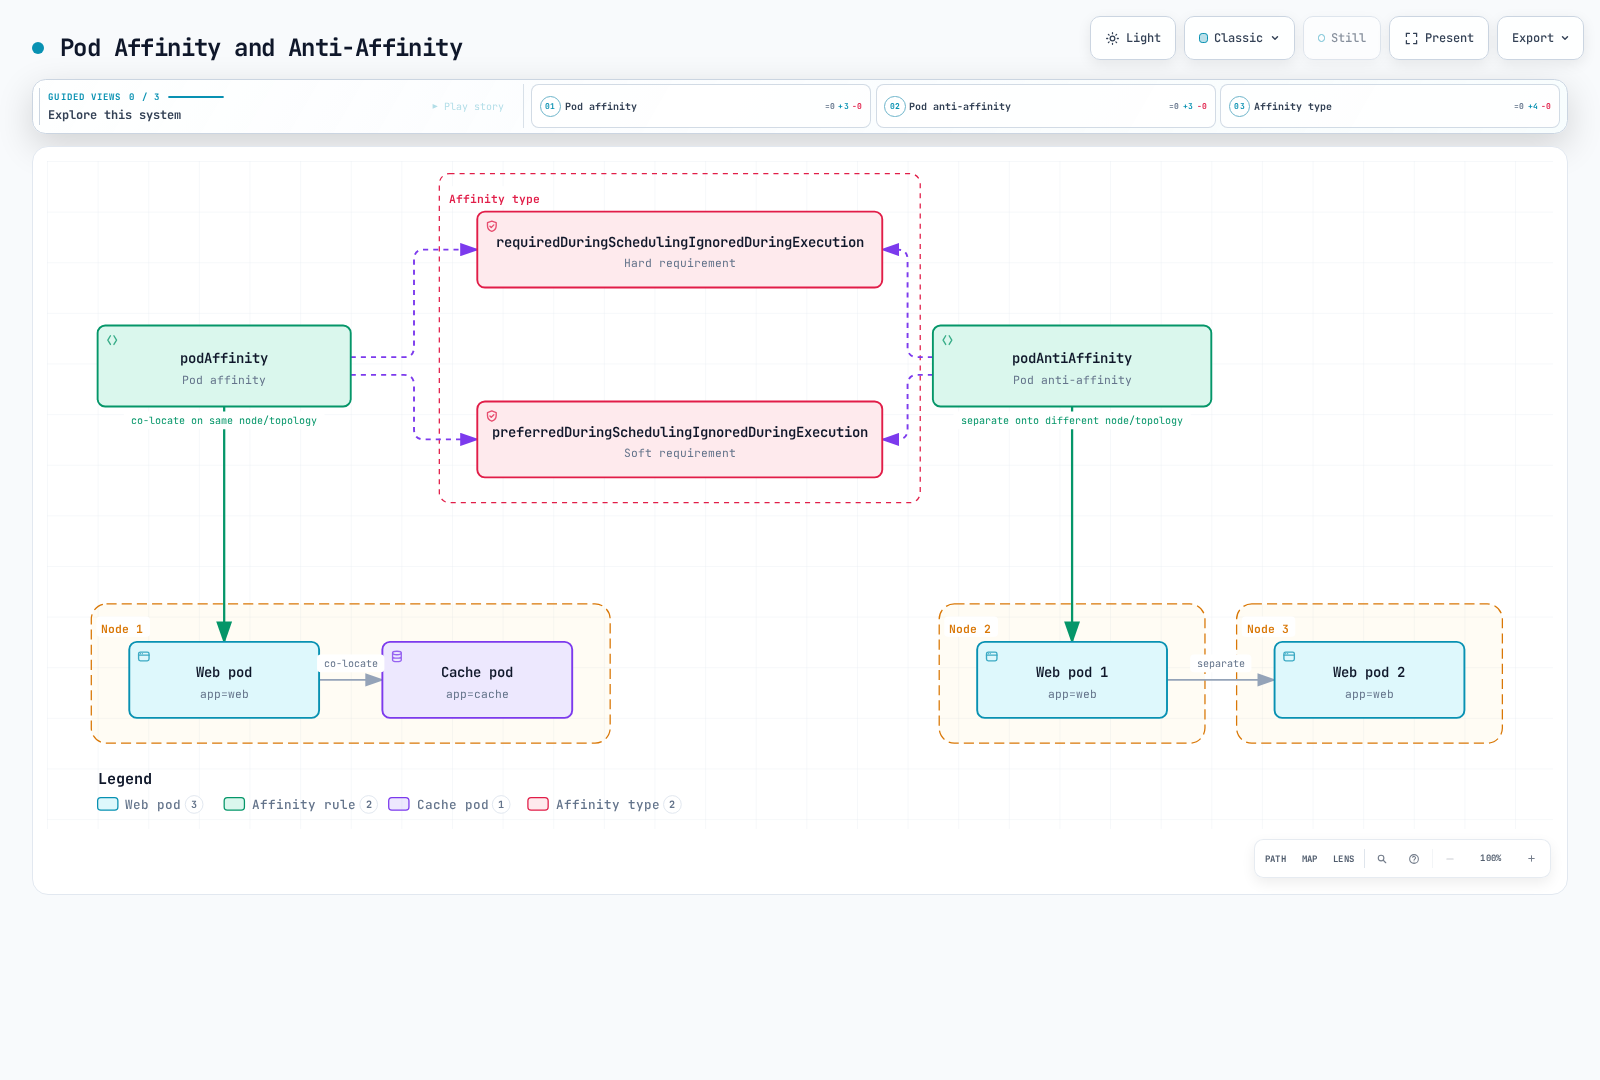
Pod Affinity
Pod affinity causes pods to be placed on the same node or topology domain as pods with specific labels.
apiVersion: v1
kind: Pod
metadata:
  name: frontend
spec:
  affinity:
    podAffinity:
      requiredDuringSchedulingIgnoredDuringExecution:
      - labelSelector:
          matchExpressions:
          - key: app
            operator: In
            values:
            - cache
        topologyKey: kubernetes.io/hostname
  containers:
  - name: frontend
    image: nginx
In the example above, the frontend pod is placed on the same host as pods with the app=cache label.
Pod Anti-Affinity
Pod anti-affinity causes pods to be placed on a different node or topology domain than pods with specific labels.
apiVersion: v1
kind: Pod
metadata:
  name: frontend
  labels:
    app: frontend
spec:
  affinity:
    podAntiAffinity:
      requiredDuringSchedulingIgnoredDuringExecution:
      - labelSelector:
          matchExpressions:
          - key: app
            operator: In
            values:
            - frontend
        topologyKey: kubernetes.io/hostname
  containers:
  - name: frontend
    image: nginx
In the example above, the frontend pod is placed on a different host than other pods with the app=frontend label. This is useful for distributing instances of the same application across multiple nodes for high availability.
Affinity Types
Pod affinity and anti-affinity have two types:
- requiredDuringSchedulingIgnoredDuringExecution: Hard requirement that must be met during scheduling
- preferredDuringSchedulingIgnoredDuringExecution: Soft requirement that is preferred but not required
# preferredDuringSchedulingIgnoredDuringExecution example
affinity:
  podAffinity:
    preferredDuringSchedulingIgnoredDuringExecution:
    - weight: 100
      podAffinityTerm:
        labelSelector:
          matchExpressions:
          - key: app
            operator: In
            values:
            - cache
        topologyKey: kubernetes.io/hostname
In the example above, the weight field indicates the weight of this preference. When there are multiple preferences, the higher weight preferences are considered more important.
Taints and Tolerations
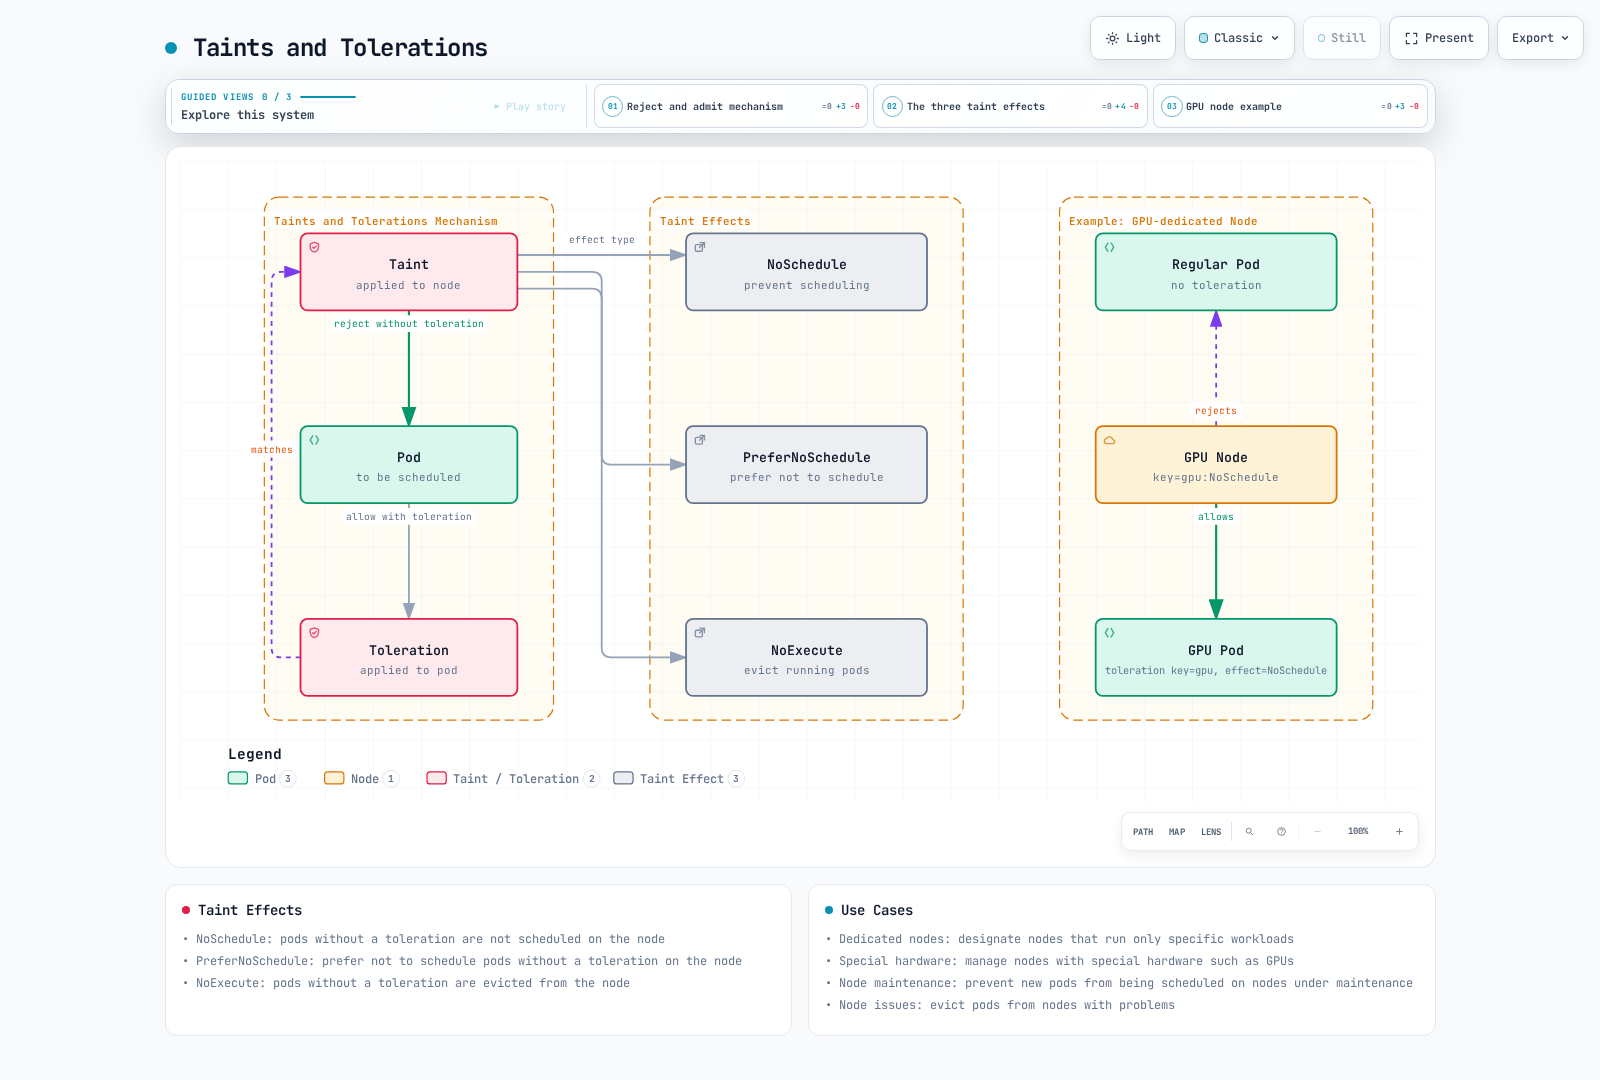
Taints and tolerations are mechanisms that allow nodes to reject specific pods.
Taints
Taints are applied to nodes to restrict pods from being scheduled on them.
# Add taint to node
kubectl taint nodes node1 key=value:NoSchedule
There are three taint effects:
- NoSchedule: Pods without tolerations are not scheduled on the node
- PreferNoSchedule: Prefer not to schedule pods without tolerations on the node
- NoExecute: Pods without tolerations are evicted from the node
Tolerations
Tolerations are applied to pods to allow them to be scheduled on nodes with taints.
apiVersion: v1
kind: Pod
metadata:
  name: nginx
spec:
  tolerations:
  - key: "key"
    operator: "Equal"
    value: "value"
    effect: "NoSchedule"
  containers:
  - name: nginx
    image: nginx
In the example above, the pod can be scheduled on nodes with the key=value:NoSchedule taint.
Use Cases
Common use cases for taints and tolerations:
- Dedicated Nodes: Designate nodes to run only specific workloads
- Special Hardware: Manage nodes with special hardware like GPUs
- Node Maintenance: Prevent new pod scheduling on nodes under maintenance
- Node Issues: Evict pods from nodes with issues
Default Taints
Kubernetes applies default taints to some nodes:
- node.kubernetes.io/not-ready: Node is not ready
- node.kubernetes.io/unreachable: Node is unreachable
- node.kubernetes.io/memory-pressure: Node has memory pressure
- node.kubernetes.io/disk-pressure: Node has disk pressure
- node.kubernetes.io/pid-pressure: Node has PID pressure
- node.kubernetes.io/network-unavailable: Node network is unavailable
- node.kubernetes.io/unschedulable: Node is unschedulable
Node Affinity
Node affinity provides a more expressive way to place pods on specific sets of nodes. It allows specifying more complex conditions than node selector.
Node Affinity Types
Node affinity has two types:
- requiredDuringSchedulingIgnoredDuringExecution: Hard requirement that must be met during scheduling
- preferredDuringSchedulingIgnoredDuringExecution: Soft requirement that is preferred but not required
apiVersion: v1
kind: Pod
metadata:
  name: with-node-affinity
spec:
  affinity:
    nodeAffinity:
      requiredDuringSchedulingIgnoredDuringExecution:
        nodeSelectorTerms:
        - matchExpressions:
          - key: topology.kubernetes.io/zone
            operator: In
            values:
            - us-west-2a
            - us-west-2b
      preferredDuringSchedulingIgnoredDuringExecution:
      - weight: 1
        preference:
          matchExpressions:
          - key: another-node-label-key
            operator: In
            values:
            - another-node-label-value
  containers:
  - name: with-node-affinity
    image: nginx
In the example above, the pod is only placed on nodes where the topology.kubernetes.io/zone label is us-west-2a or us-west-2b. Additionally, it is preferably placed on nodes with the another-node-label-key=another-node-label-value label.
Operators
Node affinity supports various operators:
- In: Label value matches one of the specified values
- NotIn: Label value does not match the specified values
- Exists: A label with the specified key exists
- DoesNotExist: A label with the specified key does not exist
- Gt: Label value is greater than the specified value
- Lt: Label value is less than the specified value
Pod Priority and Preemption
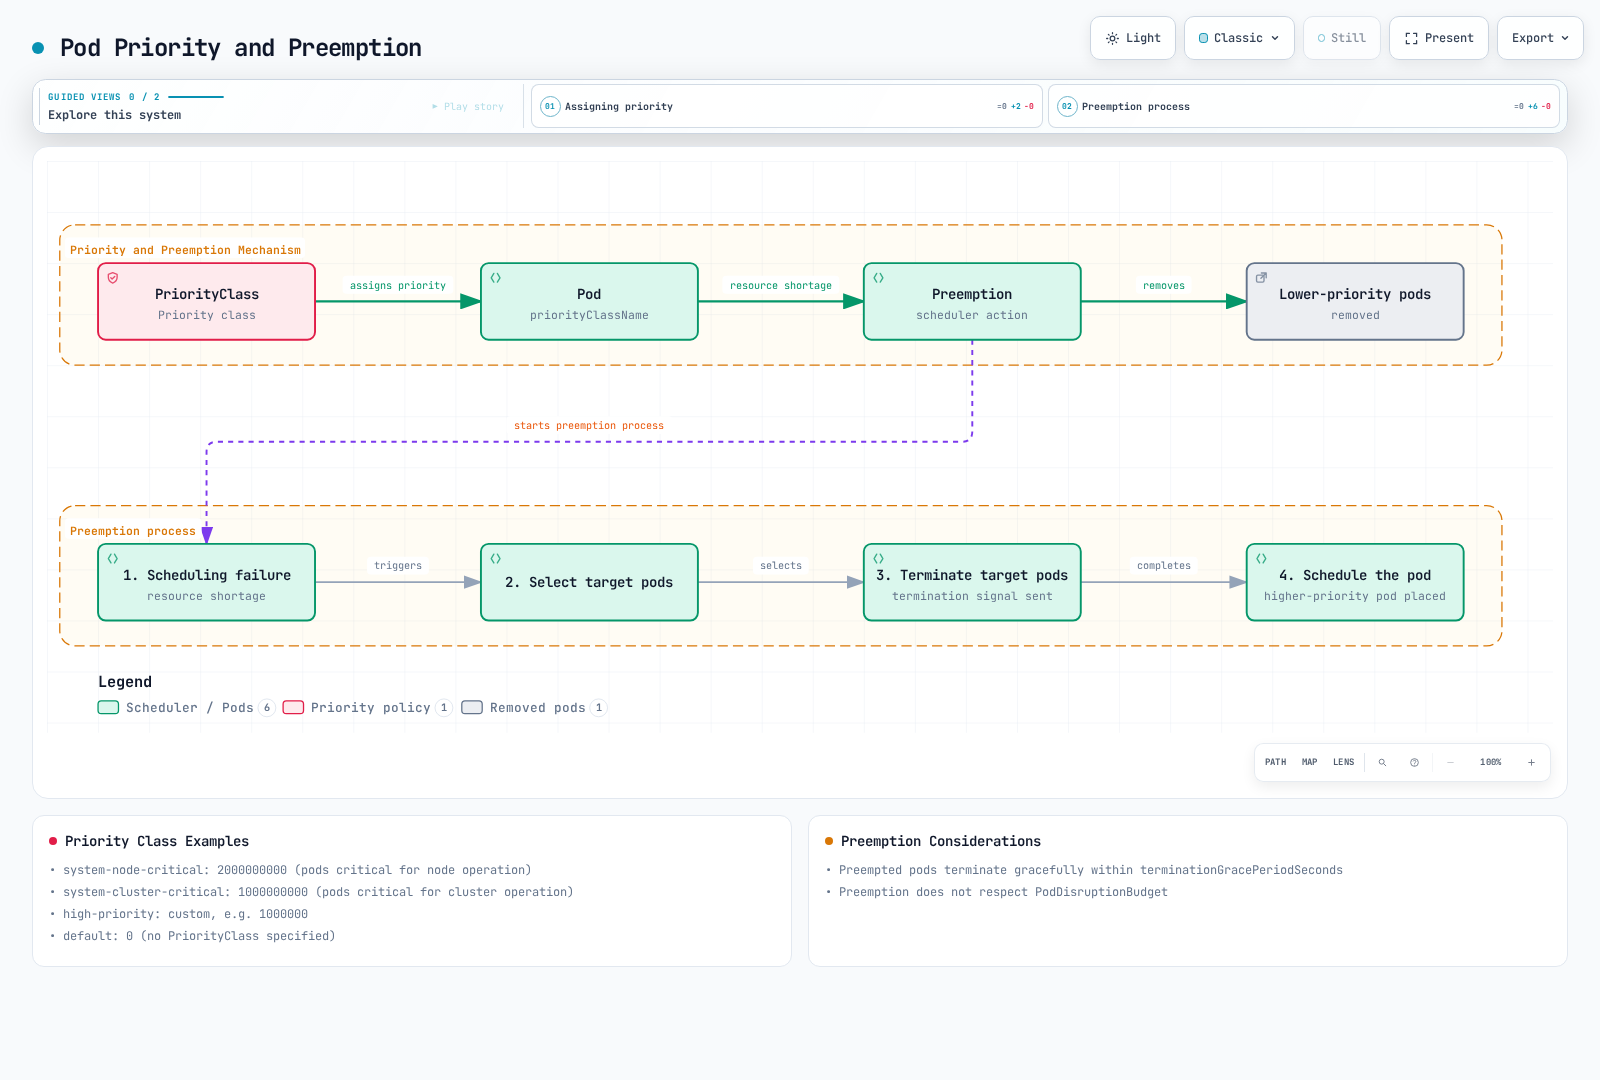
Kubernetes provides pod priority and preemption features to ensure important workloads can secure cluster resources.
PriorityClass
PriorityClass defines the relative importance of pods. The higher the priority value, the more important the pod.
apiVersion: scheduling.k8s.io/v1
kind: PriorityClass
metadata:
  name: high-priority
value: 1000000
globalDefault: false
description: "This priority class should be used for critical workloads."
In the example above, the value field indicates the priority value. The higher the value, the higher the priority. If the globalDefault field is set to true, this priority class is applied to pods without a specified priority class.
Applying PriorityClass to Pods
To apply a priority class to a pod, use the priorityClassName field.
apiVersion: v1
kind: Pod
metadata:
  name: high-priority-pod
spec:
  priorityClassName: high-priority
  containers:
  - name: container
    image: nginx
Preemption
Preemption is the process of removing lower-priority pods to schedule higher-priority pods. When the scheduler cannot find a node to schedule a higher-priority pod, it preempts lower-priority pods to secure resources.
Preemption process:
- Scheduler cannot find a node to schedule a higher-priority pod
- Scheduler selects a node to remove lower-priority pods through preemption
- Requests deletion of selected lower-priority Pods through the API; kubelet/runtime perform termination
- When pods terminate gracefully, schedules the higher-priority pod on that node
Preemption Considerations
Things to consider when using preemption:
- Graceful Termination Period: Preempted pods go through the graceful termination process for the time specified in
terminationGracePeriodSeconds - PodDisruptionBudget: The scheduler tries to avoid violations, but preemption may violate a PDB when no suitable victims avoid it
- System Priority Classes: Kubernetes provides priority classes for system components
system-cluster-critical: Pods critical for cluster operationsystem-node-critical: Pods critical for node operation
Pod Eviction
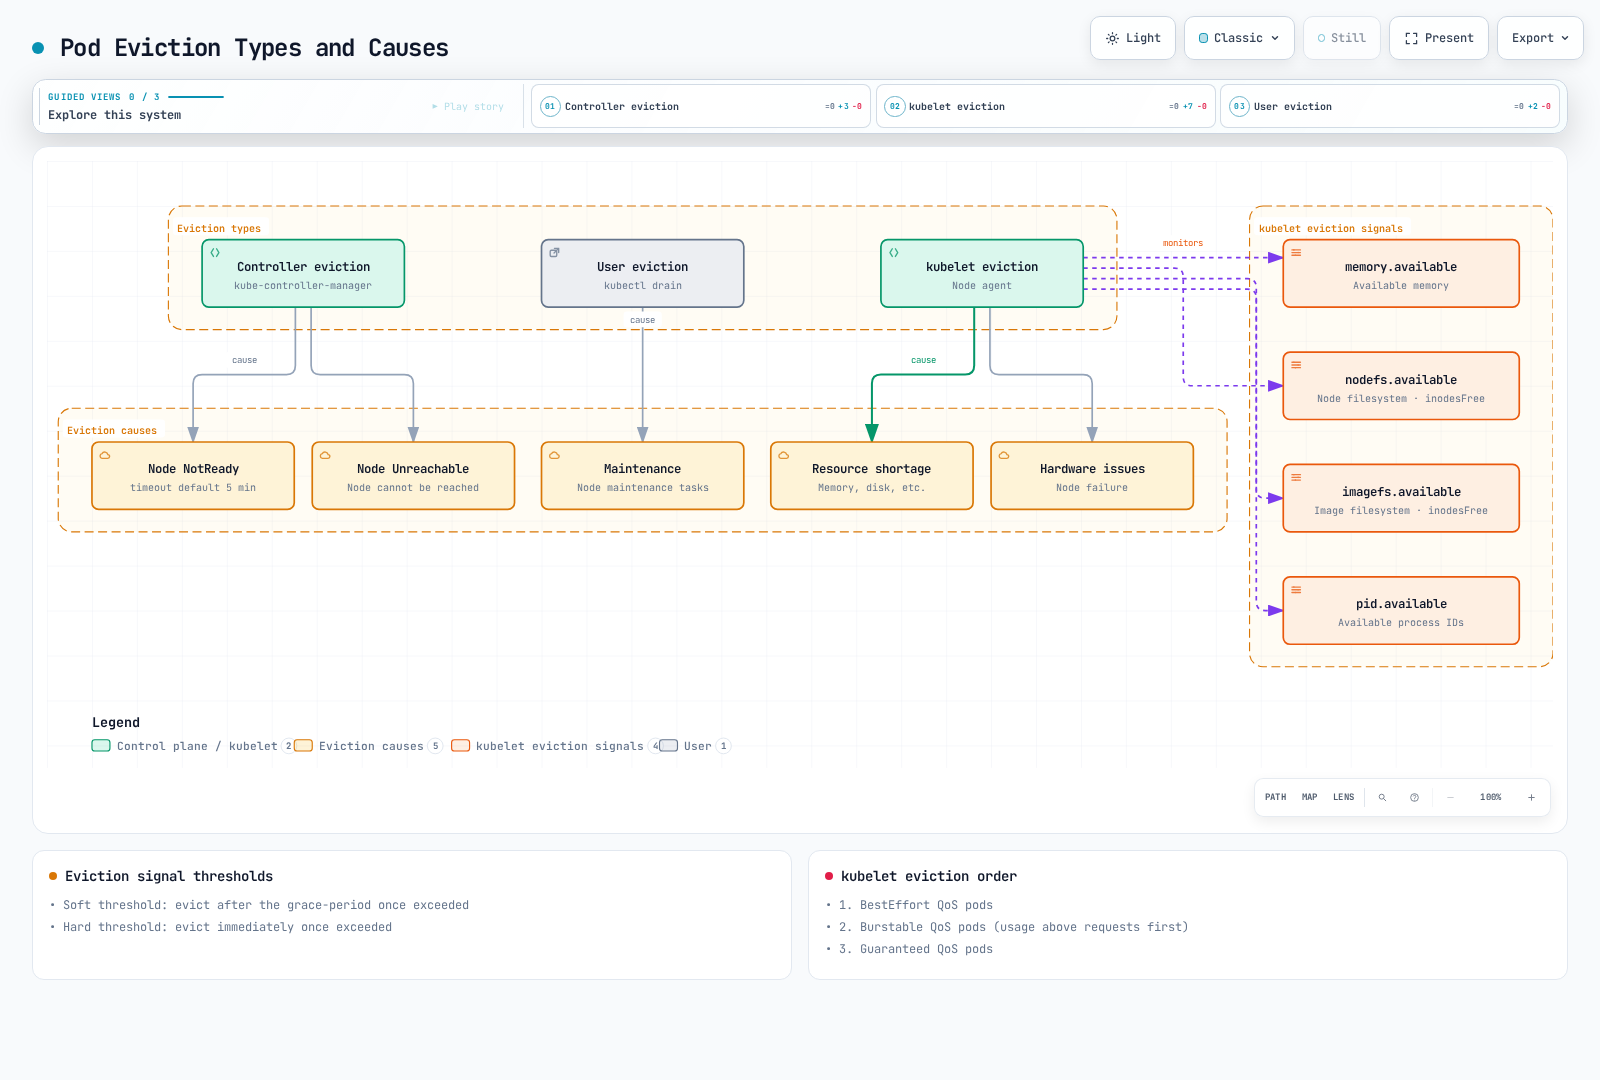
Pod eviction terminates a Pod; its workload controller may create a replacement that the scheduler places separately. Eviction can happen for various reasons.
Eviction Types
Eviction by kube-controller-manager:
- The taint-eviction-controller handles NoExecute taints. Pods normally receive 300-second not-ready/unreachable tolerations; eviction follows their toleration settings
- When a node is in Unreachable state
Eviction by kubelet:
- Node resource shortage (memory, disk, etc.)
- Hardware failures can lead to node unavailability; they are not a generic kubelet pressure-eviction signal
Eviction by user:
- Executing
kubectl draincommand - Node maintenance tasks
- Executing
kubelet Eviction Signals
kubelet monitors the following eviction signals:
- memory.available: Available memory
- nodefs.available: Available space in the node file system
- nodefs.inodesFree: Available inodes in the node file system
- imagefs.available: Available space in the image file system
- imagefs.inodesFree: Available inodes in the image file system
- pid.available: Available process IDs
Soft and hard thresholds can be set for each signal:
- Soft Threshold: Evict pods after
grace-periodwhen threshold is exceeded - Hard Threshold: Evict pods immediately when threshold is exceeded
# kubelet configuration example
evictionHard:
  memory.available: "100Mi"
  nodefs.available: "10%"
  nodefs.inodesFree: "5%"
  imagefs.available: "15%"
  imagefs.inodesFree: "5%"
evictionSoft:
  memory.available: "200Mi"
  nodefs.available: "15%"
evictionSoftGracePeriod:
  memory.available: "1m"
  nodefs.available: "2m"
evictionMaxPodGracePeriod: 30
evictionPressureTransitionPeriod: "30s"
Eviction Priority
The kubelet ranks candidates by whether usage exceeds requests, then Pod priority, then usage relative to requests. It does not simply evict all BestEffort, then all Burstable, then all Guaranteed Pods. Disk/PID pressure has different accounting constraints; QoS is not a universal eviction ordering.
Pod Disruption Budget (PDB)
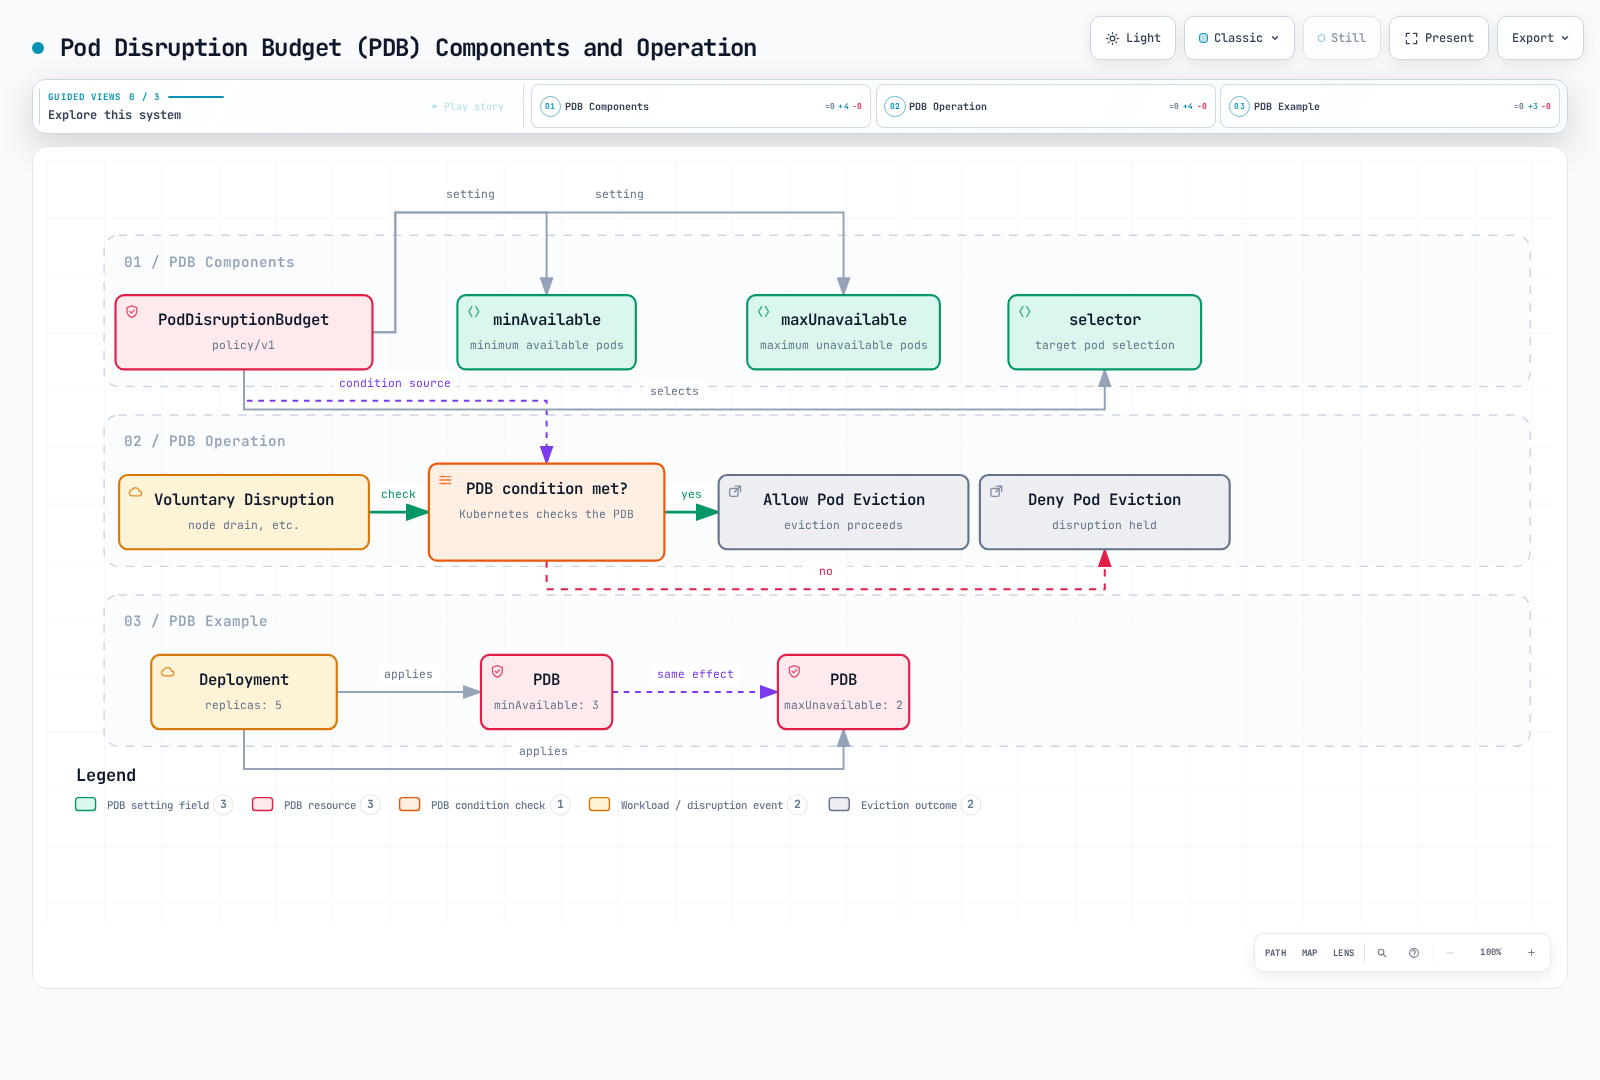
Pod Disruption Budget (PDB) is a way to maintain application availability during voluntary disruptions. PDB limits the number of pods that can be simultaneously disrupted.
PDB Definition
apiVersion: policy/v1
kind: PodDisruptionBudget
metadata:
  name: frontend-pdb
spec:
  minAvailable: 2
  selector:
    matchLabels:
      app: frontend
or
apiVersion: policy/v1
kind: PodDisruptionBudget
metadata:
  name: frontend-pdb
spec:
  maxUnavailable: 1
  selector:
    matchLabels:
      app: frontend
In the examples above:
minAvailable: Minimum number of pods that must always be availablemaxUnavailable: Maximum number of pods that can be unavailable at the same timeselector: Label selector that selects pods to which the PDB applies
PDB Operation
- When voluntary disruptions like node drain occur, Kubernetes checks the PDB
- If PDB conditions are met, proceed with pod eviction
- If PDB conditions are not met, deny pod eviction
PDBs gate Eviction API requests such as normal drain/descheduler operations. Direct Pod deletion, controller rollouts, and node-pressure eviction bypass this gate. minAvailable: 2 and maxUnavailable: 1 are equivalent only for a workload with three desired replicas; neither creates replacement capacity.
PDB Best Practices
- Set PDB for all critical workloads: Set PDB for all workloads requiring high availability
- Choose appropriate values: Select
minAvailableormaxUnavailablevalues appropriate for workload characteristics - Consider replica count:
minAvailablemay equal replicas to block voluntary evictions, but maintenance can then stall; configure a deliberate disruption allowance - Regular testing: Test PDB operation through node drain and similar tasks
Node Pressure Eviction
Node pressure eviction is a mechanism where pods are evicted due to node resource shortage.
Node Condition Status
kubelet reports the following node condition statuses:
- MemoryPressure: Node is low on memory
- DiskPressure: Node is low on disk space
- PIDPressure: Node is low on process IDs
When these conditions occur, kubelet evicts pods to secure resources.
Eviction Policy Configuration
Eviction policies can be set in kubelet configuration:
# kubelet configuration example
evictionHard:
  memory.available: "100Mi"
  nodefs.available: "10%"
  nodefs.inodesFree: "5%"
  imagefs.available: "15%"
  imagefs.inodesFree: "5%"
evictionSoft:
  memory.available: "200Mi"
  nodefs.available: "15%"
evictionSoftGracePeriod:
  memory.available: "1m"
  nodefs.available: "2m"
evictionMinimumReclaim:
  memory.available: "50Mi"
  nodefs.available: "5%"
evictionMaxPodGracePeriod: 30
evictionPressureTransitionPeriod: "30s"
In the example above:
evictionMinimumReclaim: Minimum resources that must be reclaimed after evictionevictionPressureTransitionPeriod: Wait time between pressure state transitions
TopologySpreadConstraints
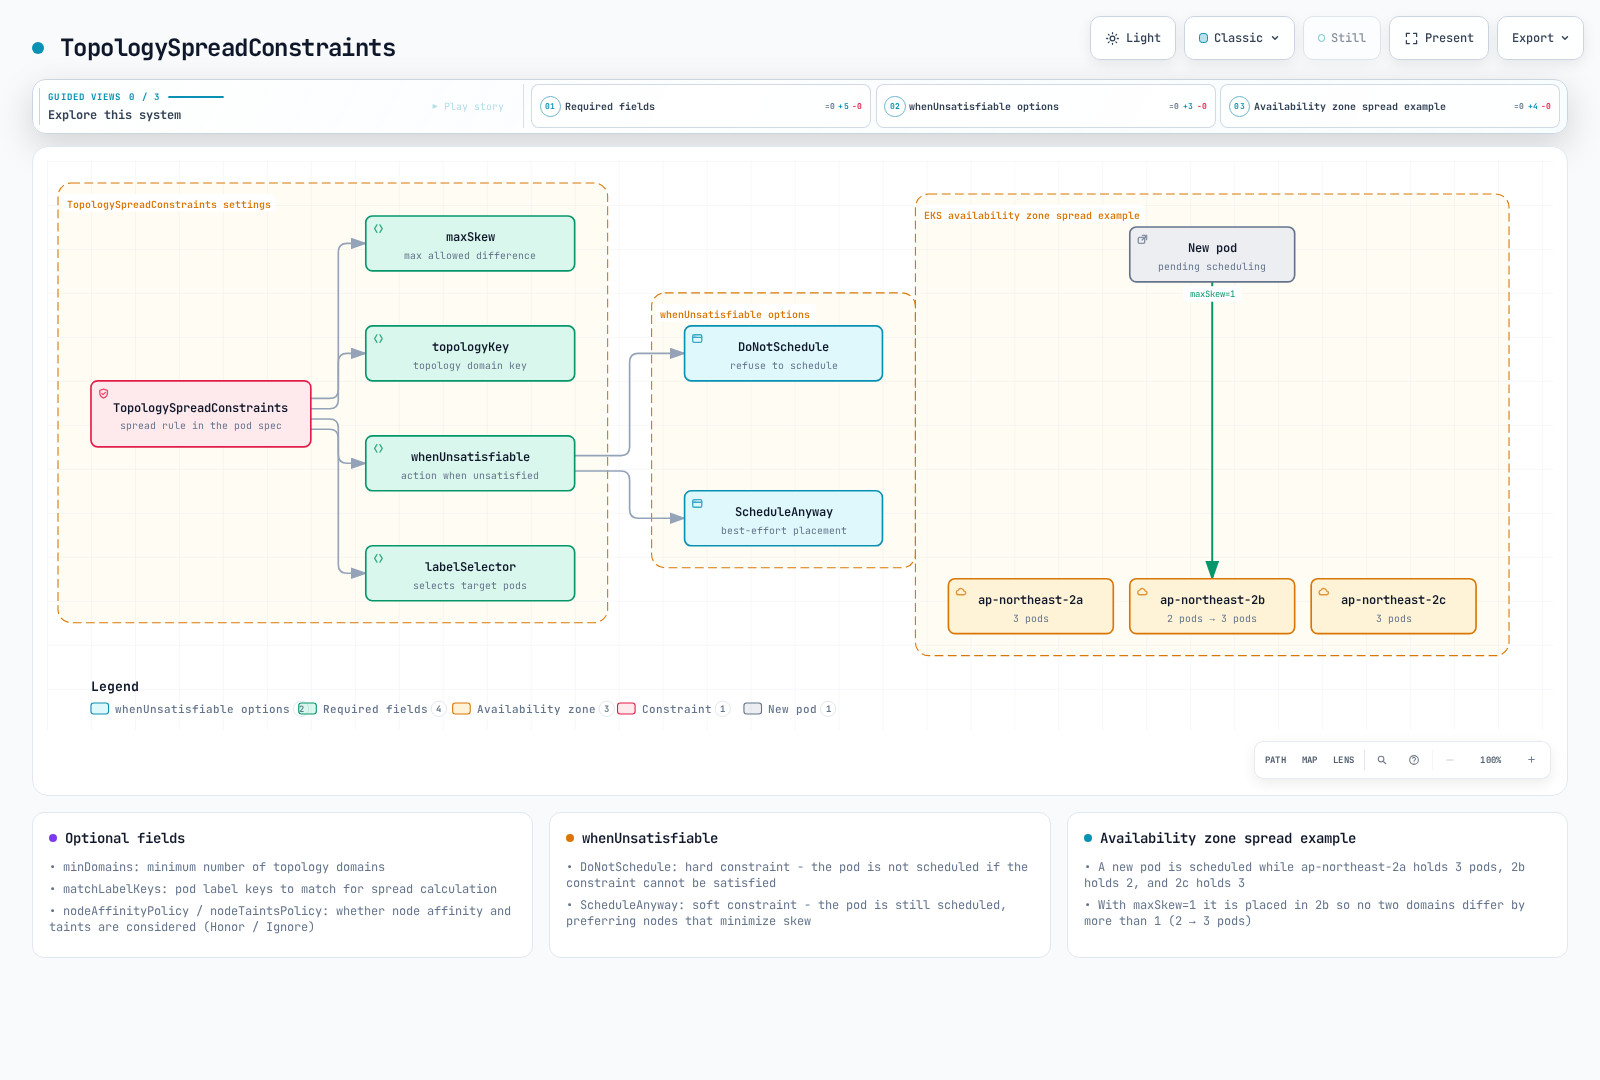
TopologySpreadConstraints provide fine-grained control over how pods are distributed across topology domains such as availability zones, nodes, or regions. This feature offers more flexibility than Pod anti-affinity for achieving high availability and efficient resource utilization.
Key Fields
| Field | Description | Required |
|---|---|---|
| maxSkew | For DoNotSchedule, allowed difference between a target domain and the global minimum; ScheduleAnyway uses skew as a preference | Yes |
| topologyKey | Node label key that defines topology domains | Yes |
| whenUnsatisfiable | Action when constraints cannot be satisfied: DoNotSchedule or ScheduleAnyway | Yes |
| labelSelector | Selects Pods to count; normally specify it and matching Pod labels | No (null matches no Pods) |
| minDomains | Minimum eligible-domain count for skew calculation (stable since v1.30) | No |
| matchLabelKeys | Pod label keys to match for spread calculation (1.27+) | No |
whenUnsatisfiable Options
- DoNotSchedule: Scheduler will not schedule the pod if the constraint cannot be satisfied (hard constraint)
- ScheduleAnyway: Scheduler still schedules the pod, giving higher priority to nodes that minimize skew (soft constraint)
EKS Availability Zone Spread Example
apiVersion: apps/v1
kind: Deployment
metadata:
  name: web-app
spec:
  replicas: 6
  selector:
    matchLabels:
      app: web
  template:
    metadata:
      labels:
        app: web
    spec:
      topologySpreadConstraints:
      - maxSkew: 1
        topologyKey: topology.kubernetes.io/zone
        whenUnsatisfiable: DoNotSchedule
        labelSelector:
          matchLabels:
            app: web
      - maxSkew: 1
        topologyKey: kubernetes.io/hostname
        whenUnsatisfiable: ScheduleAnyway
        labelSelector:
          matchLabels:
            app: web
      containers:
      - name: web
        image: nginx:1.30.4
        resources:
          requests:
            cpu: 100m
            memory: 128Mi
This configuration ensures:
- Pods are evenly distributed across availability zones (hard constraint)
- Pods are preferably distributed across nodes within each zone (soft constraint)
minDomains and matchLabelKeys
apiVersion: apps/v1
kind: Deployment
metadata:
  name: app-with-min-domains
spec:
  replicas: 4
  selector:
    matchLabels:
      app: distributed-app
  template:
    metadata:
      labels:
        app: distributed-app
        version: v1
    spec:
      topologySpreadConstraints:
      - maxSkew: 1
        topologyKey: topology.kubernetes.io/zone
        whenUnsatisfiable: DoNotSchedule
        labelSelector:
          matchLabels:
            app: distributed-app
        minDomains: 3
        matchLabelKeys:
        - version
      containers:
      - name: app
image: myapp:v1- minDomains: If fewer than 3 eligible domains exist, the global minimum becomes zero. With maxSkew 1, one matching Pod per eligible domain can still schedule; further Pods can remain Pending. It does not block every Pod immediately.
- matchLabelKeys: Automatically uses the pod's
versionlabel value in the selector, enabling per-revision spread without modifying the selector.
Advantages Over Pod Anti-Affinity
| Aspect | TopologySpreadConstraints | Pod Anti-Affinity |
|---|---|---|
| Flexibility | Allows controlled skew (maxSkew > 1) | Binary: either same or different domain |
| Soft constraints | ScheduleAnyway for best-effort | preferredDuringScheduling but less control |
| Multi-level | Multiple constraints with different topologyKeys | Requires complex nested rules |
| Performance | Better scheduler performance at scale | Can slow scheduling with many pods |
| Use case | Even distribution with tolerance | Strict separation |
Pod Deletion Cost
Pod Deletion Cost is a best-effort preference used by the ReplicaSet controller when scaling down. HPA changes the desired replica count; it does not choose individual victim Pods. The annotation does not protect Jobs/StatefulSets, prevent eviction, or guarantee deletion order.
How It Works
When a controller (like HPA or manual scale-down) needs to reduce replicas, it considers:
- Pods with lower deletion cost are removed first
- Default deletion cost is 0
- Valid range: -2147483648 to 2147483647
Basic Example
apiVersion: v1
kind: Pod
metadata:
  name: worker-pod
  annotations:
    controller.kubernetes.io/pod-deletion-cost: "100"
spec:
  containers:
  - name: worker
    image: worker:latest
HPA Scale-Down Priority Control
Use deletion cost to protect important pods during HPA scale-down:
apiVersion: apps/v1
kind: Deployment
metadata:
  name: web-service
spec:
  replicas: 5
  selector:
    matchLabels:
      app: web
  template:
    metadata:
      labels:
        app: web
      # Lower cost pods are deleted first during scale-down
      annotations:
        controller.kubernetes.io/pod-deletion-cost: "0"
    spec:
      containers:
      - name: web
        image: nginx:1.30.4
Cache Protection Pattern
Run the cache with explicit CPU requests if it will be scaled using CPU-utilization HPA. The following is a scheduling example, not a complete Redis production configuration:
apiVersion: apps/v1
kind: Deployment
metadata:
  name: cache-service
spec:
  replicas: 3
  selector:
    matchLabels:
      app: cache
  template:
    metadata:
      labels:
        app: cache
    spec:
      automountServiceAccountToken: false
      containers:
      - name: cache
        image: redis:7
        resources:
          requests:
            cpu: 100m
            memory: 128Mi
After measuring actual cache warmth, an authorized operator/controller can annotate a selected ReplicaSet-owned Pod once before scale-down:
kubectl -n default annotate pod "$CACHE_POD" \
  controller.kubernetes.io/pod-deletion-cost="1000" --overwrite
Set CACHE_POD to an actual cache Pod. Frequent annotation writes create API load. A custom updater would need both Redis and Kubernetes client tooling plus narrowly scoped Pod patch permissions; elapsed time alone is not proof of a warm cache. No updater is installed by this example.
Practical Use Cases
- Stateful caches managed by a ReplicaSet: Prefer retaining warm replicas
- Leader election: Keep leader pods running longer
- Connection draining: Give time for long-running connections
- Cache warming: Preserve pods with warm caches
- Limitations: Job and StatefulSet controllers do not use this preference
Descheduler
The Descheduler is a Kubernetes component that evicts pods from nodes to allow the scheduler to reschedule them to more appropriate nodes. Unlike the scheduler which only places new pods, the descheduler helps maintain optimal pod placement over time.
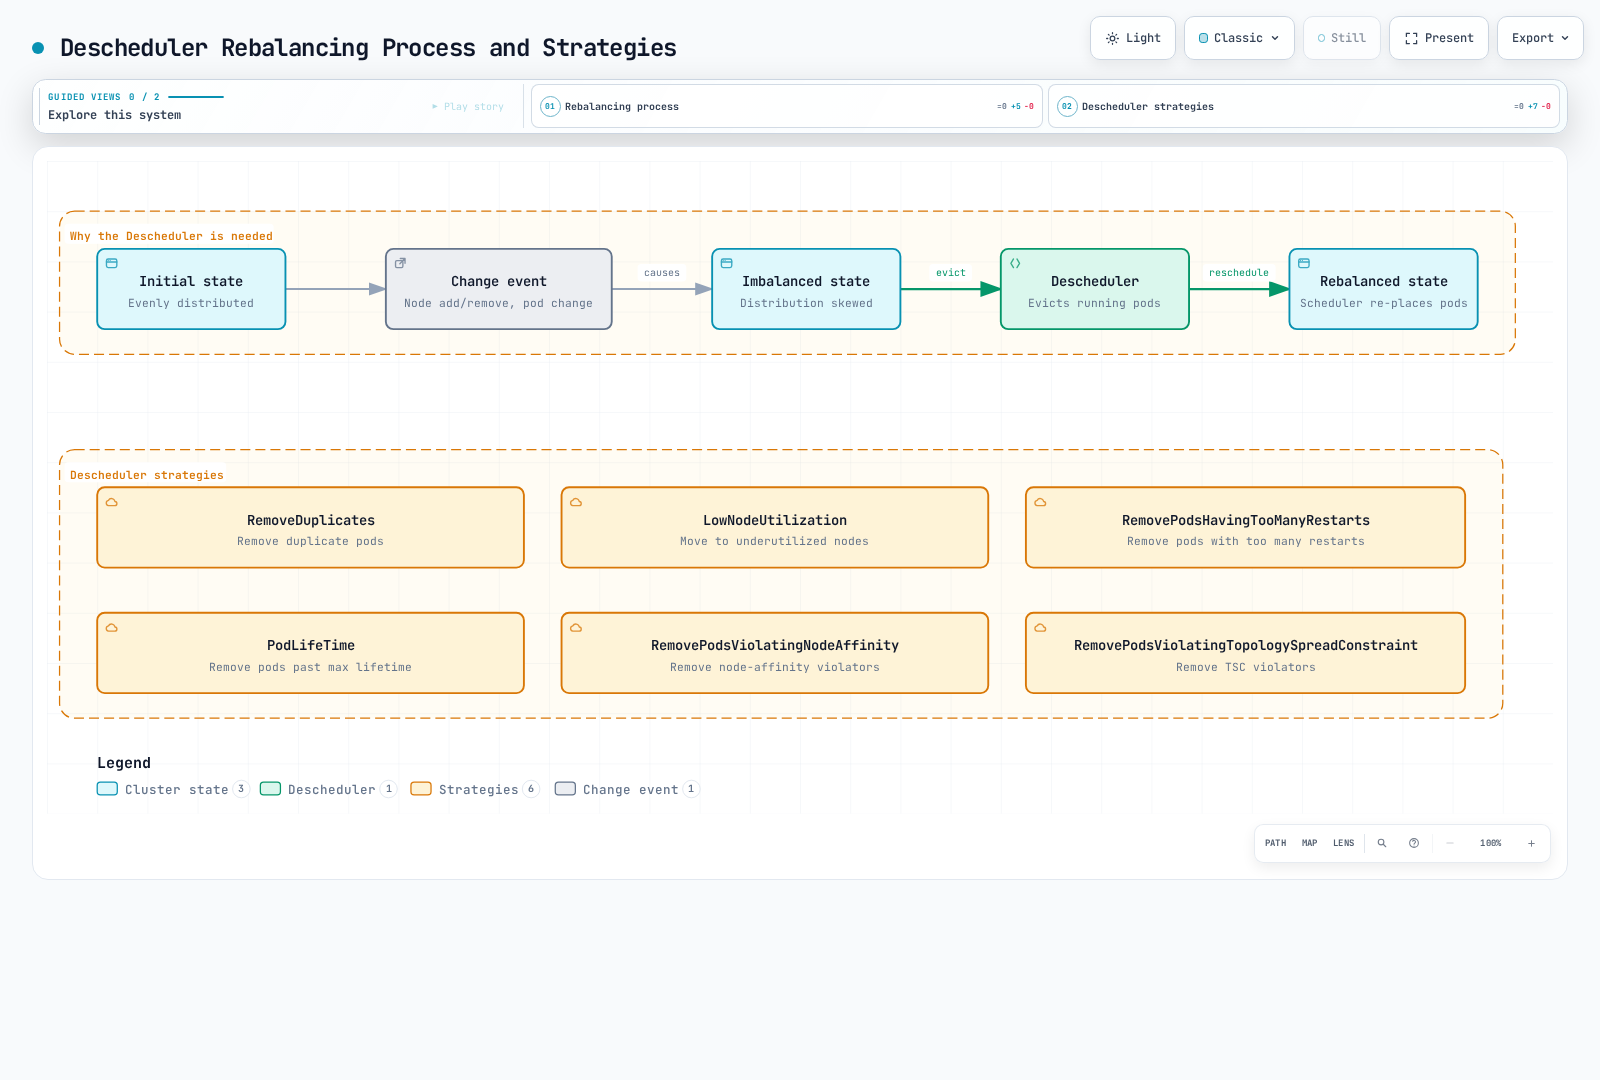
Why Descheduling Is Needed
- Cluster changes: New nodes added, node labels changed
- Pod drift: Initial placement becomes suboptimal over time
- Affinity violations: Rules violated after cluster changes
- Resource imbalance: Some nodes overutilized, others underutilized
- Failed pods: Pods stuck in restart loops
Key Strategies
| Strategy | Description | Use Case |
|---|---|---|
| RemoveDuplicates | Removes duplicate pods from the same node | Ensure HA after node failures |
| LowNodeUtilization | Moves pods from overutilized to underutilized nodes | Balance cluster resources |
| RemovePodsHavingTooManyRestarts | Evicts pods with excessive restarts | Clean up problematic pods |
| PodLifeTime | Evicts pods older than specified age | Force fresh scheduling |
| RemovePodsViolatingInterPodAntiAffinity | Evicts pods violating anti-affinity rules | Restore affinity compliance |
| RemovePodsViolatingNodeAffinity | Evicts pods violating node affinity | Restore affinity compliance |
| RemovePodsViolatingTopologySpreadConstraint | Evicts pods violating spread constraints | Restore even distribution |
Helm Installation
Descheduler v0.36.0 is the verified example release, targeting Kubernetes v1.36 and the preceding two minor versions in its test window. Check the compatibility matrix before applying it to another release. Save reviewed Helm values in descheduler-values.yaml with schedule and deschedulerPolicy.profiles (the policy profiles shown below); the old strategies.*.enabled values do not configure this API.
helm repo add descheduler https://kubernetes-sigs.github.io/descheduler/
helm upgrade --install descheduler descheduler/descheduler \
  --version 0.36.0 --namespace kube-system \
  --values descheduler-values.yaml
DeschedulerPolicy Configuration
apiVersion: descheduler/v1alpha2
kind: DeschedulerPolicy
profiles:
- name: default
  pluginConfig:
  - name: DefaultEvictor
    args:
      nodeFit: true
  - name: RemoveDuplicates
    args:
      excludeOwnerKinds: [StatefulSet]
  - name: LowNodeUtilization
    args:
      thresholds:
        cpu: 20
        memory: 20
        pods: 20
      targetThresholds:
        cpu: 50
        memory: 50
        pods: 50
  - name: RemovePodsHavingTooManyRestarts
    args:
      podRestartThreshold: 100
      includingInitContainers: true
  - name: PodLifeTime
    args:
      maxPodLifeTimeSeconds: 86400
      labelSelector:
        matchLabels:
          app.kubernetes.io/lifecycle: ephemeral
  - name: RemovePodsViolatingNodeAffinity
    args:
      nodeAffinityType: [requiredDuringSchedulingIgnoredDuringExecution]
  - name: RemovePodsViolatingTopologySpreadConstraint
    args:
      constraints: [DoNotSchedule]
  plugins:
    balance:
      enabled:
      - RemoveDuplicates
      - LowNodeUtilization
      - RemovePodsViolatingTopologySpreadConstraint
    deschedule:
      enabled:
      - RemovePodsHavingTooManyRestarts
      - PodLifeTime
      - RemovePodsViolatingNodeAffinity
PDB Respect
The descheduler respects Pod Disruption Budgets (PDBs). If evicting a pod would violate a PDB, the descheduler will not evict that pod:
apiVersion: policy/v1
kind: PodDisruptionBudget
metadata:
  name: web-pdb
spec:
  minAvailable: 2
  selector:
    matchLabels:
      app: web
With this PDB in place, the descheduler will ensure at least 2 pods with app: web label remain available during descheduling operations.
The policy above is a Descheduler configuration file, not an API object for kubectl apply. It uses Balance plugins for group redistribution and Deschedule plugins for per-Pod decisions. LowNodeUtilization normally evaluates resource requests rather than live CPU usage, and eviction does not guarantee the replacement Pod lands elsewhere. Review safeguards and test in dry-run before enabling recurring eviction.
Descheduler CronJob Example
apiVersion: batch/v1
kind: CronJob
metadata:
  name: descheduler
  namespace: kube-system
spec:
  schedule: "*/30 * * * *"
  concurrencyPolicy: Forbid
  jobTemplate:
    spec:
      template:
        spec:
          serviceAccountName: descheduler
          containers:
          - name: descheduler
            image: registry.k8s.io/descheduler/descheduler:v0.36.0
            args:
            - --policy-config-file=/policy/policy.yaml
            - --v=3
            volumeMounts:
            - name: policy
              mountPath: /policy
          volumes:
          - name: policy
            configMap:
              name: descheduler-policy
          restartPolicy: OnFailure
The standalone CronJob is an alternative to Helm, not an additional installation. It requires the descheduler ServiceAccount/RBAC and a descheduler-policy ConfigMap with key policy.yaml; use the official chart/manifests to supply these prerequisites.
Deep Dive: For detailed information on custom schedulers, see:
Scheduling Optimization in Amazon EKS
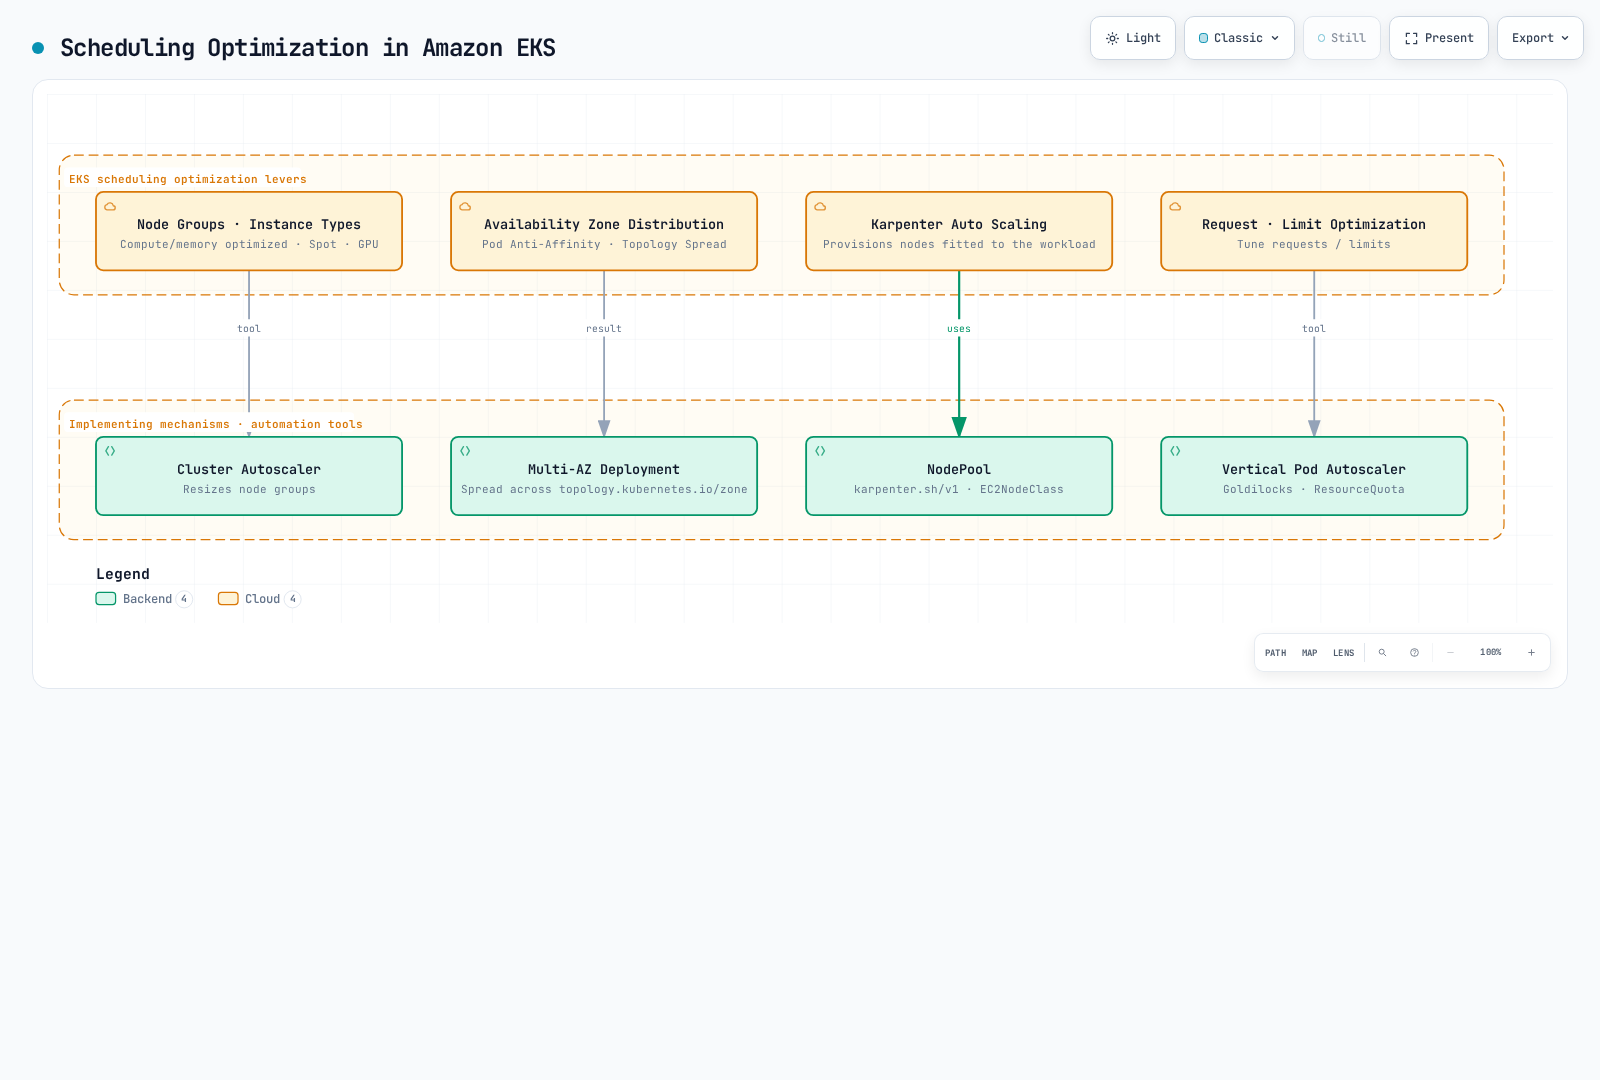
In Amazon EKS, you can optimize workloads using Kubernetes scheduling features.
Node Groups and Instance Types
In EKS, you can provide resources appropriate for workloads by utilizing various node groups and instance types:
- Various Instance Types: Compute optimized, memory optimized, storage optimized, etc.
- Spot Instances: Spot instances for cost-effective workloads
- GPU Instances: GPU instances for AI/ML workloads
You can use node labels and taints to place specific workloads on specific node groups:
Use a reviewed eksctl configuration for the existing cluster, with matching Region, supported GPU instance/AMI, and required IAM permissions:
# gpu-nodegroup.yaml
apiVersion: eksctl.io/v1alpha5
kind: ClusterConfig
metadata:
  name: my-cluster
  region: us-west-2
managedNodeGroups:
- name: gpu-nodes
  instanceType: p3.2xlarge
  desiredCapacity: 1
  privateNetworking: true
  labels:
    workload-type: gpu
  taints:
  - key: gpu
    value: "true"
effect: NoScheduleeksctl create nodegroup --config-file=gpu-nodegroup.yamlAvailability Zone Distribution
In EKS, you can distribute workloads across multiple availability zones using pod anti-affinity and topology spread constraints:
apiVersion: apps/v1
kind: Deployment
metadata:
  name: web-server
spec:
  replicas: 3
  selector:
    matchLabels:
      app: web
  template:
    metadata:
      labels:
        app: web
    spec:
      topologySpreadConstraints:
      - maxSkew: 1
        topologyKey: topology.kubernetes.io/zone
        whenUnsatisfiable: DoNotSchedule
        labelSelector:
          matchLabels:
            app: web
      containers:
      - name: web
        image: nginx
In the example above, topologySpreadConstraints distributes pods evenly across multiple availability zones.
Auto Scaling with Karpenter
In Amazon EKS, you can use Karpenter to automatically provision nodes appropriate for workloads:
apiVersion: karpenter.sh/v1
kind: NodePool
metadata:
  name: default
spec:
  template:
    spec:
      requirements:
        - key: karpenter.sh/capacity-type
          operator: In
          values: ["spot", "on-demand"]
        - key: kubernetes.io/arch
          operator: In
          values: ["amd64", "arm64"]
      nodeClassRef:
        group: karpenter.k8s.aws
        kind: EC2NodeClass
        name: default-class
  limits:
    cpu: 1000
    memory: 1000Gi
  disruption:
    consolidationPolicy: WhenEmpty
    consolidateAfter: 30s
---
apiVersion: karpenter.k8s.aws/v1
kind: EC2NodeClass
metadata:
  name: default-class
spec:
  role: KarpenterNodeRole-my-cluster
  amiSelectorTerms:
    - alias: al2023@latest
  subnetSelectorTerms:
    - tags:
        karpenter.sh/discovery: my-cluster
  securityGroupSelectorTerms:
    - tags:
        karpenter.sh/discovery: my-cluster
Karpenter optimizes costs by selecting the optimal instance type for pod resource requirements.
Resource Request and Limit Optimization
Optimizing workload resource requests and limits in EKS is important:
- Vertical Pod Autoscaler (VPA): Optimize resource requests based on actual workload resource usage
- Goldilocks: Visualize VPA recommendations to support resource request optimization
- Resource Quotas: Limit resource usage per namespace
# VPA example
apiVersion: autoscaling.k8s.io/v1
kind: VerticalPodAutoscaler
metadata:
  name: frontend-vpa
spec:
  targetRef:
    apiVersion: apps/v1
    kind: Deployment
    name: frontend
  updatePolicy:
    updateMode: "Recreate"
Scheduling Best Practices
Best practices for optimizing scheduling in Kubernetes and EKS:
Set appropriate resource requests and limits:
- Set resource requests based on actual workload resource usage
- Set appropriate resource limits for important workloads
- Use VPA to automatically optimize resource requests
Workload distribution:
- Use pod anti-affinity to distribute important workloads across multiple nodes
- Use topology spread constraints to distribute workloads across multiple availability zones
- Use node affinity to place specific workloads on specific nodes
Node resource optimization:
- Use various instance types to provide appropriate resources for workloads
- Use spot instances for cost optimization
- Use Karpenter for automatic node provisioning appropriate for workloads
PDB configuration:
- Set PDB for important workloads
- Select
minAvailableormaxUnavailablevalues appropriate for workload characteristics - Regularly test PDB operation
Priority and preemption configuration:
- Set high priority classes for important workloads
- Use
system-cluster-criticalorsystem-node-criticalpriority classes for system components - Understand and test preemption impact
Node taints and tolerations:
- Set dedicated nodes for specialized workloads
- Apply taints to nodes under maintenance
- Set appropriate tolerations
Conclusion
Kubernetes scheduling, preemption, and eviction mechanisms play important roles in efficiently managing cluster resources and maintaining workload availability. By understanding and utilizing these features, you can optimize and reliably operate workloads in Amazon EKS clusters.
Scheduling optimization is an ongoing process, and adjustments should be continuously made according to workload characteristics and cluster state. It is important to track cluster resource usage using monitoring tools and adjust scheduling policies as needed.
Quiz
To test what you learned in this chapter, try the Scheduling, Preemption, and Eviction Quiz.