Part 3: Kubeflow Notebooks
Supported Versions: Kubeflow Notebooks 1.11.0; Community Distribution 26.03.1 Last Updated: September 12, 2026
Lab Environment Setup
Use a compatible Kubernetes cluster, Notebooks 1.11.0 controller/web app, namespace permissions, storage and an authenticated access path. See Part 1 for distribution compatibility. GPU workloads need supported drivers/device plugins and suitable node capacity; Karpenter is one capacity provisioner, not a notebook prerequisite.
What Is Kubeflow Notebooks?
The Notebooks web app creates a Notebook with image/resource/volume settings. Its controller manages a StatefulSet, Service and, when configured, Istio VirtualService. The StatefulSet controller creates Pods and Kubernetes schedules them. The dashboard is the web-app entry point, not the Pod creator or a universal traffic proxy.
The namespaced Notebook resource contains a PodSpec and can also be managed through GitOps or the Kubernetes API. Directly editing its managed StatefulSet can be undone by reconciliation.
Version Context: Notebooks v1 and Workspaces
This chapter reviews Notebooks v1.11.0 and its Notebook API in distribution 26.03.1. Workspaces is a separate v2 design using Workspace and WorkspaceKind; it is not a drop-in CRD replacement.
The 26.03.1 release description calls Workspaces beta, while the tagged controller/backend/frontend manifests reference v2.0.0-alpha.3 images. Distinguish release wording from deployed image tags. This review does not establish v2 GA or a v1 end-of-support date. Verify actual releases, APIs and migration support before adoption.
Multi-Tenancy Model: Profiles and Separate Isolation Policies
The full Kubeflow UI creates notebooks in the selected Profile namespace. A Profile can be shared by team members, and the Notebook CRD itself does not require every namespace to have a Profile. Standalone installation and full-platform access models also differ.
Profile ownership/membership, RBAC and Istio AuthorizationPolicy provide parts of access control. They neither revoke unrelated RBAC grants nor automatically block all Pod traffic, storage access or AWS access. Assess NetworkPolicy enforcement, Pod privileges, volume permissions, workload IAM and application authorization separately.
Persistent Storage
The default UI normally mounts a workspace PVC at /home/jovyan. Only data stored on that volume persists across Pod replacement. Packages installed into /opt/conda, system directories or the container writable layer, and in-memory kernel state, are not preserved by that PVC. User packages in the home directory may persist but become incompatible with a new image.
Check PVC/volume lifecycle, backups and reclaim policy. EBS ReadWriteOnce means read/write mounting from one node, not exclusive use by one Pod. Single-Pod enforcement needs separate support such as CSI ReadWriteOncePod. EBS has AZ/attachment constraints; shared EFS storage requires POSIX permissions and concurrent-access design.
Idle Culling
The reviewed v1.11.0 defaults are ENABLE_CULLING=false, CULL_IDLE_TIME=1440, and IDLENESS_CHECK_PERIOD=1; times are minutes. Installation alone does not activate culling.
The culler uses Jupyter's /api/kernels and last activity. It does not comprehensively detect browser closure or GPU work in shell processes. Do not assume RStudio/code-server expose the same API. A failed request or empty kernel list leaves the last-activity value unchanged, so an old value can still lead to stopping. Validate detection with the actual images and access policies before enabling it.
Culling adds a stop annotation, reducing StatefulSet replicas to zero without deleting PVCs. Releasing Pod requests does not necessarily terminate an EC2 node: other workloads, PDBs and Karpenter policies/budgets still matter. Instance charges can continue until node termination.
Notebook Reconciliation Flow
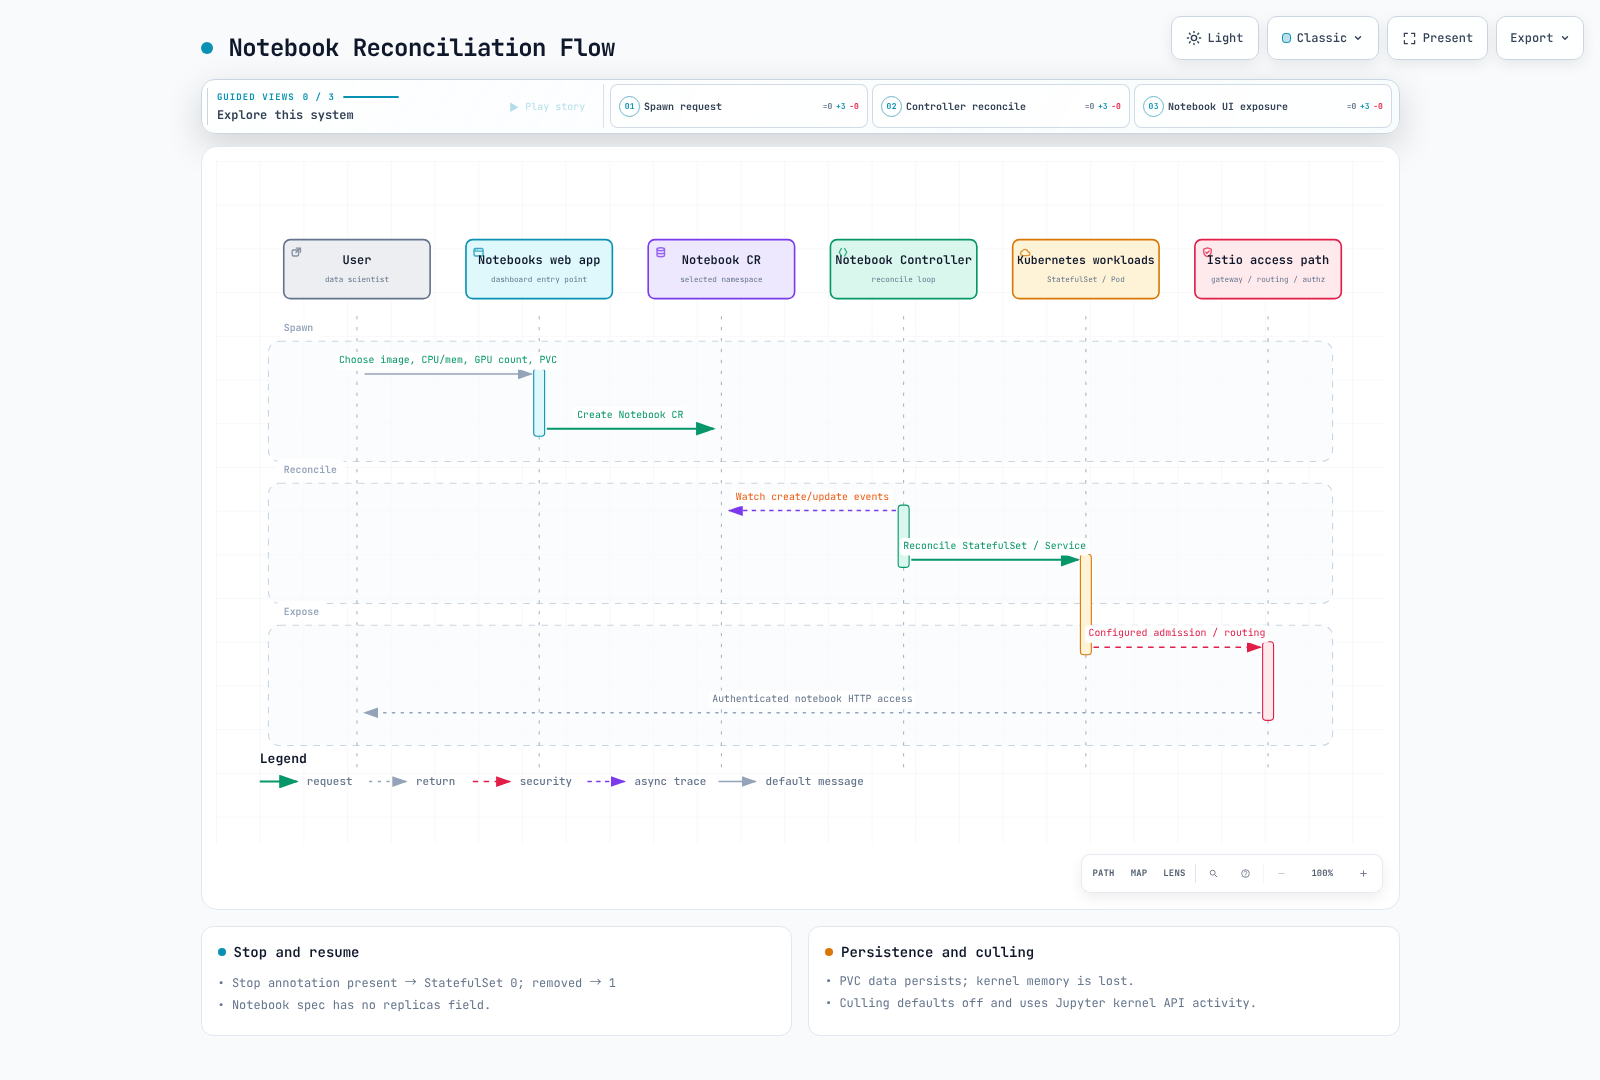
Notebook v1.11.0 has no spec.replicas field. The controller generates zero StatefulSet replicas when kubeflow-resource-stopped is present, and one when absent. Even a value of "false" stops it. Resume by removing the annotation, not by changing its value.
# Stop the selected notebook: active kernels/processes terminate.
kubectl annotate notebook -n team-a analysis \
  kubeflow-resource-stopped="2026-09-12T00:00:00Z" --overwrite
# Resume by removing the annotation.
kubectl annotate notebook -n team-a analysis kubeflow-resource-stopped-
The timestamp illustrates the annotation format. Substitute the actual namespace/notebook and save work before running these commands. Istio sidecar injection is performed by configured admission webhooks, not directly by the Notebook controller.
GPU Scheduling for Notebooks on EKS
GPU requests use standard extended resources such as resources.limits["nvidia.com/gpu"]. Device plugin, driver, node capacity, taints/tolerations and affinity must agree. Declaring a GPU resource alone does not ensure a suitable node will appear.
Karpenter can provision for eligible Pending Pods and matching NodePools, subject to EC2 capacity, quotas, limits, networking and bootstrap success. Notebook stopping and EC2 scale-down are separate operations. See Karpenter for placement and disruption conditions.
Custom Notebook Images
The reviewed spawner defaults allowCustomImage to true. A UI dropdown restriction alone cannot enforce image selection for users who can call the Notebook API directly. Apply required constraints through RBAC and admission too.
Images must satisfy server port, /notebook/<namespace>/<name>/ prefix or rewrite configuration, UID/GID, writable home, probes and runtime dependencies. A Jupyter Docker Stacks image does not automatically include every Kubeflow convention or SDK. Build pinned dependencies, reference an image digest from ECR or another registry, and verify CPU architecture and GPU driver compatibility.
An identical tag does not guarantee identical bytes. Even an identical digest does not make environments identical when PVC user packages/settings, startup scripts or runtime installation differ.
Validation and Sources
The 26.03.1 notebook-controller overlay was rendered locally with Kustomize. The v1.11.0 CRD, stop handling, culling and spawner configuration were inspected. Actual notebooks, GPU execution, PVC recovery, idle detection and EKS provisioning were not run.
- v1.11.0 Notebook controller
- v1.11.0 culling implementation
- v1.11.0 spawner defaults
- 26.03.1 Workspaces image tag
Next Steps
Continue with experiments and hyperparameter tuning in Part 4: Katib.
Quiz
To test what you've learned in this chapter, try the Topic Quiz.