Part 1: Prerequisites
Last Updated: October 12, 2026
There are several ways to create an Amazon EKS cluster. In this chapter, we will learn how to create an EKS cluster using various tools and methods.
Current release: EKS 1.37 became available on October 1, 2026.
Example baseline: The cluster-creation chapters use the reviewed EKS 1.36 baseline. Before choosing another supported version, check compatibility with its tools, node images and add-ons.
Table of Contents
- Prerequisites
- eksctl
- AWS Management Console and CLI
- Terraform
- Access, validation, upgrades and deletion
- Complete guide and CDK
Prerequisites
Before creating an EKS cluster, the following prerequisites are required:
1. AWS Account
A valid AWS account is required. If you don't have an AWS account, you can sign up at the AWS website.
2. IAM Permissions
Required permissions depend on the tool and the resources it manages. A policy granting eks:*, ec2:*, iam:* and cloudformation:* on every resource is not a required least-privilege policy.
| Task | Permission scope to review |
|---|---|
| EKS cluster/node group management | Required EKS actions and target resources |
| Passing existing IAM roles | iam:PassRole for approved role ARNs and service conditions |
| Creating IAM roles/policies/OIDC providers | Tool-managed IAM resources and name/tag scope |
| Creating networking | EC2 actions for the new VPC, subnets and security groups |
| Using eksctl/CDK | Relevant CloudFormation stacks, execution roles and bootstrap resources |
The provisioning identity, cluster service role and node role are separate. SCPs, permissions boundaries and session policies still apply. Review your organization's provisioning permissions against the synthesized template/plan. Auto Mode role requirements differ from conventional node groups.
References: EKS IAM actions and resources, Auto Mode roles.
3. Tool Installation
AWS CLI
Choose the package for your OS/CPU and follow signature verification in the official AWS CLI v2 installation guide. For an existing v1/v2 installation, review its update/migration procedure first.
| Environment | Official package/installation method |
|---|---|
| macOS | Signed AWSCLIV2.pkg |
| Linux x86_64 | awscli-exe-linux-x86_64.zip with PGP signature verification |
| Linux ARM64 | awscli-exe-linux-aarch64.zip with PGP signature verification |
| Windows | MSI installer for supported Windows versions |
Do not use the Linux x86_64 package unchanged on ARM. Check the active CLI with aws --version. If your organization uses IAM Identity Center, configure an approved profile as follows. Otherwise follow its federation procedure rather than assuming long-lived access keys.
aws configure sso --profile eks-docs
aws sso login --profile eks-docs
aws sts get-caller-identity --profile eks-docs
export AWS_PROFILE=eks-docs
See IAM Identity Center authentication. Keep using the approved account, role and region for subsequent commands.
kubectl and eksctl — Linux/macOS
This chapter's EKS 1.36 examples use kubectl 1.36.4 and eksctl 0.230.0 as their baseline. Prefer the same kubectl minor as the server; supported skew is ±1 minor. Do not blindly install the newest minor from upstream stable.txt for an older EKS cluster.
This Bash example selects AMD64/ARM64 and verifies official checksums before installation. It needs curl, tar, awk, and sha256sum or shasum; installation in /usr/local/bin requires administrator permission. Download or checksum failure stops installation.
(
  set -e
  case "$(uname -s)" in
    Linux) EKS_TOOL_OS=linux; EKS_ARCHIVE_OS=Linux ;;
    Darwin) EKS_TOOL_OS=darwin; EKS_ARCHIVE_OS=Darwin ;;
    *) printf 'Use the official installer for this operating system\n' >&2; exit 1 ;;
  esac
  case "$(uname -m)" in
    x86_64) EKS_TOOL_ARCH=amd64 ;;
    aarch64|arm64) EKS_TOOL_ARCH=arm64 ;;
    *) printf 'Select a supported CPU architecture\n' >&2; exit 1 ;;
  esac
  EKS_TOOL_ARCHIVE="eksctl_${EKS_ARCHIVE_OS}_${EKS_TOOL_ARCH}.tar.gz"
  EKS_TOOL_DIR=$(mktemp -d)
  : "${EKS_TOOL_DIR:?}"
  trap 'rm -f -- "$EKS_TOOL_DIR/kubectl" "$EKS_TOOL_DIR/kubectl.sha256" "$EKS_TOOL_DIR/eksctl" "$EKS_TOOL_DIR/eksctl_checksums.txt" "$EKS_TOOL_DIR/$EKS_TOOL_ARCHIVE" "$EKS_TOOL_DIR/selected.sha256"; rmdir -- "$EKS_TOOL_DIR"' EXIT
  cd "$EKS_TOOL_DIR" || exit 1
  verify_sha() {
    if command -v sha256sum >/dev/null 2>&1; then
      sha256sum --check "$1"
    else
      shasum -a 256 --check "$1"
    fi
  }
  EKS_KUBECTL_VERSION=v1.36.4
  curl -fL "https://dl.k8s.io/release/$EKS_KUBECTL_VERSION/bin/$EKS_TOOL_OS/$EKS_TOOL_ARCH/kubectl" -o kubectl || exit 1
  curl -fL "https://dl.k8s.io/release/$EKS_KUBECTL_VERSION/bin/$EKS_TOOL_OS/$EKS_TOOL_ARCH/kubectl.sha256" -o kubectl.sha256 || exit 1
  printf '%s  kubectl\n' "$(tr -d '[:space:]' < kubectl.sha256)" > selected.sha256
  verify_sha selected.sha256 || exit 1

  EKSCTL_VERSION=0.230.0
  curl -fL "https://github.com/eksctl-io/eksctl/releases/download/v$EKSCTL_VERSION/$EKS_TOOL_ARCHIVE" -o "$EKS_TOOL_ARCHIVE" || exit 1
  curl -fL "https://github.com/eksctl-io/eksctl/releases/download/v$EKSCTL_VERSION/eksctl_checksums.txt" -o eksctl_checksums.txt || exit 1
  awk -v name="$EKS_TOOL_ARCHIVE" '$2 == name {print; count++} END {if (count != 1) exit 1}' \
    eksctl_checksums.txt > selected.sha256 || exit 1
  verify_sha selected.sha256 || exit 1
  tar -xzf "$EKS_TOOL_ARCHIVE" eksctl || exit 1
  sudo install -m 0755 kubectl /usr/local/bin/kubectl || exit 1
  sudo install -m 0755 eksctl /usr/local/bin/eksctl || exit 1
  kubectl version --client
  eksctl version
)
Official procedures: Linux kubectl, macOS kubectl, eksctl installation.
Windows
Follow the official kubectl installation procedure in PowerShell. For this chapter's AMD64 example, use kubectl 1.36.4 and the .sha256 file at the same path. Select the Windows ZIP matching your CPU and eksctl_checksums.txt from the eksctl 0.230.0 release.
Compare Get-FileHash -Algorithm SHA256 with the official hash and stop on mismatch. After verification, extract the ZIP, add the executable directory to PATH, and check kubectl version --client and eksctl version. Do not run PowerShell syntax in Bash.
Also prepare jq for JSON generation in the AWS CLI examples. No actual client download/installation or login was performed during this audit.
4. VPC and Subnets
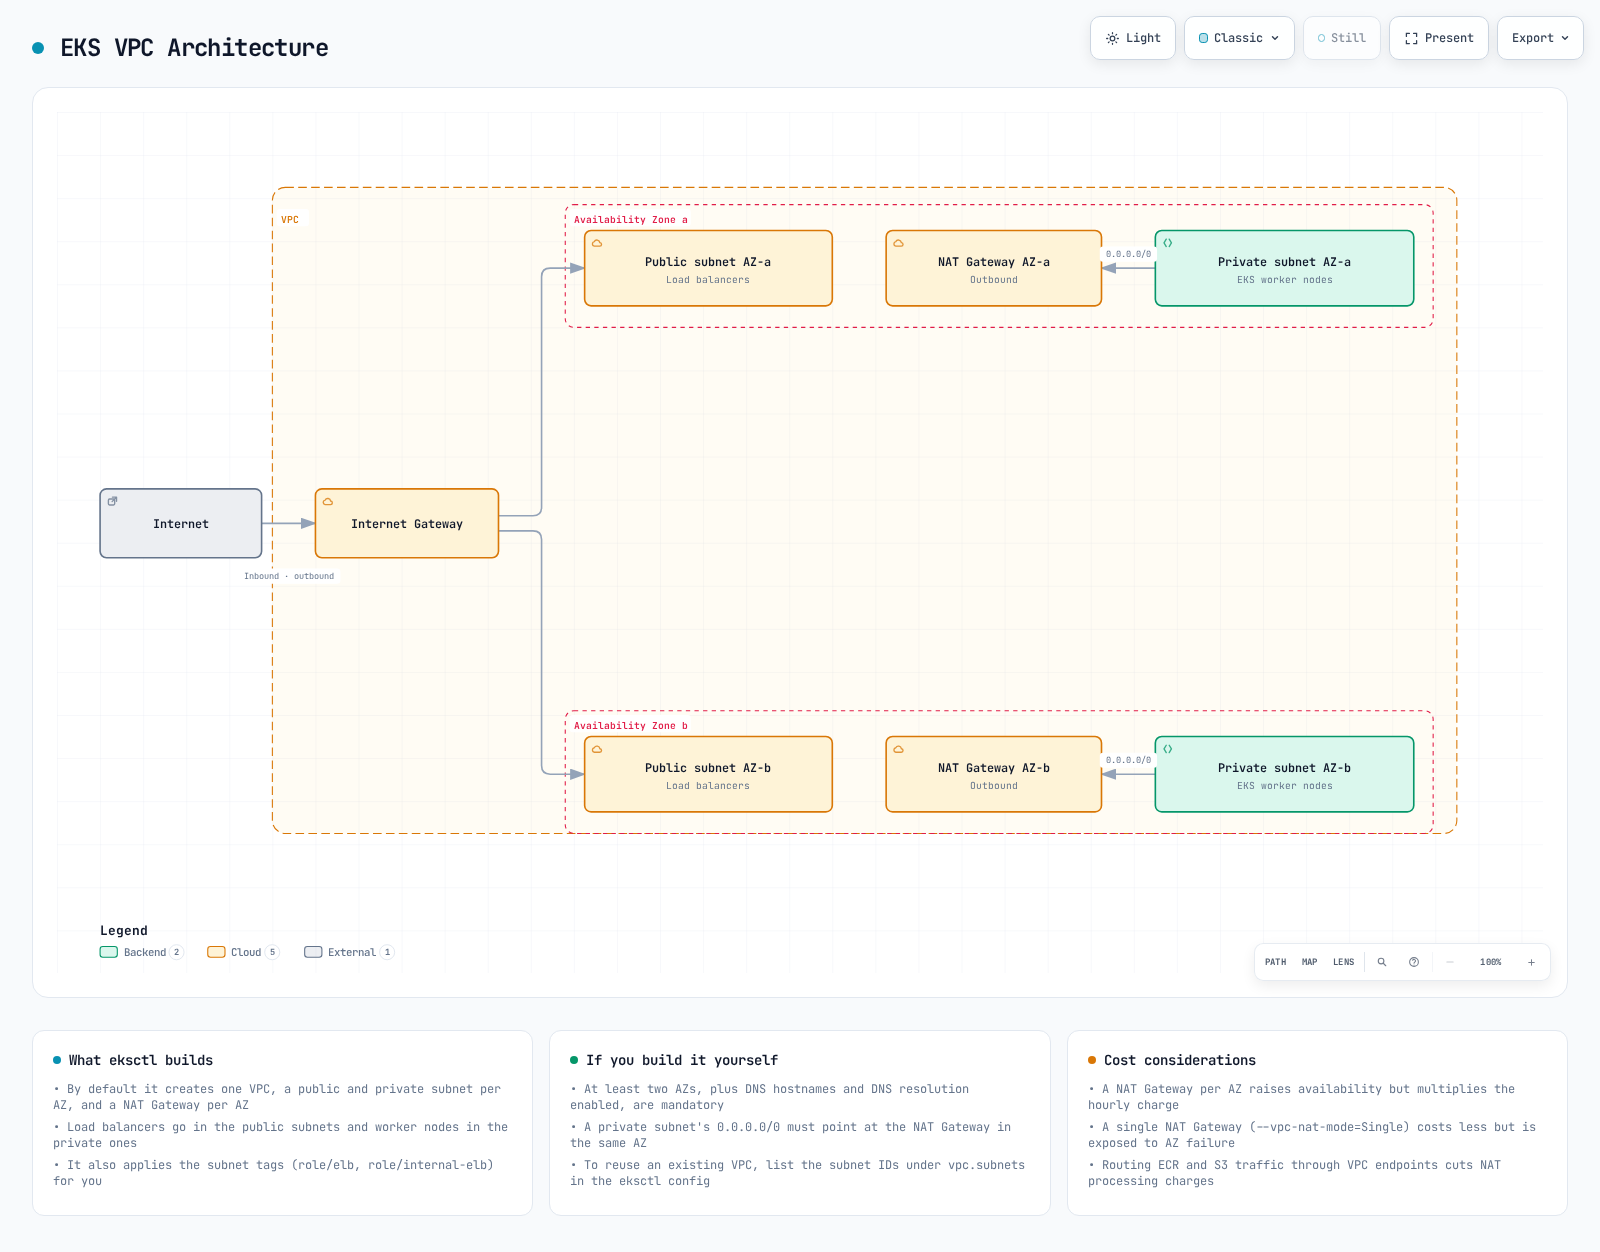
This diagram shows one NAT-based layout, not a requirement for every cluster to have internet access.
A regional EKS cluster requires at least two subnets in different AZs of the same VPC. Each cluster subnet needs at least six available IPs for EKS; AWS recommends at least sixteen. Plan additional addresses for nodes, Pods, load balancers and upgrades. Enable VPC DNS hostnames and DNS resolution.
Internet access is not mandatory for every EKS cluster. Nodes and workloads need access to the Kubernetes API, images and required AWS services through NAT/internet paths or the necessary VPC endpoints and mirrored images. The private Kubernetes endpoint is reachable from the VPC or connected networks with appropriate DNS and routing.
VPC Tags for EKS Cluster
The kubernetes.io/cluster/<cluster-name> VPC tag is a legacy mechanism, not a universal current EKS creation requirement. Follow the chosen controller's subnet-discovery rules for load balancing:
- Subnets for public load balancers:
kubernetes.io/role/elb=1 - Subnets for internal load balancers:
kubernetes.io/role/internal-elb=1
Tags do not configure routing, security groups or free IP capacity. See VPC/subnet requirements and clusters without internet access.
Quiz
To test what you learned in this chapter, try the EKS Cluster Creation - Part 1 Quiz.