Services and Networking
Supported Versions: Kubernetes 1.35, 1.36, 1.37 Last Updated: February 23, 2026
In Kubernetes, a Service is an abstraction layer that provides a single access point for a set of Pods. In this chapter, we'll explore Kubernetes networking concepts in detail, including various service types, Ingress, network policies, and more.
Lab Environment Setup
To follow the examples in this document, you'll need the following tools and environment:
Required Tools
- kubectl within one minor version of the API server
- A working Kubernetes cluster (EKS, minikube, kind, etc.)
Deploy Example Application
# Create namespace
kubectl create namespace networking-demo

# Deploy a simple application
kubectl -n networking-demo apply -f - <<EOF
apiVersion: apps/v1
kind: Deployment
metadata:
  name: web-app
  labels:
    app: web
spec:
  replicas: 3
  selector:
    matchLabels:
      app: web
  template:
    metadata:
      labels:
        app: web
    spec:
      containers:
      - name: nginx
        image: nginx:1.30.4
        ports:
        - containerPort: 80
---
apiVersion: v1
kind: Service
metadata:
  name: web-service
spec:
  selector:
    app: web
  ports:
  - port: 80
    targetPort: 80
  type: ClusterIP
EOF

# Verify services
kubectl -n networking-demo get svc,pods
Table of Contents
- Service Types
- Ingress
- Endpoints
- Service Discovery
- CoreDNS
- Network Policies
- Service Mesh
- CNI (Container Network Interface)
- Cilium
Service Types
Key Concept: Kubernetes Services provide stable network endpoints for a set of Pods and control internal and external access through various types.
Kubernetes provides various types of services to support multiple ways of exposing applications.
Service Architecture
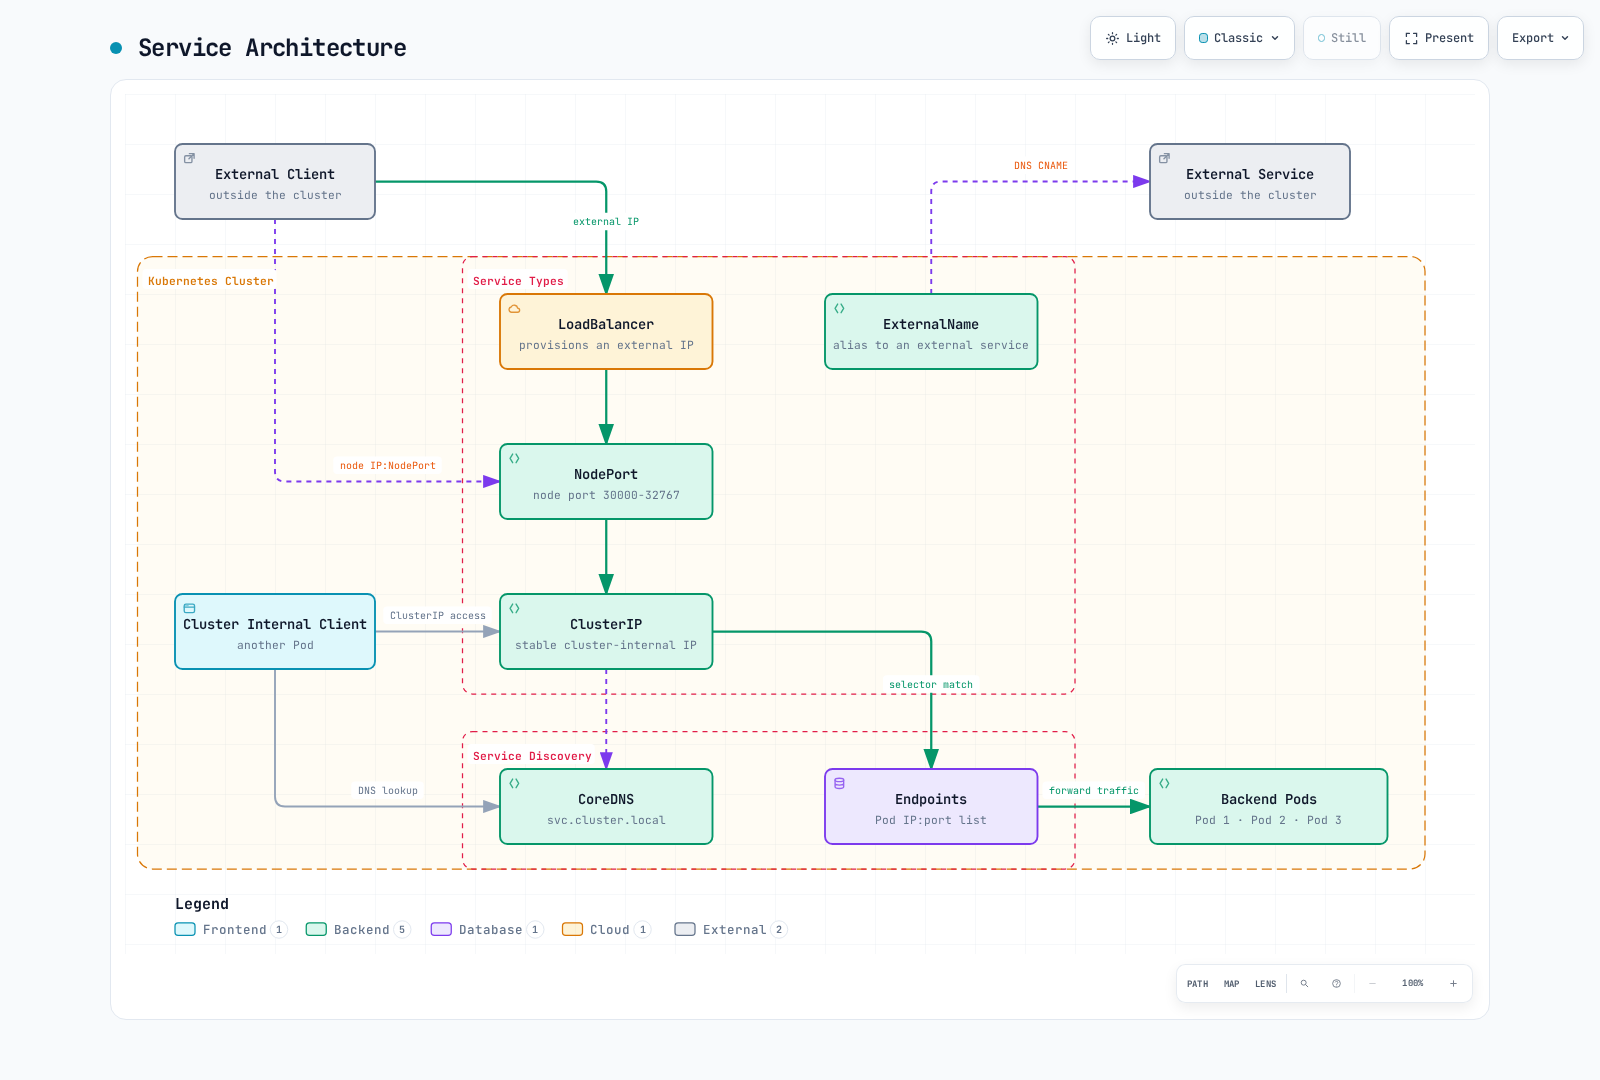
Service Type Comparison
| Service Type | Access Scope | External IP | Use Case | Features |
|---|---|---|---|---|
| ClusterIP | Cluster Internal | No | Internal microservice communication | Default service type, accessible only within cluster |
| NodePort | Cluster External | No | Development and test environments | Access through specific port (30000-32767) on all nodes |
| LoadBalancer | Cluster External | Yes | Production external services | Provisions cloud provider load balancer |
| ExternalName | Cluster Internal | No | Internal alias for external services | Redirection via DNS CNAME record |
| Headless | Cluster Internal | No | When direct Pod IP access is needed | Special service without ClusterIP |
ClusterIP
ClusterIP is the most basic service type, providing a fixed IP address accessible only within the cluster.
apiVersion: v1
kind: Service
metadata:
  name: my-service
spec:
  selector:
    app: MyApp
  ports:
  - protocol: TCP
    port: 80
    targetPort: 9376
  type: ClusterIP  # Default, can be omitted
NodePort
NodePort services allow access to the service through a specific port on all nodes.
apiVersion: v1
kind: Service
metadata:
  name: my-service
spec:
  selector:
    app: MyApp
  ports:
  - protocol: TCP
    port: 80        # Port used within cluster
    targetPort: 9376 # Pod's port
    nodePort: 30007  # Port exposed on nodes (30000-32767)
  type: NodePort
LoadBalancer
LoadBalancer services provision a load balancer from the cloud provider to expose the service externally.
apiVersion: v1
kind: Service
metadata:
  name: my-service
  annotations:
    service.beta.kubernetes.io/aws-load-balancer-type: external
    service.beta.kubernetes.io/aws-load-balancer-nlb-target-type: ip
    service.beta.kubernetes.io/aws-load-balancer-scheme: internet-facing
spec:
  selector:
    app: MyApp
  ports:
  - port: 80
    targetPort: 9376
  type: LoadBalancer
This example requires the AWS Load Balancer Controller, its IAM permissions, suitable subnets, and routable Pod IPs. It provisions an internet-facing NLB. Internal load balancers are also possible; AWS may return a DNS hostname rather than an IP. EKS Auto Mode uses a separate controller/class and configuration.
ExternalName
ExternalName services provide an alias for external services.
apiVersion: v1
kind: Service
metadata:
  name: my-service
spec:
  type: ExternalName
  externalName: my.database.example.com
This service maps the DNS name my-service to my.database.example.com.
Headless Service
A headless service is a service without a cluster IP that creates DNS records for each Pod.
apiVersion: v1
kind: Service
metadata:
  name: my-service
spec:
  clusterIP: None  # Headless service
  selector:
    app: MyApp
  ports:
  - port: 80
    targetPort: 9376
This service does not allocate a cluster IP and creates DNS records for each Pod.
External IP
externalIPs exposes this Service at administrator-managed IPs already routed to the nodes; it does not allocate addresses or select an external backend. It is deprecated since v1.36. Prefer a supported load balancer or Gateway implementation for new configurations. The documentation-only address below must be replaced with an address you control.
apiVersion: v1
kind: Service
metadata:
  name: my-service
spec:
  selector:
    app: MyApp
  ports:
  - port: 80
    targetPort: 9376
  externalIPs:
  - 198.51.100.32
Ingress
Ingress is an API object that exposes HTTP and HTTPS routes from outside the cluster to services within the cluster. Ingress provides load balancing, SSL termination, and name-based virtual hosting.
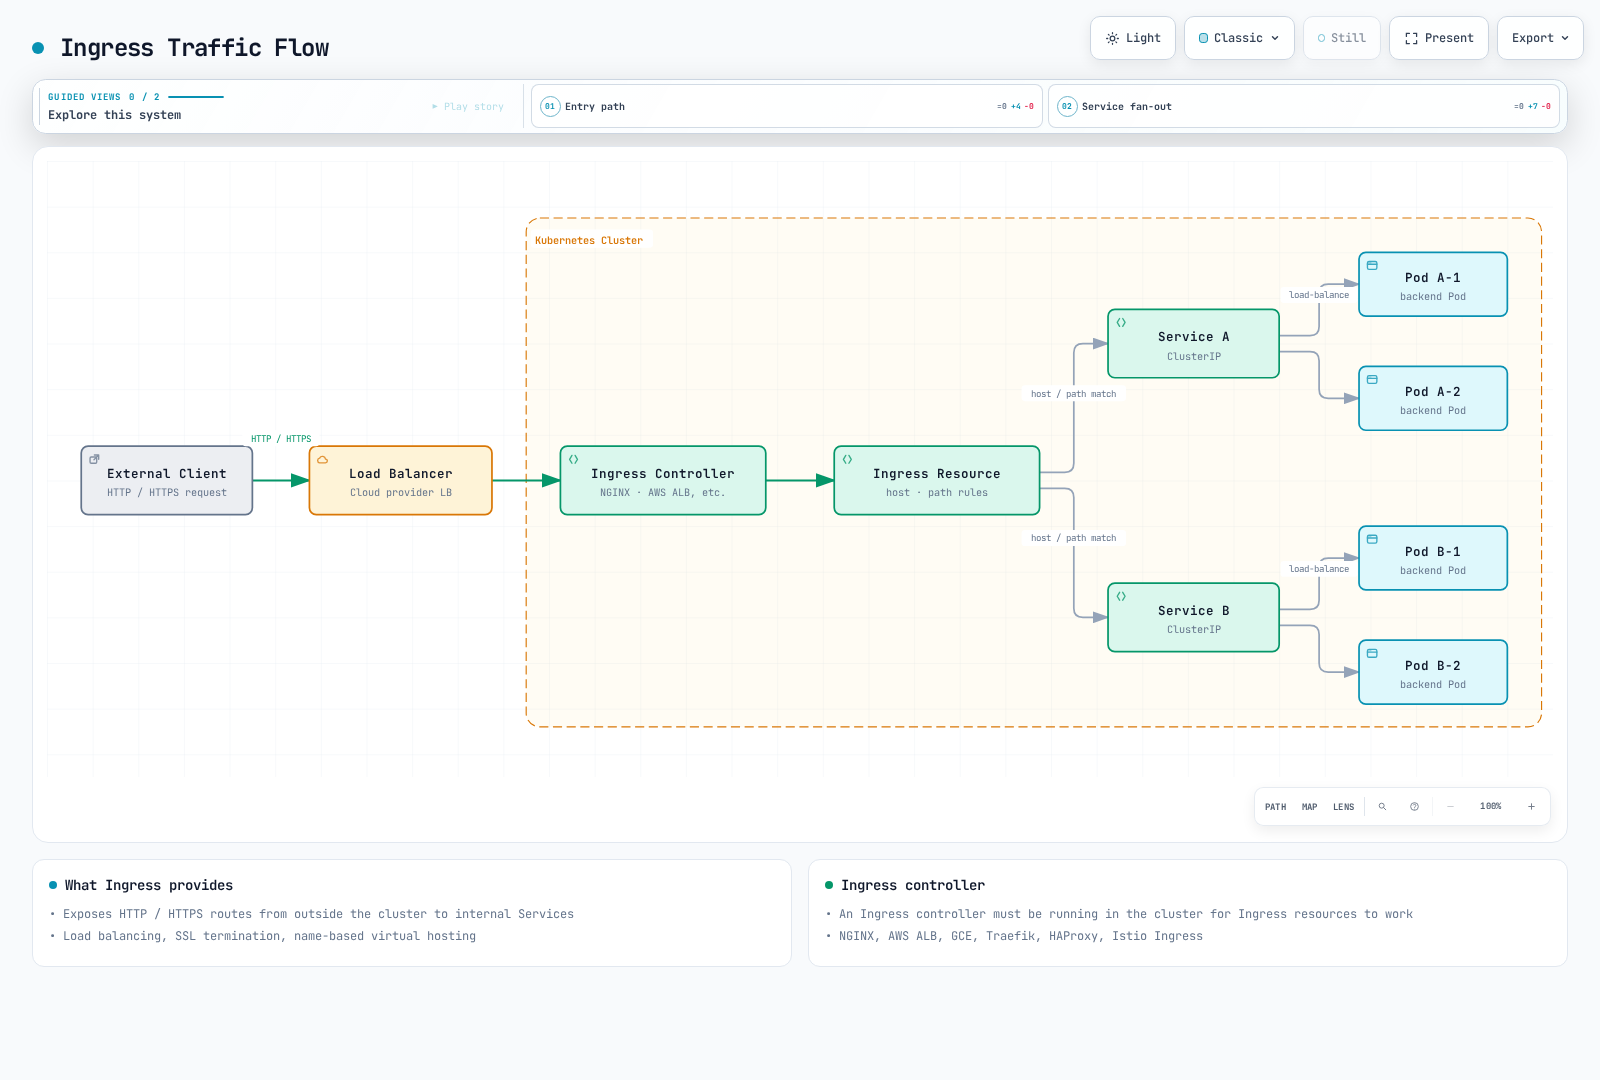
Ingress Controller
To use Ingress resources, an Ingress controller must be running in the cluster. There are various Ingress controllers:
- AWS Load Balancer Controller
- GCE Ingress Controller
- Traefik
- HAProxy
- Istio Ingress
Community ingress-nginx retired in March 2026 (notice). The generic examples below assume an installed Traefik controller and traefik IngressClass. Ingress is a configuration API, not a packet-processing hop; the controller configures the actual proxy/load balancer.
Basic Ingress
apiVersion: networking.k8s.io/v1
kind: Ingress
metadata:
  name: minimal-ingress
spec:
  ingressClassName: traefik  # Ingress controller class to use
  rules:
  - host: example.com
    http:
      paths:
      - path: /
        pathType: Prefix
        backend:
          service:
            name: example-service
            port:
              number: 80
This Ingress routes all requests to the example.com host to example-service:80.
Path-Based Routing
apiVersion: networking.k8s.io/v1
kind: Ingress
metadata:
  name: path-based-ingress
spec:
  ingressClassName: traefik
  rules:
  - host: example.com
    http:
      paths:
      - path: /api
        pathType: Prefix
        backend:
          service:
            name: api-service
            port:
              number: 80
      - path: /web
        pathType: Prefix
        backend:
          service:
            name: web-service
            port:
              number: 80
This Ingress routes requests starting with example.com/api to api-service and requests starting with example.com/web to web-service.
Name-Based Virtual Hosting
apiVersion: networking.k8s.io/v1
kind: Ingress
metadata:
  name: name-based-ingress
spec:
  ingressClassName: traefik
  rules:
  - host: foo.example.com
    http:
      paths:
      - path: /
        pathType: Prefix
        backend:
          service:
            name: foo-service
            port:
              number: 80
  - host: bar.example.com
    http:
      paths:
      - path: /
        pathType: Prefix
        backend:
          service:
            name: bar-service
            port:
              number: 80
This Ingress routes requests to foo.example.com to foo-service and requests to bar.example.com to bar-service.
TLS Configuration
apiVersion: networking.k8s.io/v1
kind: Ingress
metadata:
  name: tls-ingress
spec:
  ingressClassName: traefik
  tls:
  - hosts:
    - example.com
    secretName: example-tls
  rules:
  - host: example.com
    http:
      paths:
      - path: /
        pathType: Prefix
        backend:
          service:
            name: example-service
            port:
              number: 80
This Ingress terminates HTTPS connections to example.com using the TLS certificate stored in the example-tls secret.
TLS secret creation:
kubectl create secret tls example-tls --cert=path/to/cert.crt --key=path/to/key.keyAWS Load Balancer Controller
On AWS EKS, you can use the AWS Load Balancer Controller to provision Application Load Balancers.
apiVersion: networking.k8s.io/v1
kind: Ingress
metadata:
  name: alb-ingress
  annotations:
    alb.ingress.kubernetes.io/scheme: internet-facing
    alb.ingress.kubernetes.io/target-type: ip
    alb.ingress.kubernetes.io/listen-ports: '[{"HTTP": 80}, {"HTTPS": 443}]'
    alb.ingress.kubernetes.io/ssl-redirect: "443"
    alb.ingress.kubernetes.io/certificate-arn: arn:aws:acm:region:account-id:certificate/certificate-id
spec:
  ingressClassName: alb
  rules:
  - host: example.com
    http:
      paths:
      - path: /
        pathType: Prefix
        backend:
          service:
            name: example-service
            port:
              number: 80
This Ingress uses AWS ALB to handle requests to example.com.
Endpoints
The legacy v1/Endpoints API is deprecated since v1.33. Use discovery.k8s.io/v1 EndpointSlices for new integrations. These objects describe backends; traffic does not pass through API objects.
Endpoints are resources that store the IP addresses and ports of Pods that a service points to. When there are Pods matching the service's selector, Kubernetes automatically creates and manages the Endpoints object.
apiVersion: v1
kind: Endpoints
metadata:
  name: my-service
subsets:
- addresses:
  - ip: 192.168.1.1
  ports:
  - port: 9376
For manual backends, create a Service named my-service without a selector and matching ports; otherwise the controller can overwrite the backend data. Prefer a manually managed EndpointSlice as below.
EndpointSlice
EndpointSlice is a scalable alternative to Endpoints that provides better performance in large clusters.
apiVersion: discovery.k8s.io/v1
kind: EndpointSlice
metadata:
  name: my-service-abc
  labels:
    kubernetes.io/service-name: my-service
    endpointslice.kubernetes.io/managed-by: docs.example.com
addressType: IPv4
ports:
- name: ""
  protocol: TCP
  port: 9376
endpoints:
- addresses:
  - "10.1.2.3"
  conditions:
    ready: true
  hostname: pod-1
  nodeName: node-1
  zone: us-west-2a
Service Discovery
Kubernetes provides two main service discovery methods:
- Environment Variables: Kubernetes injects environment variables for active services into Pods when they are created.
- DNS: Kubernetes provides DNS records for services through the cluster DNS server.
Environment Variables
With enableServiceLinks: true, kubelet adds variables for Services with ClusterIPs already present in the Pod's namespace when its containers start. These variables do not update dynamically; DNS is preferable for later-created Services. For example, if there's a service called my-service, the following environment variables are created:
MY_SERVICE_SERVICE_HOST=10.0.0.11
MY_SERVICE_SERVICE_PORT=80
DNS
Kubernetes DNS creates DNS records for services. Pods can access services using the service name.
- Regular service:
my-service.my-namespace.svc.cluster.local - Pod of headless service:
pod-name.my-service.my-namespace.svc.cluster.local
CoreDNS
CoreDNS is a flexible and extensible DNS server used as the DNS server for Kubernetes clusters.
CoreDNS Configuration
CoreDNS is configured through a ConfigMap:
apiVersion: v1
kind: ConfigMap
metadata:
  name: coredns
  namespace: kube-system
data:
  Corefile: |
    .:53 {
        errors
        health {
            lameduck 5s
        }
        ready
        kubernetes cluster.local in-addr.arpa ip6.arpa {
            pods insecure
            fallthrough in-addr.arpa ip6.arpa
            ttl 30
        }
        prometheus :9153
        forward . /etc/resolv.conf
        cache 30
        loop
        reload
        loadbalance
    }
This configuration provides the following features:
errors: Error logginghealth: Health check endpointready: Readiness check endpointkubernetes: DNS records for Kubernetes services and Podsprometheus: Prometheus metrics exposureforward: Forward external DNS queriescache: DNS response cachingloop: Loop detectionreload: Auto-reload on configuration file changesloadbalance: Load balancing
DNS Policy
A Pod's DNS policy can be configured through the dnsPolicy field:
ClusterFirst: Default, uses Kubernetes DNS server first and forwards to upstream nameservers if no match is found.Default: Inherits DNS settings from the node where the Pod is running.ClusterFirstWithHostNet: Recommended policy for Pods withhostNetwork: true.None: All DNS settings must be provided through thednsConfigfield.
apiVersion: v1
kind: Pod
metadata:
  name: custom-dns
spec:
  containers:
  - name: nginx
    image: nginx
  dnsPolicy: "None"
  dnsConfig:
    nameservers:
    - 1.1.1.1
    - 8.8.8.8
    searches:
    - ns1.svc.cluster.local
    - my.dns.search.suffix
    options:
    - name: ndots
      value: "2"
    - name: edns0
Network Policies
Network policies provide a way to control communication between Pods. To use network policies, the network plugin must support them (e.g., Calico, Cilium).
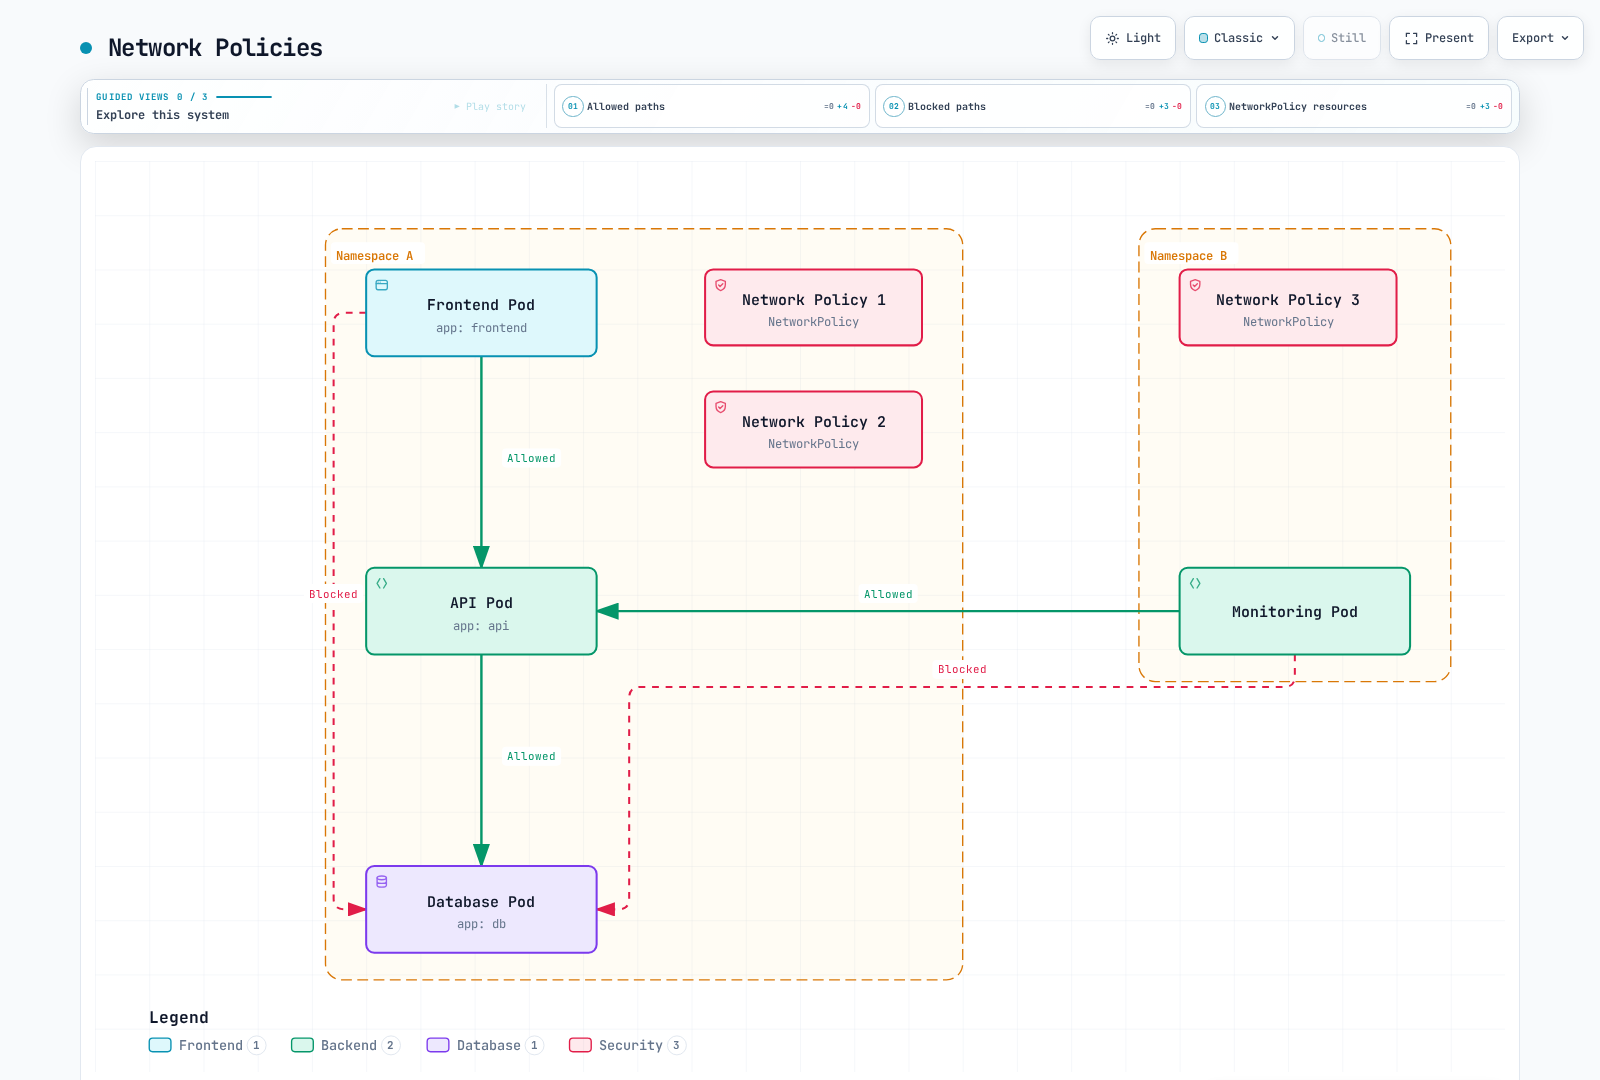
Basic Network Policy
apiVersion: networking.k8s.io/v1
kind: NetworkPolicy
metadata:
  name: default-deny-ingress
spec:
  podSelector: {}  # Applies to all Pods
  policyTypes:
  - Ingress
This policy isolates ingress to Pods in its own namespace. Standard NetworkPolicies are additive: traffic allowed by another policy remains allowed. The plugin must enforce policies; source egress and destination ingress must both allow a connection. Node traffic has documented exceptions.
Allow Ingress to Specific Pods
apiVersion: networking.k8s.io/v1
kind: NetworkPolicy
metadata:
  name: allow-nginx-ingress
spec:
  podSelector:
    matchLabels:
      app: nginx
  policyTypes:
  - Ingress
  ingress:
  - from:
    - podSelector:
        matchLabels:
          access: allowed
    ports:
    - protocol: TCP
      port: 80
This network policy allows ingress traffic on TCP port 80 from Pods with the access: allowed label to Pods with the app: nginx label.
Namespace-Based Policy
apiVersion: networking.k8s.io/v1
kind: NetworkPolicy
metadata:
  name: allow-from-prod-namespace
spec:
  podSelector:
    matchLabels:
      app: db
  policyTypes:
  - Ingress
  ingress:
  - from:
    - namespaceSelector:
        matchLabels:
          purpose: production
This network policy allows ingress traffic from all Pods in namespaces with the purpose: production label to Pods with the app: db label.
Egress Policy
apiVersion: networking.k8s.io/v1
kind: NetworkPolicy
metadata:
  name: limit-egress
spec:
  podSelector:
    matchLabels:
      app: frontend
  policyTypes:
  - Egress
  egress:
  - to:
    - podSelector:
        matchLabels:
          app: api
    ports:
    - protocol: TCP
      port: 8080
  - to:
    - namespaceSelector:
        matchLabels:
          purpose: monitoring
This network policy allows egress traffic from Pods with the app: frontend label to TCP port 8080 on Pods with the app: api label and to all Pods in namespaces with the purpose: monitoring label.
The egress example also blocks DNS unless another policy permits it. Add TCP/UDP 53 access to the cluster DNS endpoints when applications use Service names; account for NodeLocal DNS if installed.
CIDR-Based Policy
apiVersion: networking.k8s.io/v1
kind: NetworkPolicy
metadata:
  name: allow-external-traffic
spec:
  podSelector:
    matchLabels:
      app: web
  policyTypes:
  - Ingress
  ingress:
  - from:
    - ipBlock:
        cidr: 192.168.1.0/24
        except:
        - 192.168.1.1/32
This network policy allows ingress traffic from the 192.168.1.0/24 CIDR block (excluding 192.168.1.1) to Pods with the app: web label.
Service Mesh
A service mesh is an infrastructure layer that manages communication between microservices. Service meshes provide features such as service discovery, load balancing, encryption, authentication, authorization, and observability.
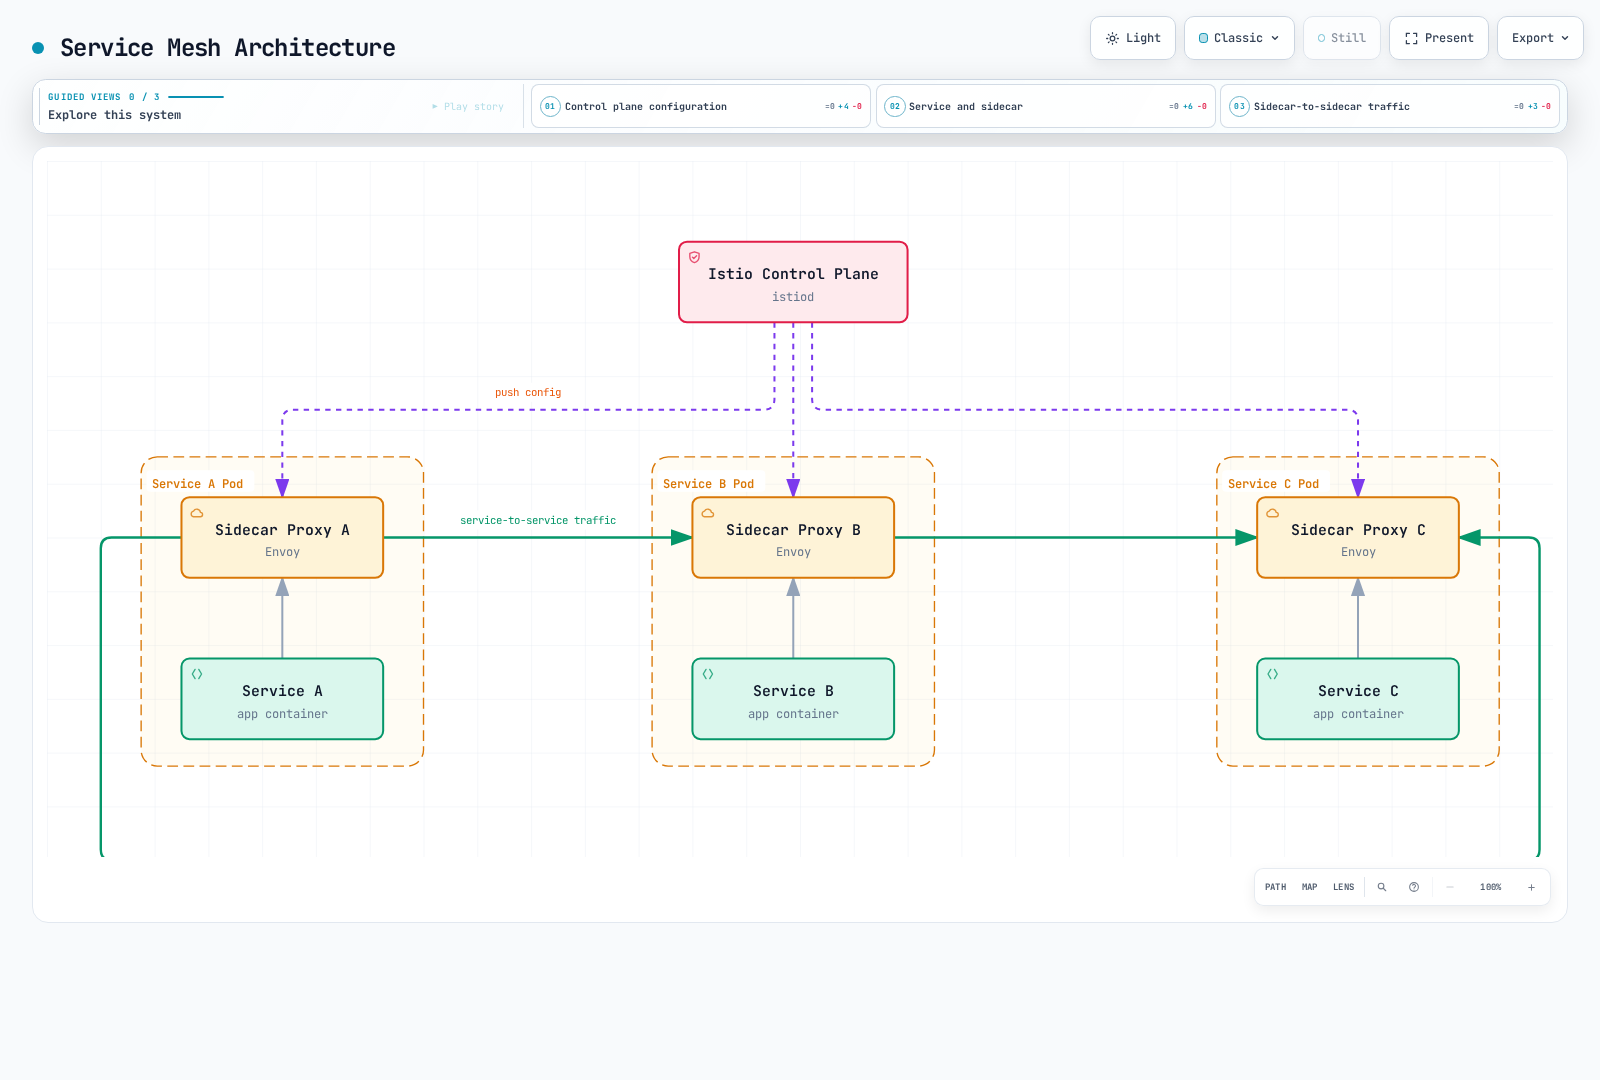
Istio
Istio is one of the popular service mesh implementations. The diagram shows Istio sidecar mode, which injects Envoy into enrolled Pods. Istio also offers ambient mode with a different data plane.
Istio Virtual Service
apiVersion: networking.istio.io/v1
kind: VirtualService
metadata:
  name: reviews
spec:
  hosts:
  - reviews
  http:
  - match:
    - headers:
        end-user:
          exact: jason
    route:
    - destination:
        host: reviews
        subset: v2
  - route:
    - destination:
        host: reviews
        subset: v1
This VirtualService routes requests with the end-user: jason header to the v2 subset of the reviews service and all other requests to the v1 subset.
Istio Destination Rule
apiVersion: networking.istio.io/v1
kind: DestinationRule
metadata:
  name: reviews
spec:
  host: reviews
  trafficPolicy:
    loadBalancer:
      simple: RANDOM
  subsets:
  - name: v1
    labels:
      version: v1
  - name: v2
    labels:
      version: v2
    trafficPolicy:
      loadBalancer:
        simple: ROUND_ROBIN
This DestinationRule defines two subsets (v1 and v2) for the reviews service and sets load balancing policies for each subset.
Linkerd
Linkerd is a lightweight service mesh characterized by simple installation and use.
Linkerd Service Profile
This is a legacy example. Since Linkerd 2.16, Gateway API types supersede ServiceProfiles; they remain for compatibility. See the current reference.
apiVersion: linkerd.io/v1alpha2
kind: ServiceProfile
metadata:
  name: nginx.default.svc.cluster.local
  namespace: default
spec:
  routes:
  - name: GET /
    condition:
      method: GET
      pathRegex: /
    responseClasses:
    - condition:
        status:
          min: 500
          max: 599
      isFailure: true
  retryBudget:
    retryRatio: 0.2
    minRetriesPerSecond: 10
    ttl: 10s
This ServiceProfile defines routes and retry policies for the nginx service.
CNI(Container Network Interface)
CNI plugins configure Pod network interfaces and IP addressing. NetworkPolicy enforcement is optional and depends on the plugin.
Cilium
Introduction to Cilium
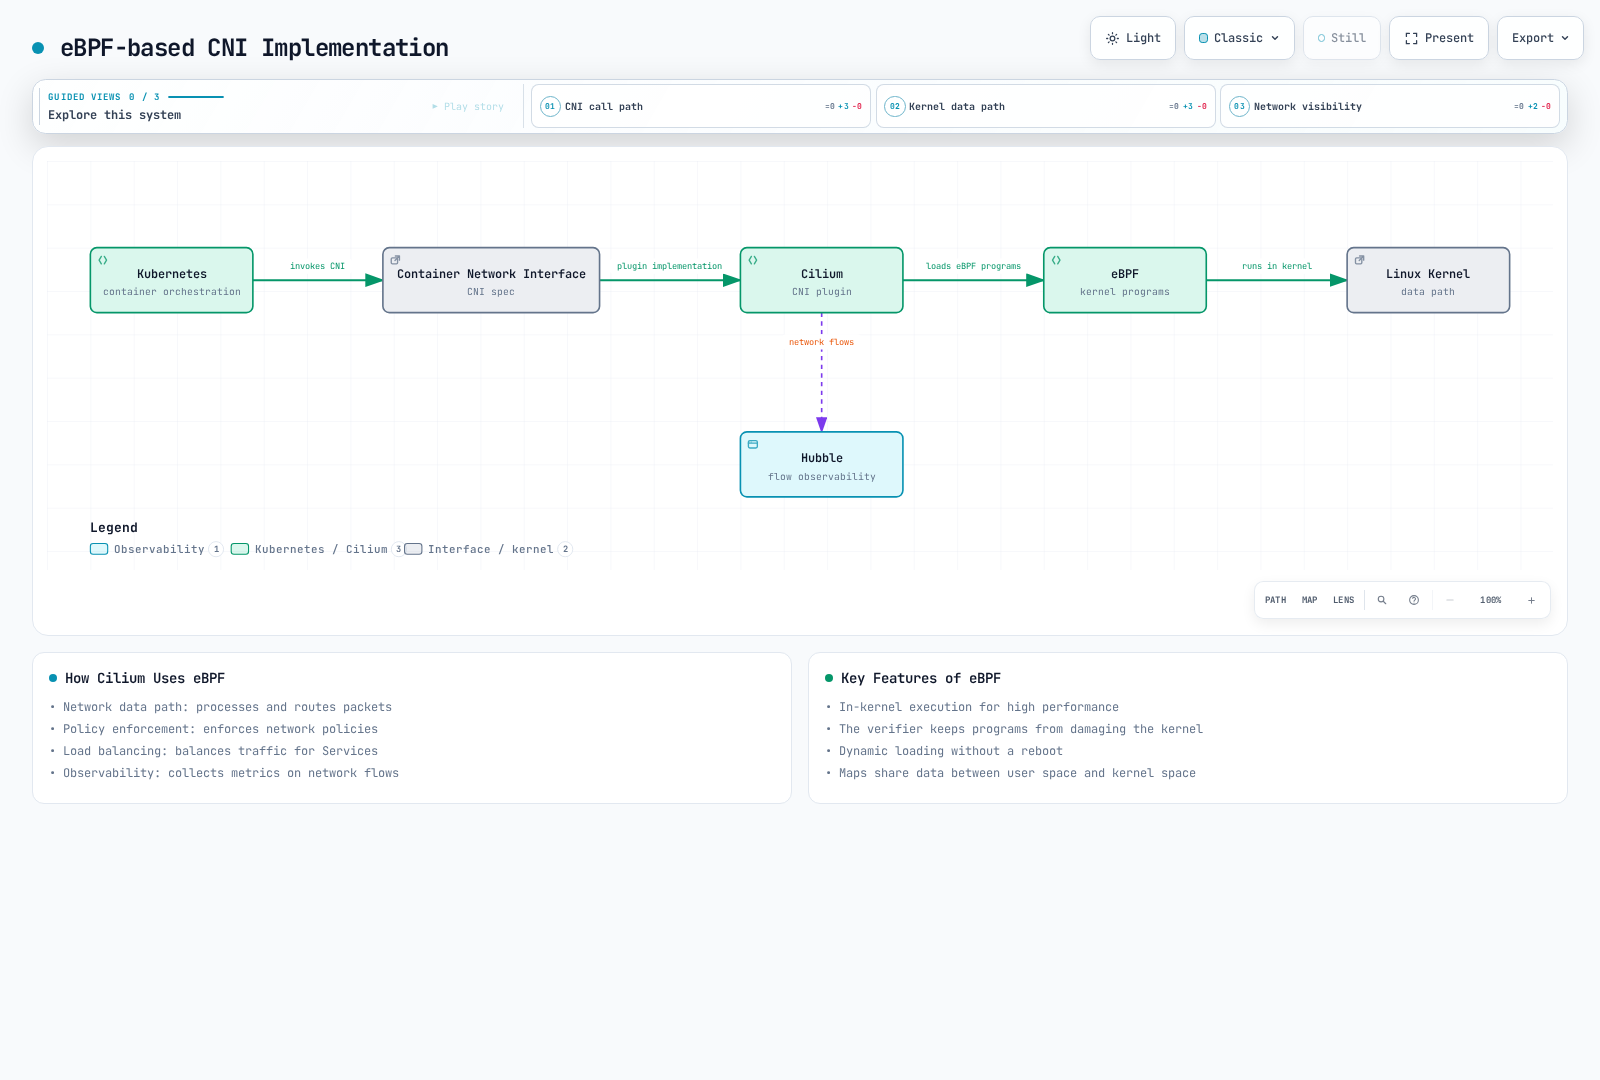
Cilium is open-source software that leverages the powerful eBPF technology in the Linux kernel to provide network connectivity, security, and observability for containerized applications. Its current Kubernetes integration provides networking, security, and observability through a CNI plugin and controllers.
Key Features
- eBPF-based: Provides high-performance networking and security features through a programmable data path within the kernel
- API-aware Networking: Supports API-aware network security policies at L3-L7 layers
- Kubernetes Integration: Provides a Kubernetes CNI (Container Network Interface) implementation
- Distributed Load Balancing: Distributed load balancing for efficient service-to-service communication
- Network Visibility: Network flow monitoring and troubleshooting through Hubble
- Multi-cluster Support: Support for cross-cluster networking and security policies
Cilium's Differentiating Points
Cilium provides several unique advantages compared to other CNI solutions.
Technical Differentiation:
- eBPF Utilization: High performance and flexibility through programmable data path within the kernel
- API-aware Networking: Network policy support up to L7 layer
- XDP (eXpress Data Path): Packet processing performance optimization
- Kube-proxy Replacement: More efficient service load balancing
- Hubble Integration: Powerful network observability tool
Benefits by Use Case:
- Microservice Architecture: Fine-grained network policies and observability
- Multi-cluster Deployment: Seamless networking across clusters
- Security-focused Environment: Robust network security policies
- High-performance Requirements: Optimized data path
- Service Mesh Integration: Integration with service meshes like Istio
eBPF Technology
eBPF (extended Berkeley Packet Filter) is a technology that allows programs to run safely within the Linux kernel. Cilium uses eBPF to implement networking, security, and observability features.
Key Features of eBPF
- In-kernel Execution: eBPF programs execute directly within the kernel, providing high performance.
- Safety: The verifier checks program safety constraints before loading; this is not a guarantee against kernel bugs or incorrect policy logic.
- Dynamic Loading: eBPF programs can be loaded and unloaded without rebooting the kernel.
- Maps: eBPF maps are used to store data and share data between user space and kernel space.
eBPF Usage in Cilium
Cilium uses eBPF in the following ways:
- Network Data Path: eBPF programs process and route network packets.
- Policy Enforcement: eBPF programs enforce network policies.
- Load Balancing: eBPF programs perform load balancing for services.
- Observability: eBPF programs collect metrics on network flows.
eBPF vs Traditional Networking Approaches
| Feature | eBPF | Traditional Approach (iptables) |
|---|---|---|
| Performance | Very High | Medium |
| Scalability | Very High | Limited |
| Programmability | High | Limited |
| Observability | High | Limited |
| Implementation Complexity | High | Medium |
Cilium Networking Model
Cilium supports various networking models that can be configured to match different environments and requirements.
Overlay Networking
Cilium implements overlay networking by default using VXLAN, but also supports other encapsulation protocols like Geneve.
How it works:
- Packets are created at the source node.
- Cilium encapsulates the packet by wrapping the original packet with encapsulation headers.
- The encapsulated packet is transmitted to the destination node through the physical network.
- At the destination node, Cilium decapsulates the packet to extract the original packet.
- The extracted packet is delivered to the destination container.
Advantages:
- Compatibility with existing network infrastructure
- Network topology independence
- Pod addressing independent of the underlay; connected clusters still need a compatible, non-overlapping address plan
Disadvantages:
- Performance impact due to encapsulation overhead
- Reduced MTU size
- Additional CPU usage
Native Routing
Native routing uses direct routing without encapsulation. In this mode, the underlying network infrastructure must be able to route Pod IP addresses.
How it works:
- Each node advertises the CIDR block of Pods running on that node.
- Routing tables are configured to route each Pod CIDR block to the corresponding node.
- Packets are routed directly to the destination node without encapsulation.
Advantages:
- No encapsulation overhead
- Improved network performance
- Lower CPU usage
Disadvantages:
- Dependency on underlying network infrastructure
- Network topology constraints
- IP address management complexity
Routing Mode Selection
Select encapsulation or native routing explicitly for the deployment. Do not assume that failed native routes automatically fall back to a tunnel; configure routing and any migration according to the chosen Cilium version.
AWS ENI Mode
On AWS EKS, Cilium can leverage AWS Elastic Network Interfaces (ENIs) to assign native VPC IP addresses to Pods.
Key Features:
- Assigns VPC native IP addresses to Pods
- VPC native networking without overlay network
- AWS security groups and network policy integration
- Improved network performance
Cilium Network Policies
Cilium extends Kubernetes network policies to provide fine-grained network security policies at L3-L7 layers.
L3/L4 Policies
Cilium supports standard Kubernetes network policies to define policies based on IP addresses, ports, and protocols.
apiVersion: "cilium.io/v2"
kind: CiliumNetworkPolicy
metadata:
  name: "l3-l4-policy"
spec:
  endpointSelector:
    matchLabels:
      app: myapp
  ingress:
  - fromEndpoints:
    - matchLabels:
        app: frontend
    toPorts:
    - ports:
      - port: "80"
        protocol: TCP
This policy allows ingress traffic on TCP port 80 from Pods with the app: frontend label to Pods with the app: myapp label.
L7 Policies
Cilium supports L7 policies, such as HTTP rules, using a userspace Envoy proxy in conjunction with eBPF. L7 inspection is not performed entirely inside the kernel; check protocol and encryption limitations for the installed version.
apiVersion: "cilium.io/v2"
kind: CiliumNetworkPolicy
metadata:
  name: "l7-policy"
spec:
  endpointSelector:
    matchLabels:
      app: myapp
  ingress:
  - fromEndpoints:
    - matchLabels:
        app: frontend
    toPorts:
    - ports:
      - port: "80"
        protocol: TCP
      rules:
        http:
        - method: "GET"
          path: "/api/v1/products"
This policy allows only HTTP GET requests to the /api/v1/products path from Pods with the app: frontend label to Pods with the app: myapp label.
Cluster-wide Policies
Cilium supports cluster-wide network policies to define policies that apply to all Pods.
apiVersion: "cilium.io/v2"
kind: CiliumClusterwideNetworkPolicy
metadata:
  name: "cluster-wide-policy"
spec:
  endpointSelector:
    matchLabels: {}  # Applies to all Pods
  ingress:
  - fromEndpoints:
    - matchLabels:
        io.kubernetes.pod.namespace: kube-system
This policy allows ingress traffic from Pods in the kube-system namespace to all Pods.
Network Visibility with Hubble
Hubble is Cilium's observability layer that uses eBPF to monitor network flows and troubleshoot issues.
Key Features of Hubble
- Network Flow Monitoring: Monitor Pod-to-Pod communication in real-time.
- Service Dependency Mapping: Visualize service-to-service dependencies.
- Security Observation: Detect network policy violations.
- Performance Analysis: Analyze network latency and throughput.
- Troubleshooting: Diagnose network connectivity issues.
Hubble Architecture
Hubble consists of the following components:
- Hubble Server: Server embedded in the Cilium agent that collects network flow data.
- Hubble Relay: Aggregates data from multiple Hubble Servers.
- Hubble UI: Web interface for visualizing network flows.
- Hubble CLI: Command-line tool for querying network flows.
Hubble Usage Examples
# Install Hubble CLI
curl -L --remote-name-all https://github.com/cilium/hubble/releases/latest/download/hubble-linux-amd64.tar.gz
sudo tar xzvfC hubble-linux-amd64.tar.gz /usr/local/bin
rm hubble-linux-amd64.tar.gz

# Enable Hubble
cilium hubble enable

# Run in a separate terminal and keep it open
cilium hubble port-forward

# Observe network flows
hubble observe

# Observe HTTP requests
hubble observe --protocol http

# Observe network flows for specific Pod
hubble observe --pod default/myapp-pod

# Observe network policy violations
hubble observe --verdict DROPPED
Configuring Cilium on Amazon EKS
There are various ways to configure Cilium on Amazon EKS. Here we'll look at some common configuration methods.
Choose the CNI Mode Before Installation
Use a disposable EKS test cluster and select a Cilium release compatible with its Kubernetes version. Follow the official EKS installation guide; the following are Helm values fragments, not complete installation or migration commands.
For AWS VPC CNI chaining, retain aws-node as IPAM and use:
cni:
  chainingMode: aws-cni
  exclusive: false
enableIPv4Masquerade: false
routingMode: native
Existing Pods must be recreated through a controlled rollout for the new CNI chain to apply. Review chaining feature limitations before enabling L7 policy or kube-proxy replacement.
For Cilium ENI IPAM, Cilium owns ENIs instead of VPC CNI:
eni:
  enabled: true
ipam:
  mode: eni
routingMode: native
This mode requires EC2 API permissions and preventing aws-node from managing the same nodes, following the official migration/install procedure. Do not apply it over a running VPC CNI installation without those steps. EKS Auto Mode and Fargate manage their networking separately.
Validate after installation with cilium status --wait and the connectivity test in the isolated test cluster. Pin the chart version and preserve the reviewed values for upgrades.
Enable Hubble
# Enable Hubble
cilium hubble enable --ui

# Access Hubble UI
kubectl port-forward -n kube-system svc/hubble-ui 12000:80
Cilium Network Policy Example
apiVersion: "cilium.io/v2"
kind: CiliumNetworkPolicy
metadata:
  name: "eks-app-policy"
spec:
  endpointSelector:
    matchLabels:
      app: api
  ingress:
  - fromEndpoints:
    - matchLabels:
        app: frontend
    toPorts:
    - ports:
      - port: "8080"
        protocol: TCP
      rules:
        http:
        - method: "GET"
          path: "/api/v1/.*"
  egress:
  - toEndpoints:
    - matchLabels:
        app: database
    toPorts:
    - ports:
      - port: "3306"
        protocol: TCP
This policy allows only HTTP GET requests to the /api/v1/ path from Pods with the app: frontend label to Pods with the app: api label, and allows egress traffic on TCP port 3306 from Pods with the app: api label to Pods with the app: database label.
Cilium Optimization on EKS
Node Group Configuration:
- Select instance types that provide sufficient ENIs and IP addresses
- Configure appropriate maximum Pod count
Performance Optimization:
- Use direct routing mode
- Enable XDP acceleration
- Enable BBR congestion control algorithm
Monitoring and Logging:
- Enable Hubble
- Prometheus metrics collection
- Integration with CloudWatch
Conclusion
In this chapter, we learned about Kubernetes services and networking. Services provide stable endpoints for a set of Pods, and Ingress routes external traffic to services within the cluster. Network policies control communication between Pods, and service meshes manage service-to-service communication in microservice architectures. We also explored how to implement advanced networking features through CNI and Cilium.
Understanding and utilizing Kubernetes networking features enables you to build secure and scalable applications.
In the next chapter, we'll learn about Kubernetes storage options.
References
- Kubernetes Official Documentation - Services
- Kubernetes Official Documentation - Ingress
- Kubernetes Official Documentation - Network Policies
- Kubernetes Official Documentation - DNS for Services and Pods
- Istio Official Documentation
- Linkerd Official Documentation
- Cilium Official Documentation
- CNI Official Documentation
Quiz
To test what you learned in this chapter, try the Services and Networking Quiz.