Part 3: Creating Clusters with AWS Management Console and CLI
Creating a Cluster Using AWS Management Console
The steps to create an EKS cluster using the AWS Management Console are as follows:
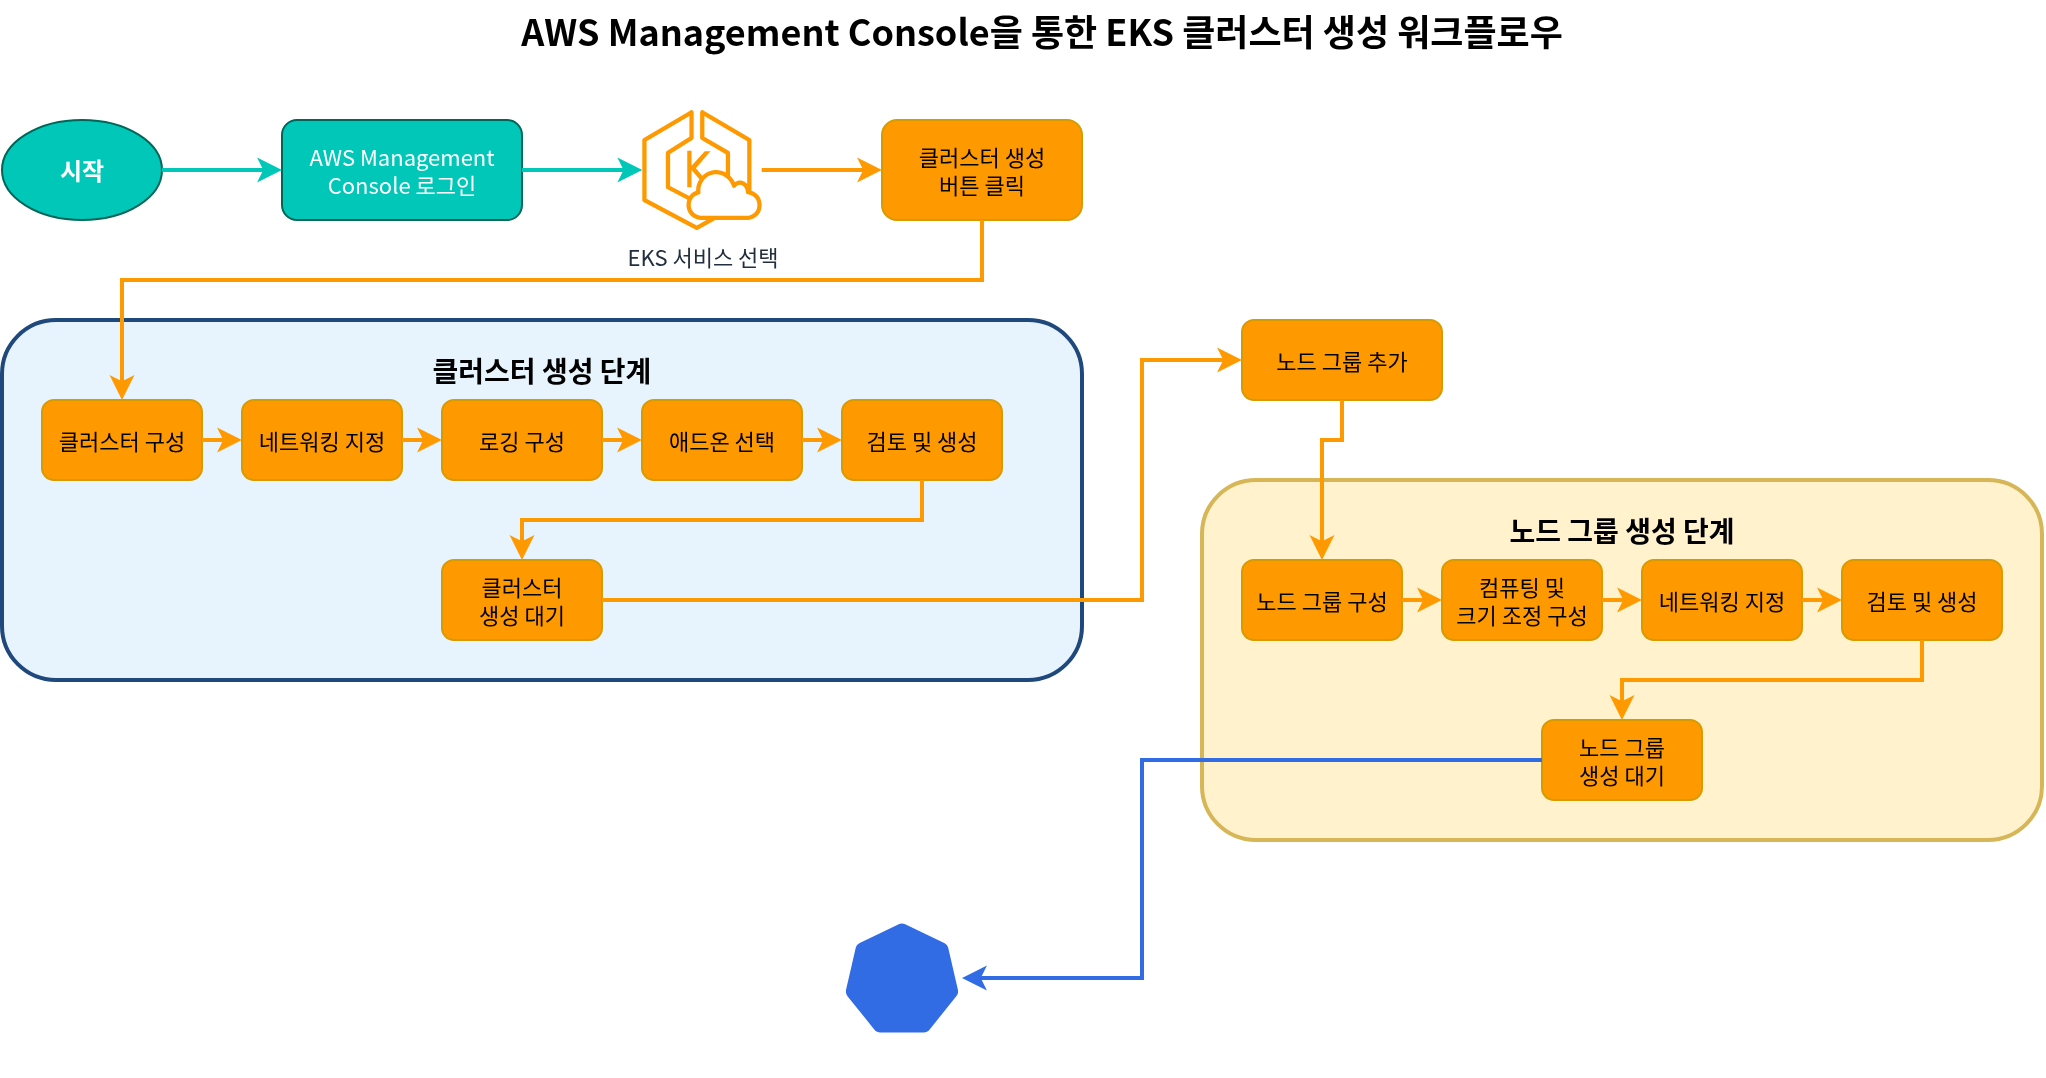
- Log in to the AWS Management Console.
- Search for "EKS" or select "Elastic Kubernetes Service" from the services list.
- On the "Clusters" page, click the "Create cluster" button.
Cluster Configuration
- On the "Configure cluster" page, enter the following information:
- Cluster name: Enter a unique name for the cluster.
- Kubernetes version: Select the Kubernetes version to use.
- Cluster service role: Create a new role or select an existing role.
- Tags: Add tags if needed.
- Click the "Next" button.
Specify Networking
- On the "Specify networking" page, enter the following information:
- VPC: Create a new VPC or select an existing VPC.
- Subnets: Select the subnets to use for the cluster. At least 2 subnets must be in different availability zones.
- Security groups: Select the security groups to use for the cluster.
- Cluster endpoint access: Configure access to the cluster API server endpoint.
- Public: The API server can be accessed from the internet.
- Private: The API server can only be accessed from within the VPC.
- Public and Private: The API server can be accessed from both the internet and within the VPC.
- Click the "Next" button.
Configure Logging
- On the "Configure logging" page, enter the following information:
- Control plane logging: Select the log types to enable.
- API server logs
- Audit logs
- Authenticator logs
- Controller manager logs
- Scheduler logs
- Click the "Next" button.
- Control plane logging: Select the log types to enable.
Select Add-ons
- On the "Select add-ons" page, enter the following information:
- Amazon VPC CNI: CNI plugin for pod networking.
- CoreDNS: DNS service within the cluster.
- kube-proxy: Provides network proxy and load balancing.
- Click the "Next" button.
Review and Create
- On the "Review and create" page, review the configuration and click the "Create" button.
Once cluster creation is complete, you can click the "Add node group" button to add a node group.
Add Node Group
- On the "Node group configuration" page, enter the following information:
- Node group name: Enter a unique name for the node group.
- Node IAM role: Create a new role or select an existing role.
- Click the "Next" button.
- On the "Set compute and scaling configuration" page, enter the following information:
- AMI type: Select the AMI type to use for the nodes.
- Instance type: Select the EC2 instance type to use for the nodes.
- Disk size: Specify the disk size for the nodes.
- Node count: Specify the minimum, maximum, and desired number of nodes.
- Click the "Next" button.
- On the "Specify networking" page, enter the following information:
- Subnets: Select the subnets to use for the node group.
- Remote access configuration: Configure SSH access.
- Click the "Next" button.
- On the "Review and create" page, review the configuration and click the "Create" button.
Creating a Cluster Using AWS CLI
The process of creating an EKS cluster using AWS CLI consists of several steps. This method is useful when more control is needed.
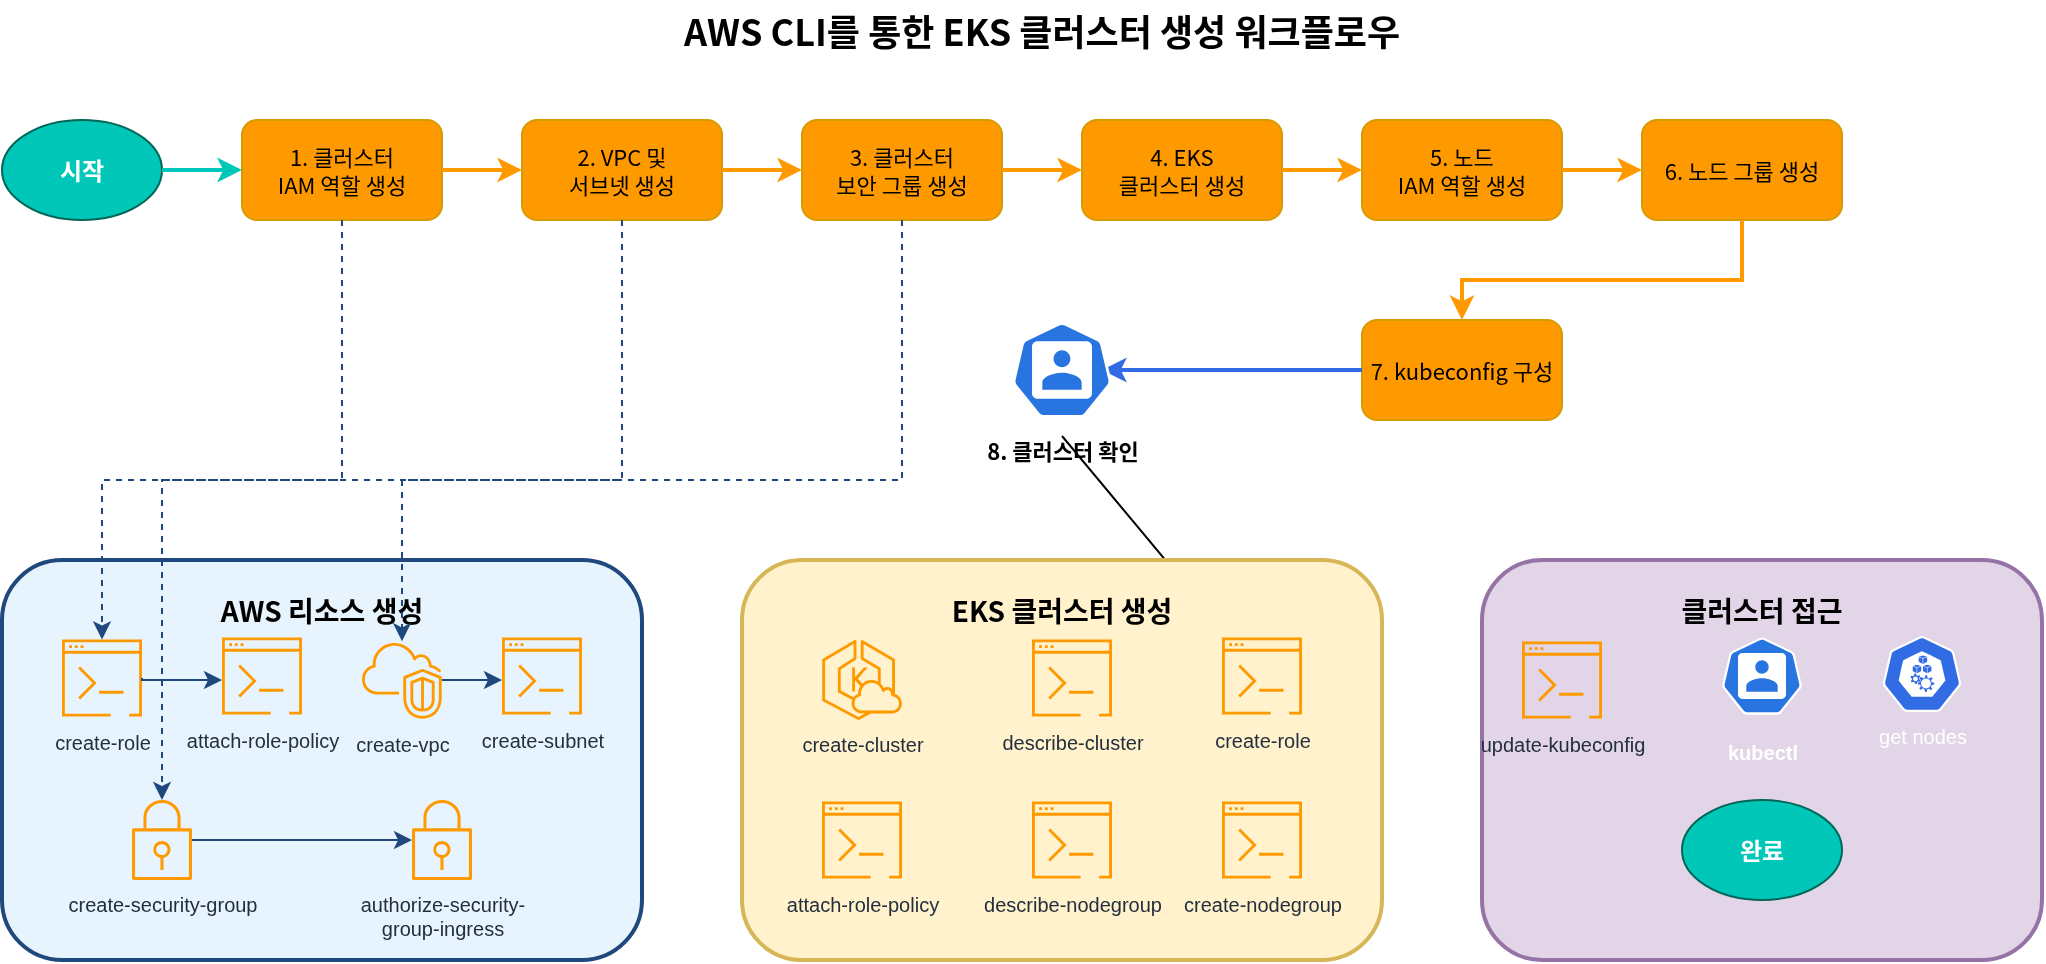
1. Create Cluster IAM Role
An EKS cluster requires an IAM role that allows the Kubernetes control plane to manage AWS resources.
# Create role
aws iam create-role \
  --role-name EKSClusterRole \
  --assume-role-policy-document '{
    "Version": "2012-10-17",
    "Statement": [
      {
        "Effect": "Allow",
        "Principal": {
          "Service": "eks.amazonaws.com"
        },
        "Action": "sts:AssumeRole"
      }
    ]
  }'

# Attach required policy
aws iam attach-role-policy \
  --role-name EKSClusterRole \
  --policy-arn arn:aws:iam::aws:policy/AmazonEKSClusterPolicy
2. Create VPC and Subnets
An EKS cluster requires a VPC and subnets. You can use an existing VPC or create a new one.
# Create VPC
aws ec2 create-vpc \
  --cidr-block 10.0.0.0/16 \
  --tag-specifications 'ResourceType=vpc,Tags=[{Key=Name,Value=EKS-VPC}]' \
  --query Vpc.VpcId \
  --output text

# Create subnets
aws ec2 create-subnet \
  --vpc-id vpc-xxxxxxxxxxxxxxxxx \
  --cidr-block 10.0.1.0/24 \
  --availability-zone us-west-2a \
  --tag-specifications 'ResourceType=subnet,Tags=[{Key=Name,Value=EKS-Subnet-1}]' \
  --query Subnet.SubnetId \
  --output text

aws ec2 create-subnet \
  --vpc-id vpc-xxxxxxxxxxxxxxxxx \
  --cidr-block 10.0.2.0/24 \
  --availability-zone us-west-2b \
  --tag-specifications 'ResourceType=subnet,Tags=[{Key=Name,Value=EKS-Subnet-2}]' \
  --query Subnet.SubnetId \
  --output text
3. Create Cluster Security Group
An EKS cluster requires a security group.
# Create security group
aws ec2 create-security-group \
  --group-name EKS-Cluster-SG \
  --description "Security group for EKS cluster" \
  --vpc-id vpc-xxxxxxxxxxxxxxxxx \
  --query GroupId \
  --output text

# Add inbound rule
aws ec2 authorize-security-group-ingress \
  --group-id sg-xxxxxxxxxxxxxxxxx \
  --protocol tcp \
  --port 443 \
  --cidr 0.0.0.0/0
4. Create EKS Cluster
Now you can create the EKS cluster.
aws eks create-cluster \
  --name my-cluster \
  --role-arn arn:aws:iam::123456789012:role/EKSClusterRole \
  --resources-vpc-config subnetIds=subnet-xxxxxxxxxxxxxxxxx,subnet-yyyyyyyyyyyyyyyyy,securityGroupIds=sg-zzzzzzzzzzzzzzzzz \
  --kubernetes-version 1.26
Wait for cluster creation to complete. To check the cluster status, run the following command:
aws eks describe-cluster \
  --name my-cluster \
  --query "cluster.status"
5. Create Node IAM Role
EKS nodes require an IAM role to access AWS resources.
# Create role
aws iam create-role \
  --role-name EKSNodeRole \
  --assume-role-policy-document '{
    "Version": "2012-10-17",
    "Statement": [
      {
        "Effect": "Allow",
        "Principal": {
          "Service": "ec2.amazonaws.com"
        },
        "Action": "sts:AssumeRole"
      }
    ]
  }'

# Attach required policies
aws iam attach-role-policy \
  --role-name EKSNodeRole \
  --policy-arn arn:aws:iam::aws:policy/AmazonEKSWorkerNodePolicy

aws iam attach-role-policy \
  --role-name EKSNodeRole \
  --policy-arn arn:aws:iam::aws:policy/AmazonEKS_CNI_Policy

aws iam attach-role-policy \
  --role-name EKSNodeRole \
  --policy-arn arn:aws:iam::aws:policy/AmazonEC2ContainerRegistryReadOnly
6. Create Node Group
Now you can create the node group.
aws eks create-nodegroup \
  --cluster-name my-cluster \
  --nodegroup-name my-nodegroup \
  --node-role arn:aws:iam::123456789012:role/EKSNodeRole \
  --subnets subnet-xxxxxxxxxxxxxxxxx subnet-yyyyyyyyyyyyyyyyy \
  --disk-size 80 \
  --scaling-config minSize=1,maxSize=3,desiredSize=2 \
  --instance-types m5.large
Wait for node group creation to complete. To check the node group status, run the following command:
aws eks describe-nodegroup \
  --cluster-name my-cluster \
  --nodegroup-name my-nodegroup \
  --query "nodegroup.status"
7. Configure kubeconfig
You need to configure the kubeconfig file to access the cluster.
aws eks update-kubeconfig \
  --name my-cluster \
  --region us-west-2
8. Verify Cluster
Verify that the cluster is configured correctly.
kubectl get nodesQuiz
To test what you learned in this chapter, try the EKS Cluster Creation - Part 3 Quiz.