パート 8: EKS 統合
サポート対象バージョン: Calico v3.29+ / Kubernetes 1.28+ / EKS 1.28+ 最終更新: February 23, 2026
概要
この章では、アーキテクチャパターン、インストール方法、EKS 固有の最適化を含む、Amazon EKS との Calico 統合について扱います。最適な EKS ネットワーキングのために、AWS VPC CNI と併用して Calico の NetworkPolicy 機能を活用する方法を学びます。
VPC CNI + Calico アーキテクチャ
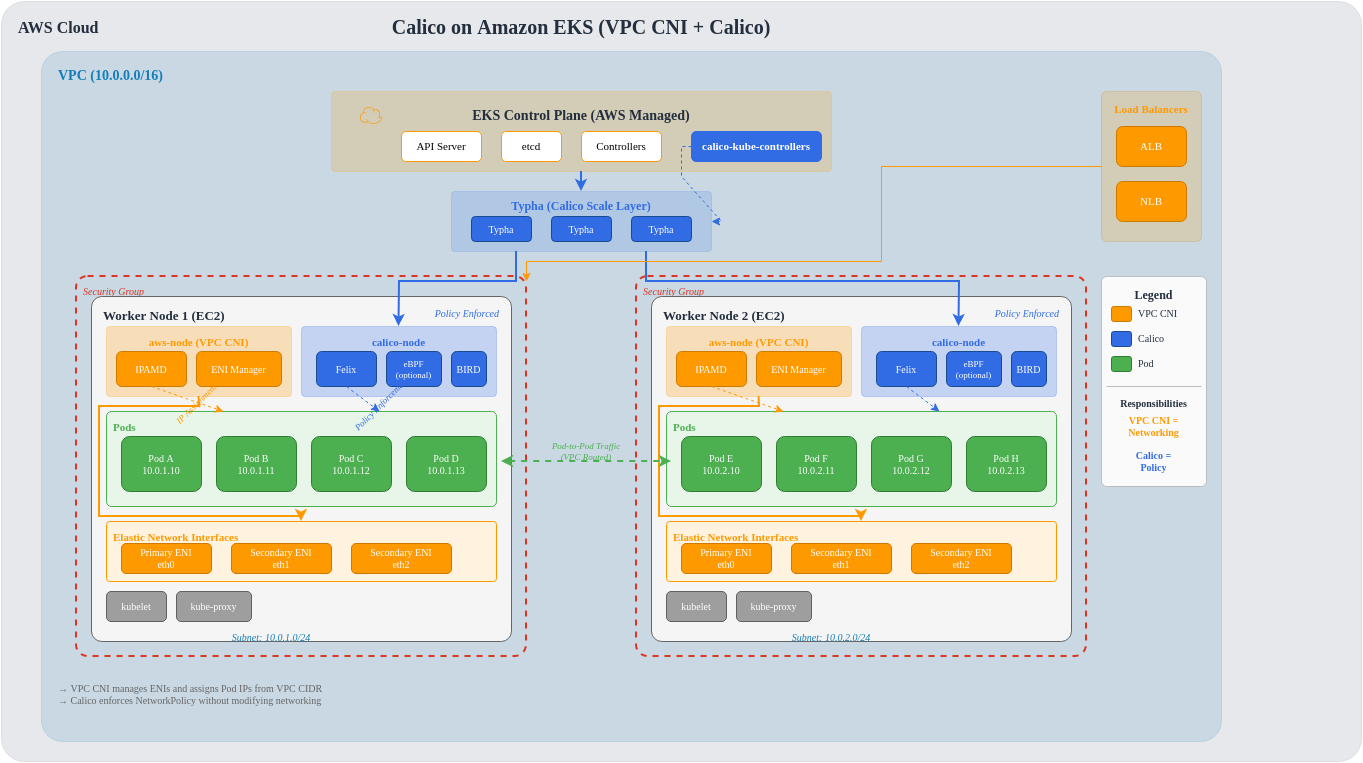
Amazon EKS は、デフォルトで Pod ネットワーキングに AWS VPC CNI を使用します。VPC CNI が IP アドレス管理を処理する一方で、高度な NetworkPolicy 機能のために Calico を追加できます。
アーキテクチャの詳細
VPC CNI + Calico のトラフィックフロー
インストール方法の比較
方法の概要
| 方法 | 複雑さ | 柔軟性 | アップグレードパス | EKS 統合 |
|---|---|---|---|---|
| EKS Add-on | 低 | 制限あり | 自動 | ネイティブ |
| Tigera Operator | 中 | 高 | 半自動 | 良好 |
| Helm | 中 | 最高 | 手動 | 良好 |
| Manifest | 高 | 中 | 手動 | 基本的 |
方法 1: EKS Add-on(最も簡単)
EKS Add-on は、EKS ライフサイクル管理とのネイティブ統合を提供します。
bash
# Enable via AWS CLI
aws eks create-addon \
  --cluster-name my-cluster \
  --addon-name vpc-cni \
  --addon-version v1.18.0-eksbuild.1 \
  --configuration-values '{"enableNetworkPolicy": "true"}'

# Or enable Calico as separate add-on (if available)
aws eks create-addon \
  --cluster-name my-cluster \
  --addon-name calico \
  --service-account-role-arn arn:aws:iam::ACCOUNT:role/CalicoRole
yaml
# eksctl configuration
apiVersion: eksctl.io/v1alpha5
kind: ClusterConfig
metadata:
  name: my-cluster
  region: us-east-1
  version: "1.30"

addons:
  - name: vpc-cni
    version: latest
    configurationValues: |
      enableNetworkPolicy: "true"
      nodeAgent:
        enablePolicyEventLogs: "true"
利点:
- EKS による自動更新
- AWS サポートが含まれる
- シンプルな設定
- ネイティブな CloudWatch 統合
欠点:
- Kubernetes NetworkPolicy に限定される
- Calico 固有の機能がない
- 設定の柔軟性が低い
方法 2: Tigera Operator(推奨)
bash
# Install Tigera Operator
kubectl create -f https://raw.githubusercontent.com/projectcalico/calico/v3.29.0/manifests/tigera-operator.yaml
yaml
# Installation resource for EKS
apiVersion: operator.tigera.io/v1
kind: Installation
metadata:
  name: default
spec:
  # Specify EKS as the Kubernetes provider
  kubernetesProvider: EKS

  # Use VPC CNI for networking
  cni:
    type: AmazonVPC

  calicoNetwork:
    # Disable Calico networking (using VPC CNI)
    bgp: Disabled

    # No IP pools needed (VPC CNI handles IPAM)
    ipPools: []

    # Linux dataplane
    linuxDataplane: Iptables  # or BPF for eBPF mode

  # Component resources
  componentResources:
    - componentName: Node
      resourceRequirements:
        requests:
          cpu: 100m
          memory: 128Mi
        limits:
          cpu: 500m
          memory: 256Mi

  # Enable Typha for clusters > 50 nodes
  typhaDeployment:
    spec:
      replicas: 3
bash
# Apply installation
kubectl apply -f installation.yaml

# Verify installation
kubectl get tigerastatus
kubectl get pods -n calico-system
利点:
- 完全な Calico 機能(GlobalNetworkPolicy、Tiers など)
- Operator がライフサイクルを管理
- 自動コンポーネント照合
- eBPF dataplane のサポート
欠点:
- 追加の Operator デプロイメントが必要
- EKS とは別にアップグレードが必要
方法 3: Helm インストール
bash
# Add Tigera Helm repository
helm repo add projectcalico https://docs.tigera.io/calico/charts
helm repo update

# Install with EKS-specific values
helm install calico projectcalico/tigera-operator \
  --namespace tigera-operator \
  --create-namespace \
  --version v3.29.0 \
  -f eks-values.yaml
yaml
# eks-values.yaml
installation:
  kubernetesProvider: EKS
  cni:
    type: AmazonVPC
  calicoNetwork:
    bgp: Disabled
    linuxDataplane: Iptables

  # Node configuration
  nodeUpdateStrategy:
    rollingUpdate:
      maxUnavailable: 1
    type: RollingUpdate

# Typha configuration
typhaDeployment:
  replicas: 3
  resources:
    requests:
      cpu: 100m
      memory: 128Mi
    limits:
      cpu: 500m
      memory: 256Mi

# Felix configuration via operator
felixConfiguration:
  prometheusMetricsEnabled: true
  prometheusMetricsPort: 9091
  flowLogsFlushInterval: "15s"
  flowLogsFileEnabled: true

# API server (for calicoctl access)
apiServer:
  enabled: false  # Set to true for Calico Enterprise
利点:
- GitOps に適している
- 設定をバージョン管理できる
- 簡単にロールバックできる
- 値をカスタマイズ可能
欠点:
- Helm の知識が必要
- 手動のアップグレード管理が必要
EKS Network Policy Controller(v1.14+)
EKS 1.25+ には、VPC CNI を介したネイティブな Network Policy サポートが含まれています。
ネイティブ Network Policy の有効化
yaml
# eksctl configuration
apiVersion: eksctl.io/v1alpha5
kind: ClusterConfig
metadata:
  name: network-policy-cluster
  region: us-east-1
  version: "1.30"

addons:
  - name: vpc-cni
    version: latest
    configurationValues: |
      enableNetworkPolicy: "true"
      nodeAgent:
        enablePolicyEventLogs: "true"
        enableCloudWatchLogs: "true"
bash
# Enable via kubectl
kubectl set env daemonset aws-node -n kube-system ENABLE_NETWORK_POLICY=true

# Verify network policy agent
kubectl get pods -n kube-system -l k8s-app=aws-node
kubectl logs -n kube-system -l k8s-app=aws-node -c aws-network-policy-agent
EKS ネイティブと Calico Network Policy の比較
| 機能 | EKS ネイティブ(VPC CNI) | Calico |
|---|---|---|
| Kubernetes NetworkPolicy | はい | はい |
| GlobalNetworkPolicy | いいえ | はい |
| Policy Tiers | いいえ | はい |
| L7 Policy(HTTP) | いいえ | はい(Enterprise) |
| DNS ベースの Policy | いいえ | はい |
| FQDN Egress Rules | いいえ | はい |
| Host Endpoint Policy | いいえ | はい |
| Policy Preview | いいえ | はい(Enterprise) |
| Flow Logs | CloudWatch | Prometheus/File |
| パフォーマンス | eBPF 最適化済み | iptables/eBPF |
Node タイプに関する考慮事項
Node タイプ別の機能マトリクス
| 機能 | Managed Nodes | Self-Managed | Fargate |
|---|---|---|---|
| Calico CNI | いいえ(VPC CNI) | はい | いいえ |
| Calico Policy | はい | はい | 制限あり |
| eBPF Dataplane | はい | はい | いいえ |
| BGP | いいえ | はい | いいえ |
| WireGuard | はい | はい | いいえ |
| Host Endpoints | はい | はい | いいえ |
| Custom IPAM | いいえ | はい | いいえ |
| Node Taints | はい | はい | N/A |
Managed Node Groups
yaml
# eksctl with managed nodes and Calico
apiVersion: eksctl.io/v1alpha5
kind: ClusterConfig
metadata:
  name: managed-calico-cluster
  region: us-east-1
  version: "1.30"

managedNodeGroups:
  - name: calico-nodes
    instanceType: m5.large
    desiredCapacity: 3
    minSize: 2
    maxSize: 10
    volumeSize: 100
    volumeType: gp3

    # Labels for Calico node selector
    labels:
      calico-enabled: "true"

    # IAM policies for Calico
    iam:
      withAddonPolicies:
        cloudWatch: true

    # Taints (optional)
    taints:
      - key: calico
        value: "true"
        effect: NoSchedule
Self-Managed Nodes(完全な Calico)
yaml
# Self-managed nodes with full Calico networking
apiVersion: eksctl.io/v1alpha5
kind: ClusterConfig
metadata:
  name: self-managed-calico
  region: us-east-1
  version: "1.30"

# Disable VPC CNI for self-managed nodes
addons:
  - name: vpc-cni
    version: latest
    configurationValues: |
      enableNetworkPolicy: "false"

nodeGroups:
  - name: calico-full-nodes
    instanceType: m5.xlarge
    desiredCapacity: 3

    # Custom AMI with Calico pre-installed (optional)
    ami: ami-0123456789abcdef0

    # Disable VPC CNI on these nodes
    overrideBootstrapCommand: |
      #!/bin/bash
      # Remove VPC CNI
      /etc/eks/bootstrap.sh my-cluster \
        --kubelet-extra-args '--network-plugin=cni'

    labels:
      networking: calico-full

# Then install full Calico CNI on these nodes
Fargate に関する考慮事項
yaml
# Fargate profile with limited Calico support
apiVersion: eksctl.io/v1alpha5
kind: ClusterConfig
metadata:
  name: fargate-cluster
  region: us-east-1

fargateProfiles:
  - name: default
    selectors:
      - namespace: default
      - namespace: production
    # Note: Only Kubernetes NetworkPolicy works on Fargate
    # Calico GlobalNetworkPolicy does NOT apply to Fargate pods
Fargate の制限事項:
- Kubernetes 標準 NetworkPolicy のみ
- Calico GlobalNetworkPolicy は利用不可
- eBPF dataplane は利用不可
- Host endpoint policy は利用不可
- Custom IPAM は利用不可
IRSA 設定
IAM Roles for Service Accounts(IRSA)は、Calico コンポーネントにきめ細かな IAM 権限を提供します。
yaml
# Create IAM policy for Calico
# calico-policy.json
{
  "Version": "2012-10-17",
  "Statement": [
    {
      "Effect": "Allow",
      "Action": [
        "logs:CreateLogGroup",
        "logs:CreateLogStream",
        "logs:PutLogEvents",
        "logs:DescribeLogGroups",
        "logs:DescribeLogStreams"
      ],
      "Resource": "arn:aws:logs:*:*:log-group:/aws/calico/*"
    },
    {
      "Effect": "Allow",
      "Action": [
        "ec2:DescribeInstances",
        "ec2:DescribeNetworkInterfaces",
        "ec2:DescribeSecurityGroups",
        "ec2:DescribeSubnets",
        "ec2:DescribeVpcs"
      ],
      "Resource": "*"
    }
  ]
}
bash
# Create IAM policy
aws iam create-policy \
  --policy-name CalicoPolicy \
  --policy-document file://calico-policy.json

# Create IRSA for Calico
eksctl create iamserviceaccount \
  --cluster my-cluster \
  --namespace calico-system \
  --name calico-node \
  --attach-policy-arn arn:aws:iam::ACCOUNT:policy/CalicoPolicy \
  --approve
yaml
# Calico installation with IRSA
apiVersion: operator.tigera.io/v1
kind: Installation
metadata:
  name: default
spec:
  kubernetesProvider: EKS
  cni:
    type: AmazonVPC

  # Reference the IRSA service account
  nodeMetadata: "true"

  calicoNetwork:
    bgp: Disabled
Security Group と Calico Policy
比較
| 項目 | Security Groups | Calico Policy |
|---|---|---|
| スコープ | Instance/ENI | Pod/Namespace/Cluster |
| 粒度 | IP/Port | Labels/Selectors/FQDN |
| レイヤー | L3-L4 | L3-L7 |
| Pod の選択 | Instance 単位 | Labels 単位 |
| 動的な更新 | 制限あり | リアルタイム |
| 監査 | CloudTrail | Flow Logs |
| Cross-AZ | はい | はい |
| コスト | 無料 | 無料(OSS) |
両方を併用する
yaml
# Security Group for node-level protection
# (Managed via AWS Console or Terraform)

# Calico for pod-level protection
apiVersion: projectcalico.org/v3
kind: NetworkPolicy
metadata:
  name: frontend-policy
  namespace: production
spec:
  selector: app == 'frontend'
  ingress:
    - action: Allow
      source:
        selector: app == 'load-balancer'
      protocol: TCP
      destination:
        ports:
          - 80
          - 443
  egress:
    - action: Allow
      destination:
        selector: app == 'backend'
      protocol: TCP
      destination:
        ports:
          - 8080
---
# Security Groups for Pods (EKS feature)
apiVersion: vpcresources.k8s.aws/v1beta1
kind: SecurityGroupPolicy
metadata:
  name: frontend-sg
  namespace: production
spec:
  podSelector:
    matchLabels:
      app: frontend
  securityGroups:
    groupIds:
      - sg-0123456789abcdef0
EKS アップグレードに関する考慮事項
互換性マトリクス
| EKS バージョン | Calico 3.26 | Calico 3.27 | Calico 3.28 | Calico 3.29 |
|---|---|---|---|---|
| 1.27 | はい | はい | はい | はい |
| 1.28 | はい | はい | はい | はい |
| 1.29 | 制限あり | はい | はい | はい |
| 1.30 | いいえ | はい | はい | はい |
| 1.31 | いいえ | 制限あり | はい | はい |
アップグレード手順
bash
# 1. Check current versions
kubectl get pods -n calico-system -o jsonpath='{.items[*].spec.containers[*].image}'
aws eks describe-cluster --name my-cluster --query 'cluster.version'

# 2. Review release notes for compatibility
# https://docs.tigera.io/calico/latest/release-notes/

# 3. Upgrade Calico first (before EKS)
helm upgrade calico projectcalico/tigera-operator \
  --namespace tigera-operator \
  --version v3.29.0 \
  -f eks-values.yaml

# 4. Verify Calico health
kubectl get tigerastatus
calicoctl node status

# 5. Upgrade EKS control plane
aws eks update-cluster-version \
  --name my-cluster \
  --kubernetes-version 1.30

# 6. Upgrade node groups
eksctl upgrade nodegroup \
  --cluster my-cluster \
  --name calico-nodes \
  --kubernetes-version 1.30
コストに関する考慮事項
コスト要因
| コンポーネント | コスト要因 | 最適化 |
|---|---|---|
| VPC CNI IPs | ENI のアタッチ、IP 割り当て | prefix delegation を使用 |
| Calico Typha | Instance リソース | レプリカを適正化 |
| Flow Logs | ストレージ、処理 | 集約、フィルタリング |
| Cross-AZ | データ転送 | Zone affinity |
| eBPF | CPU 効率 | サポートされる場所で有効化 |
コスト最適化戦略
yaml
# 1. Enable VPC CNI prefix delegation (reduce ENI usage)
apiVersion: v1
kind: ConfigMap
metadata:
  name: amazon-vpc-cni
  namespace: kube-system
data:
  enable-prefix-delegation: "true"
  warm-prefix-target: "1"
---
# 2. Optimize Calico resource allocation
apiVersion: operator.tigera.io/v1
kind: Installation
metadata:
  name: default
spec:
  componentResources:
    - componentName: Node
      resourceRequirements:
        requests:
          cpu: 50m  # Start low, scale as needed
          memory: 64Mi
        limits:
          cpu: 200m
          memory: 128Mi
---
# 3. Reduce flow log storage
apiVersion: projectcalico.org/v3
kind: FelixConfiguration
metadata:
  name: default
spec:
  flowLogsFlushInterval: "60s"  # Less frequent
  flowLogsFileAggregationKindForAllowed: 2  # Aggregate allowed flows
EKS パフォーマンス最適化
Prefix Delegation
yaml
# Enable prefix delegation for better IP density
apiVersion: v1
kind: ConfigMap
metadata:
  name: amazon-vpc-cni
  namespace: kube-system
data:
  enable-prefix-delegation: "true"
  warm-prefix-target: "1"
  minimum-ip-target: "16"
  warm-ip-target: "4"
EKS 上の eBPF
yaml
# Enable eBPF dataplane on EKS
apiVersion: operator.tigera.io/v1
kind: Installation
metadata:
  name: default
spec:
  kubernetesProvider: EKS
  cni:
    type: AmazonVPC
  calicoNetwork:
    bgp: Disabled
    linuxDataplane: BPF
---
apiVersion: projectcalico.org/v3
kind: FelixConfiguration
metadata:
  name: default
spec:
  bpfEnabled: true
  bpfExternalServiceMode: "Tunnel"  # or "DSR" for direct server return
  bpfKubeProxyIptablesCleanupEnabled: false  # Keep kube-proxy on EKS
  bpfDataIfacePattern: "^(eth.*)"
注: EKS では、VPC CNI 統合で必要となるため、eBPF モードでも kube-proxy を実行したままにしてください。
完全な eksctl 設定
yaml
# Full EKS cluster with Calico - production-ready
apiVersion: eksctl.io/v1alpha5
kind: ClusterConfig

metadata:
  name: production-calico-cluster
  region: us-east-1
  version: "1.30"
  tags:
    environment: production
    networking: calico

# IAM configuration
iam:
  withOIDC: true
  serviceAccounts:
    - metadata:
        name: calico-node
        namespace: calico-system
      wellKnownPolicies:
        cloudWatch: true
      attachPolicy:
        Version: "2012-10-17"
        Statement:
          - Effect: Allow
            Action:
              - "ec2:DescribeInstances"
              - "ec2:DescribeNetworkInterfaces"
            Resource: "*"

# VPC configuration
vpc:
  cidr: 10.0.0.0/16
  nat:
    gateway: HighlyAvailable
  clusterEndpoints:
    publicAccess: true
    privateAccess: true

# Add-ons
addons:
  - name: vpc-cni
    version: latest
    configurationValues: |
      enableNetworkPolicy: "false"
      env:
        ENABLE_PREFIX_DELEGATION: "true"
        WARM_PREFIX_TARGET: "1"
  - name: coredns
    version: latest
  - name: kube-proxy
    version: latest

# Managed node groups
managedNodeGroups:
  - name: system-nodes
    instanceType: m5.large
    desiredCapacity: 3
    minSize: 3
    maxSize: 6
    volumeSize: 100
    volumeType: gp3
    labels:
      role: system
      calico: "true"
    taints:
      - key: CriticalAddonsOnly
        effect: NoSchedule
    iam:
      withAddonPolicies:
        cloudWatch: true
    availabilityZones:
      - us-east-1a
      - us-east-1b
      - us-east-1c

  - name: workload-nodes
    instanceType: m5.xlarge
    desiredCapacity: 6
    minSize: 3
    maxSize: 20
    volumeSize: 200
    volumeType: gp3
    labels:
      role: workload
      calico: "true"
    iam:
      withAddonPolicies:
        cloudWatch: true
        autoScaler: true
    availabilityZones:
      - us-east-1a
      - us-east-1b
      - us-east-1c

# Logging
cloudWatch:
  clusterLogging:
    enableTypes:
      - api
      - audit
      - authenticator
      - controllerManager
      - scheduler
Helm インストールの手順
bash
# Step 1: Create EKS cluster
eksctl create cluster -f cluster-config.yaml

# Step 2: Verify cluster
kubectl get nodes
aws eks describe-cluster --name production-calico-cluster

# Step 3: Add Tigera Helm repo
helm repo add projectcalico https://docs.tigera.io/calico/charts
helm repo update

# Step 4: Create namespace
kubectl create namespace tigera-operator

# Step 5: Create values file
cat > calico-values.yaml << 'EOF'
installation:
  kubernetesProvider: EKS
  cni:
    type: AmazonVPC
  calicoNetwork:
    bgp: Disabled
    linuxDataplane: Iptables
  nodeUpdateStrategy:
    rollingUpdate:
      maxUnavailable: 1
    type: RollingUpdate
  componentResources:
    - componentName: Node
      resourceRequirements:
        requests:
          cpu: 100m
          memory: 128Mi
        limits:
          cpu: 500m
          memory: 256Mi
    - componentName: Typha
      resourceRequirements:
        requests:
          cpu: 100m
          memory: 128Mi
        limits:
          cpu: 500m
          memory: 256Mi

typhaDeployment:
  replicas: 3

apiServer:
  enabled: false
EOF

# Step 6: Install Calico
helm install calico projectcalico/tigera-operator \
  --namespace tigera-operator \
  --version v3.29.0 \
  -f calico-values.yaml

# Step 7: Wait for installation
kubectl wait --for=condition=Available deployment/calico-typha \
  -n calico-system --timeout=300s

# Step 8: Verify installation
kubectl get pods -n calico-system
kubectl get tigerastatus

# Step 9: Install calicoctl
curl -L https://github.com/projectcalico/calico/releases/download/v3.29.0/calicoctl-linux-amd64 -o calicoctl
chmod +x calicoctl
sudo mv calicoctl /usr/local/bin/

# Step 10: Configure calicoctl
export DATASTORE_TYPE=kubernetes
export KUBECONFIG=~/.kube/config

# Step 11: Verify connectivity
calicoctl node status
calicoctl get nodes -o wide

# Step 12: Apply default deny policy (optional)
kubectl apply -f - << 'EOF'
apiVersion: projectcalico.org/v3
kind: GlobalNetworkPolicy
metadata:
  name: default-deny
spec:
  selector: all()
  types:
    - Ingress
    - Egress
EOF

echo "Calico installation complete!"
参考資料
クイズ
この章で学んだ内容を確認するには、EKS 統合クイズに挑戦してください。