第 2 部分:Storage Classes
本文档是 Amazon EKS 存储系列的第二部分,涵盖 FSx for Lustre、Amazon S3、snapshot、volume expansion 和性能优化。
目录
- Amazon FSx for Lustre
- Amazon S3 存储集成
- Snapshots 和 Backups
- Volume Expansion 和 Resizing
- Volume Cloning
- Multi-Attach EBS
- Mountpoint for S3 CSI 深入解析
- 存储性能优化
Amazon FSx for Lustre
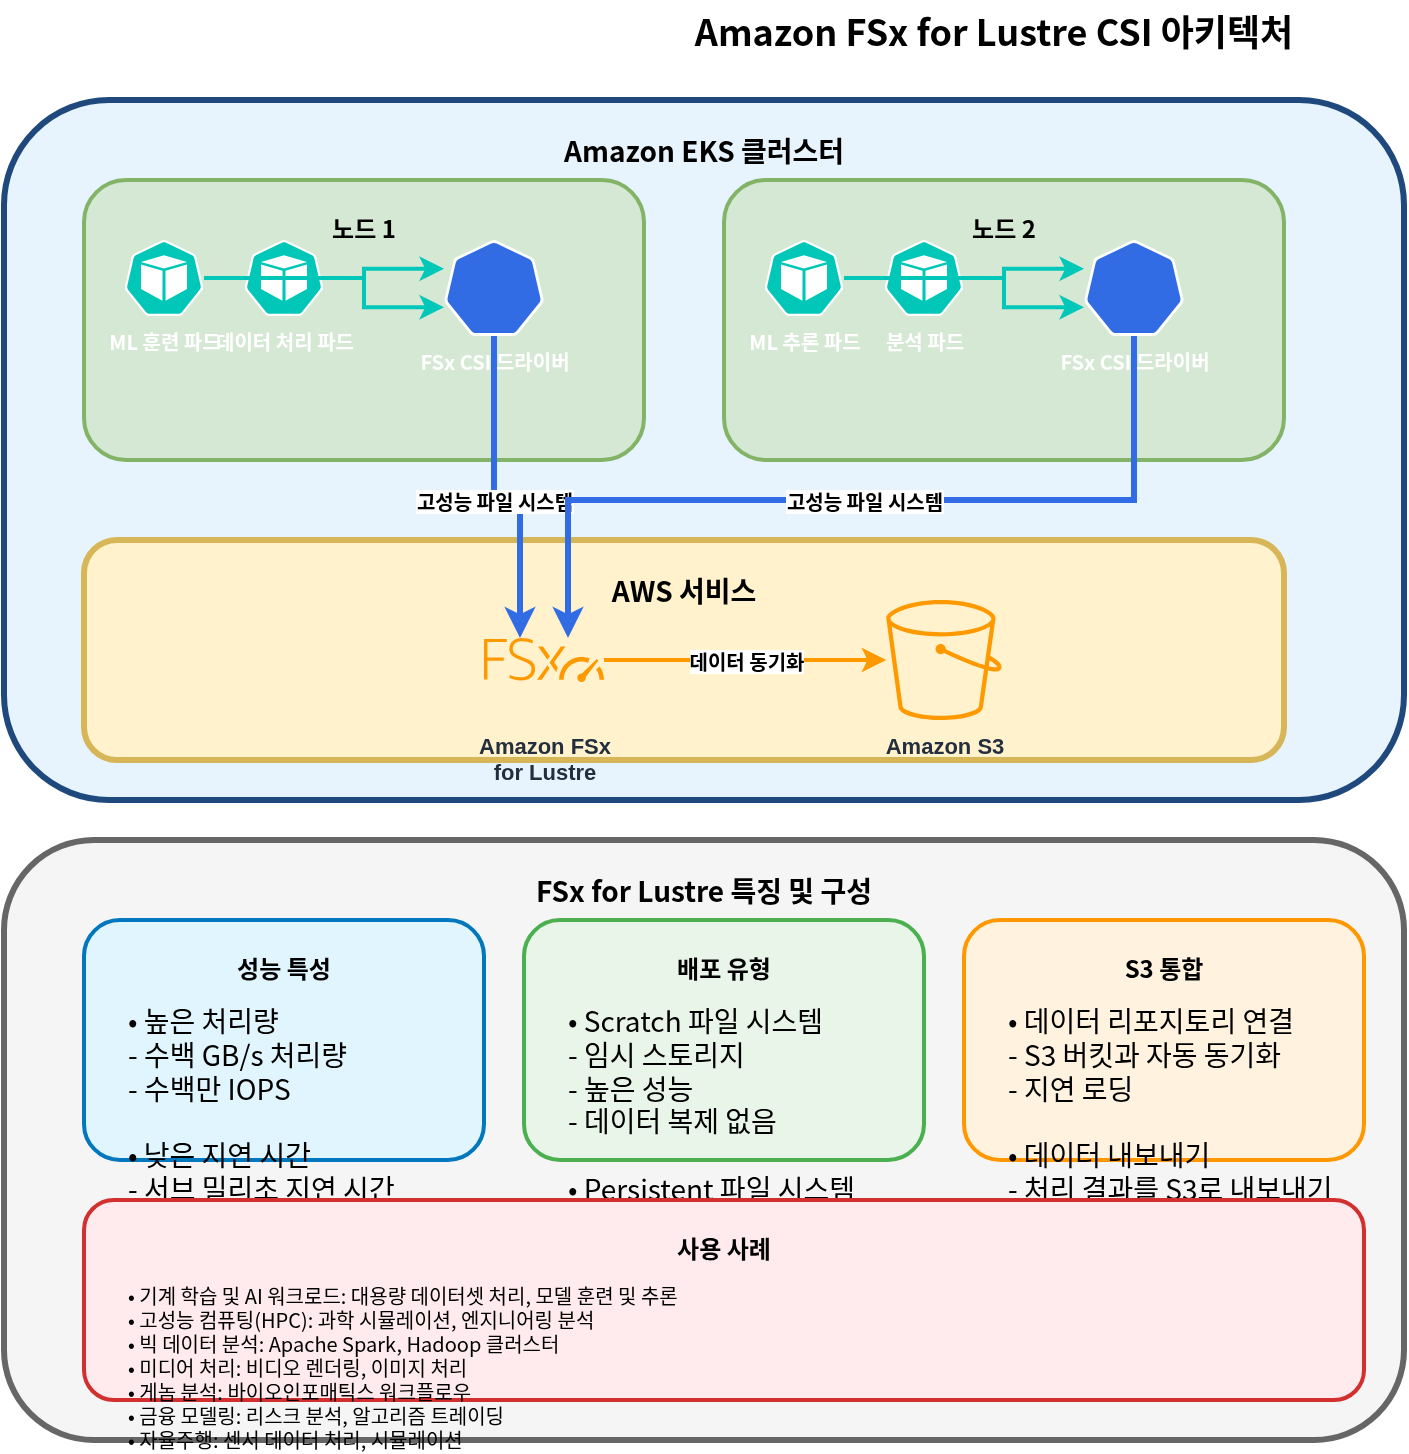
Amazon FSx for Lustre 是一种面向计算密集型工作负载的高性能 file system,例如高性能计算 (HPC)、machine learning 和 big data processing。Lustre 是一种并行分布式 file system,可提供高吞吐量和低延迟,并支持数千个客户端同时访问。
安装 FSx for Lustre CSI Driver
按照以下步骤安装 FSx for Lustre CSI driver:
- 创建 IAM role:
eksctl create iamserviceaccount \
  --name fsx-csi-controller-sa \
  --namespace kube-system \
  --cluster my-cluster \
  --attach-policy-arn arn:aws:iam::aws:policy/AmazonFSxFullAccess \
  --approve \
  --role-only \
--role-name AmazonEKS_FSx_Lustre_CSI_DriverRole- 使用 Helm 安装 driver:
helm repo add aws-fsx-csi-driver https://kubernetes-sigs.github.io/aws-fsx-csi-driver/
helm repo update
helm upgrade -i aws-fsx-csi-driver aws-fsx-csi-driver/aws-fsx-csi-driver \
  --namespace kube-system \
  --set controller.serviceAccount.create=false \
  --set controller.serviceAccount.name=fsx-csi-controller-sa
创建 FSx for Lustre File System
你可以使用 AWS CLI 创建 FSx for Lustre file system:
# Get VPC ID and subnet ID of EKS cluster
VPC_ID=$(aws eks describe-cluster \
  --name my-cluster \
  --query "cluster.resourcesVpcConfig.vpcId" \
  --output text)

SUBNET_ID=$(aws ec2 describe-subnets \
  --filters "Name=vpc-id,Values=$VPC_ID" \
  --query "Subnets[0].SubnetId" \
  --output text)

# Create security group
SECURITY_GROUP_ID=$(aws ec2 create-security-group \
  --group-name FsxLustreSecurityGroup \
  --description "Security group for FSx Lustre file system" \
  --vpc-id $VPC_ID \
  --output text)

# Allow Lustre traffic
aws ec2 authorize-security-group-ingress \
  --group-id $SECURITY_GROUP_ID \
  --protocol tcp \
  --port 988 \
  --cidr $VPC_CIDR

# Create FSx for Lustre file system
FILE_SYSTEM_ID=$(aws fsx create-file-system \
  --file-system-type LUSTRE \
  --storage-capacity 1200 \
  --subnet-ids $SUBNET_ID \
  --lustre-configuration DeploymentType=SCRATCH_2,PerUnitStorageThroughput=125 \
  --security-group-ids $SECURITY_GROUP_ID \
  --tags Key=Name,Value=MyLustreFileSystem \
  --query "FileSystem.FileSystemId" \
  --output text)
创建 FSx for Lustre Storage Class
创建一个使用 FSx for Lustre 的 storage class:
apiVersion: storage.k8s.io/v1
kind: StorageClass
metadata:
  name: fsx-lustre-sc
provisioner: fsx.csi.aws.com
parameters:
  deploymentType: SCRATCH_2
  storageCapacity: "1200"
  perUnitStorageThroughput: "125"
  automaticBackupRetentionDays: "0"
  dailyAutomaticBackupStartTime: "00:00"
  copyTagsToBackups: "false"
  dataCompressionType: "NONE"
  driveCacheType: "NONE"
  storageType: "SSD"
  mountName: "fsx-lustre-fs"
创建 PVC 并挂载到 Pod
- 创建 PVC:
apiVersion: v1
kind: PersistentVolumeClaim
metadata:
  name: fsx-claim
spec:
  accessModes:
    - ReadWriteMany
  storageClassName: fsx-lustre-sc
  resources:
    requests:
storage: 1200Gi- 将 PVC 挂载到 pod:
apiVersion: v1
kind: Pod
metadata:
  name: app-with-fsx
spec:
  containers:
  - name: app
    image: nvidia/cuda:11.6.0-base-ubuntu20.04
    command: ["sleep", "infinity"]
    volumeMounts:
    - mountPath: "/data"
      name: fsx-volume
  volumes:
  - name: fsx-volume
    persistentVolumeClaim:
      claimName: fsx-claim
FSx for Lustre Mount 的 Static Provisioning
你也可以静态挂载已经创建的 FSx for Lustre file system:
apiVersion: v1
kind: PersistentVolume
metadata:
  name: fsx-lustre-pv
spec:
  capacity:
    storage: 1200Gi
  volumeMode: Filesystem
  accessModes:
    - ReadWriteMany
  persistentVolumeReclaimPolicy: Retain
  storageClassName: fsx-lustre-sc
  csi:
    driver: fsx.csi.aws.com
    volumeHandle: fs-0123456789abcdef0
    volumeAttributes:
      dnsname: fs-0123456789abcdef0.fsx.us-west-2.amazonaws.com
      mountname: fsx
FSx for Lustre Deployment Types
FSx for Lustre 提供多种 deployment type,以满足不同的工作负载需求:
- Scratch File Systems:
- Scratch 1: 面向短期存储和处理的成本优化 file system
- Scratch 2: 与 Scratch 1 相比,提供更高的突发吞吐量和更好的数据持久性
- Persistent File Systems:
- Persistent 1: 面向长期存储和吞吐量关键型工作负载的 file system
- Persistent 2: 与 Persistent 1 相比,提供更高吞吐量
面向 vLLM 的 FSx for Lustre 配置
请考虑使用以下配置,为 vLLM (Vector Language Model) 等大规模 AI 工作负载优化 FSx for Lustre:
apiVersion: storage.k8s.io/v1
kind: StorageClass
metadata:
  name: fsx-lustre-vllm
provisioner: fsx.csi.aws.com
parameters:
  deploymentType: PERSISTENT_2
  storageCapacity: "4800"  # 4.8TB
  perUnitStorageThroughput: "1000"  # 1000 MB/s per TiB
  dataCompressionType: "LZ4"  # Enable data compression
  mountName: "vllm-models"
此配置提供以下优势:
- 高吞吐量可减少模型加载时间
- 数据压缩可提升存储效率
- 多个 Node 可同时访问相同的模型文件
Amazon S3 存储集成
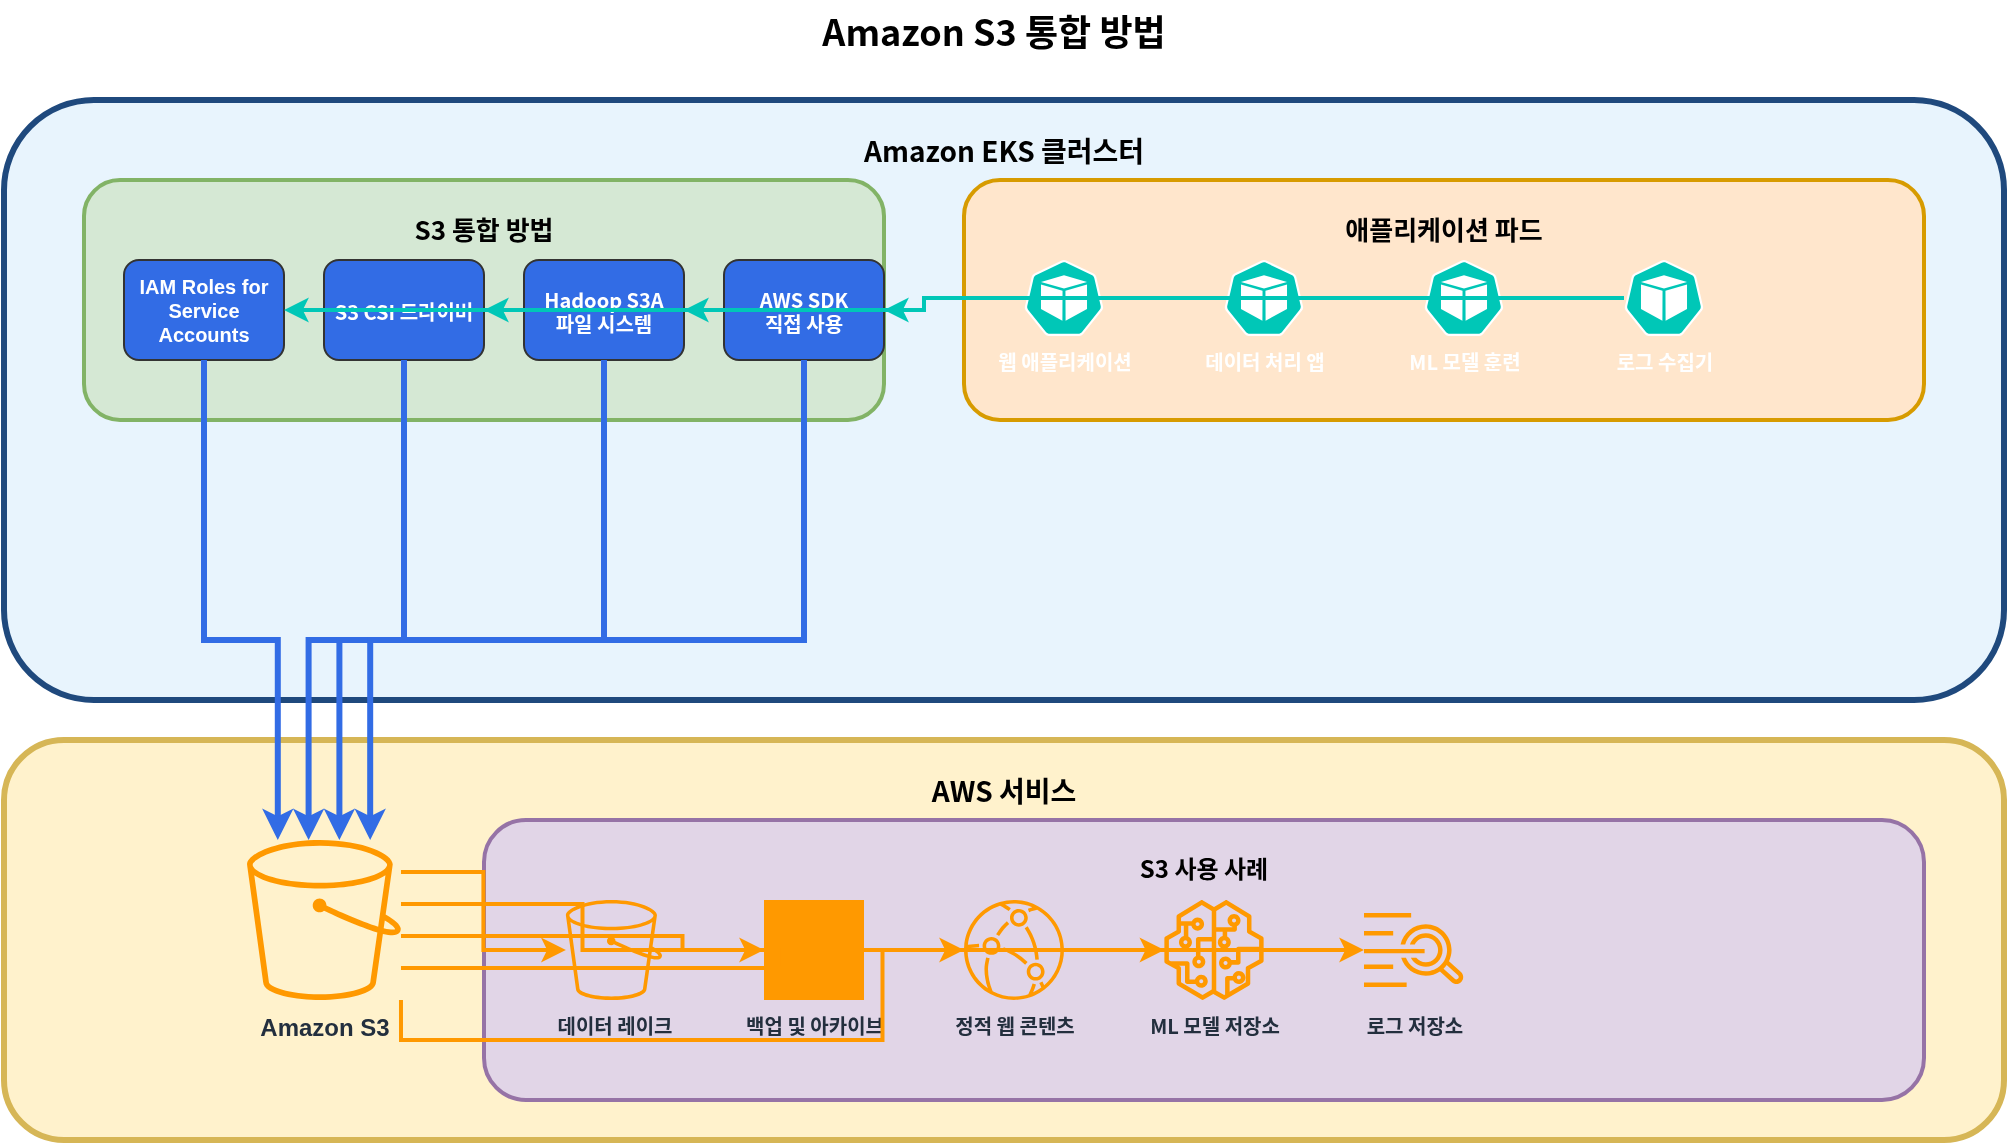
Amazon S3 是一种 object storage 服务,可以存储和检索无限量的数据。在 Kubernetes 中,S3 不能作为 volume 直接挂载,但有多种方式可以与 S3 集成。
S3 访问的 IRSA 设置
为 pods 设置 IAM Roles for Service Accounts (IRSA),以访问 S3:
eksctl create iamserviceaccount \
  --name s3-access-sa \
  --namespace default \
  --cluster my-cluster \
  --attach-policy-arn arn:aws:iam::aws:policy/AmazonS3ReadOnlyAccess \
  --approve
S3 访问的 Pod 配置
使用 service account 访问 S3 的 Pod:
apiVersion: v1
kind: Pod
metadata:
  name: s3-access-pod
spec:
  serviceAccountName: s3-access-sa
  containers:
  - name: app
    image: amazon/aws-cli:latest
    command: ["sleep", "infinity"]
S3A File System Mount
你可以使用 Hadoop S3A file system,以类似 HDFS 的方式访问 S3:
apiVersion: v1
kind: Pod
metadata:
  name: hadoop-s3a-pod
spec:
  serviceAccountName: s3-access-sa
  containers:
  - name: hadoop
    image: apache/hadoop:3.3.1
    env:
    - name: HADOOP_HOME
      value: /opt/hadoop
    - name: HADOOP_CONF_DIR
      value: /opt/hadoop/etc/hadoop
    - name: AWS_REGION
      value: us-west-2
    command: ["sleep", "infinity"]
    volumeMounts:
    - name: hadoop-config
      mountPath: /opt/hadoop/etc/hadoop
  volumes:
  - name: hadoop-config
    configMap:
      name: hadoop-config
---
apiVersion: v1
kind: ConfigMap
metadata:
  name: hadoop-config
data:
  core-site.xml: |
    <?xml version="1.0" encoding="UTF-8"?>
    <configuration>
      <property>
        <name>fs.s3a.aws.credentials.provider</name>
        <value>com.amazonaws.auth.WebIdentityTokenCredentialsProvider</value>
      </property>
      <property>
        <name>fs.s3a.endpoint</name>
        <value>s3.us-west-2.amazonaws.com</value>
      </property>
    </configuration>
使用 CSI Driver 挂载 S3 Bucket
你可以使用 AWS S3 CSI driver 将 S3 buckets 挂载为 Kubernetes volumes:
- 安装 driver:
helm repo add aws-mountpoint-s3-csi-driver https://awslabs.github.io/mountpoint-s3-csi-driver
helm repo update
helm upgrade --install aws-mountpoint-s3-csi-driver aws-mountpoint-s3-csi-driver/aws-mountpoint-s3-csi-driver \
  --namespace kube-system \
  --set controller.serviceAccount.create=false \
--set controller.serviceAccount.name=s3-csi-controller-sa- 创建 storage class:
apiVersion: storage.k8s.io/v1
kind: StorageClass
metadata:
  name: s3-sc
provisioner: s3.csi.aws.com
parameters:
  bucketName: my-eks-bucket
mountOptions: "--cache-control-max-ttl 0"- 创建 PVC 和 pod:
apiVersion: v1
kind: PersistentVolumeClaim
metadata:
  name: s3-claim
spec:
  accessModes:
    - ReadWriteMany
  storageClassName: s3-sc
  resources:
    requests:
      storage: 1Gi
---
apiVersion: v1
kind: Pod
metadata:
  name: app-with-s3
spec:
  serviceAccountName: s3-access-sa
  containers:
  - name: app
    image: nginx
    volumeMounts:
    - mountPath: "/data"
      name: s3-volume
  volumes:
  - name: s3-volume
    persistentVolumeClaim:
      claimName: s3-claim
S3 使用场景
Amazon S3 适用于以下使用场景:
- Data Lake: 面向大规模 data analytics 的集中式存储库
- Backup and Archive: 长期数据保留
- Static Web Content: 提供图片、视频、文档等静态内容
- ML Model Repository: 存储训练好的模型文件
- Logs and Audit Data: 存储日志文件和审计数据
Snapshots 和 Backups
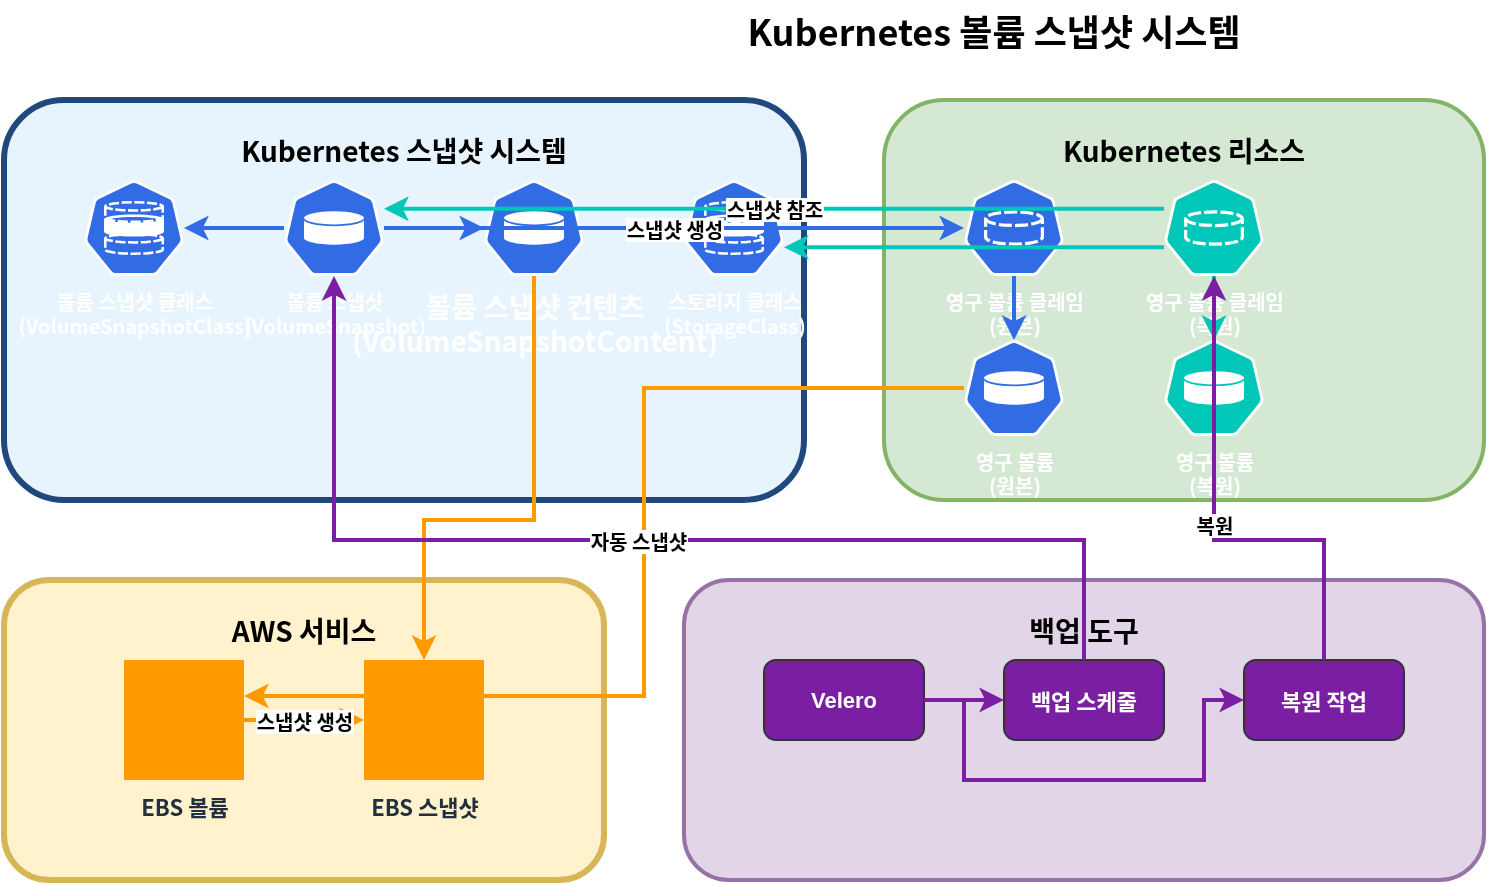
在 Kubernetes 中,你可以使用 volume snapshots 来备份和恢复 PV 数据。
安装 Volume Snapshot Controller
安装 snapshot controller 以使用 volume snapshot 功能:
kubectl apply -f https://raw.githubusercontent.com/kubernetes-csi/external-snapshotter/master/client/config/crd/snapshot.storage.k8s.io_volumesnapshotclasses.yaml
kubectl apply -f https://raw.githubusercontent.com/kubernetes-csi/external-snapshotter/master/client/config/crd/snapshot.storage.k8s.io_volumesnapshotcontents.yaml
kubectl apply -f https://raw.githubusercontent.com/kubernetes-csi/external-snapshotter/master/client/config/crd/snapshot.storage.k8s.io_volumesnapshots.yaml

kubectl apply -f https://raw.githubusercontent.com/kubernetes-csi/external-snapshotter/master/deploy/kubernetes/snapshot-controller/rbac-snapshot-controller.yaml
kubectl apply -f https://raw.githubusercontent.com/kubernetes-csi/external-snapshotter/master/deploy/kubernetes/snapshot-controller/setup-snapshot-controller.yaml
创建 Volume Snapshot Class
为 EBS volumes 创建 snapshot class:
apiVersion: snapshot.storage.k8s.io/v1
kind: VolumeSnapshotClass
metadata:
  name: ebs-snapshot-class
driver: ebs.csi.aws.com
deletionPolicy: Delete
parameters:
  csi.storage.k8s.io/snapshotter-secret-name: ""
  csi.storage.k8s.io/snapshotter-secret-namespace: ""
创建 Volume Snapshot
创建 PVC 的 snapshot:
apiVersion: snapshot.storage.k8s.io/v1
kind: VolumeSnapshot
metadata:
  name: ebs-volume-snapshot
spec:
  volumeSnapshotClassName: ebs-snapshot-class
  source:
    persistentVolumeClaimName: ebs-claim
从 Snapshot 恢复 PVC
从 snapshot 创建新的 PVC:
apiVersion: v1
kind: PersistentVolumeClaim
metadata:
  name: ebs-claim-restored
spec:
  accessModes:
    - ReadWriteOnce
  storageClassName: ebs-gp3
  resources:
    requests:
      storage: 10Gi
  dataSource:
    name: ebs-volume-snapshot
    kind: VolumeSnapshot
    apiGroup: snapshot.storage.k8s.io
自动化定期 Snapshots
你可以使用 Velero 自动执行定期备份和恢复:
- 安装 Velero:
# Install Velero CLI
brew install velero

# Install Velero server
velero install \
  --provider aws \
  --plugins velero/velero-plugin-for-aws:v1.5.0 \
  --bucket velero-backup-bucket \
  --backup-location-config region=us-west-2 \
  --snapshot-location-config region=us-west-2 \
--secret-file ./credentials-velero- 创建备份计划:
velero schedule create daily-backup \
  --schedule="0 1 * * *" \
--include-namespaces=default,app-namespace- 恢复到特定时间点:
velero restore create --from-backup daily-backup-20250710010000Volume Expansion 和 Resizing
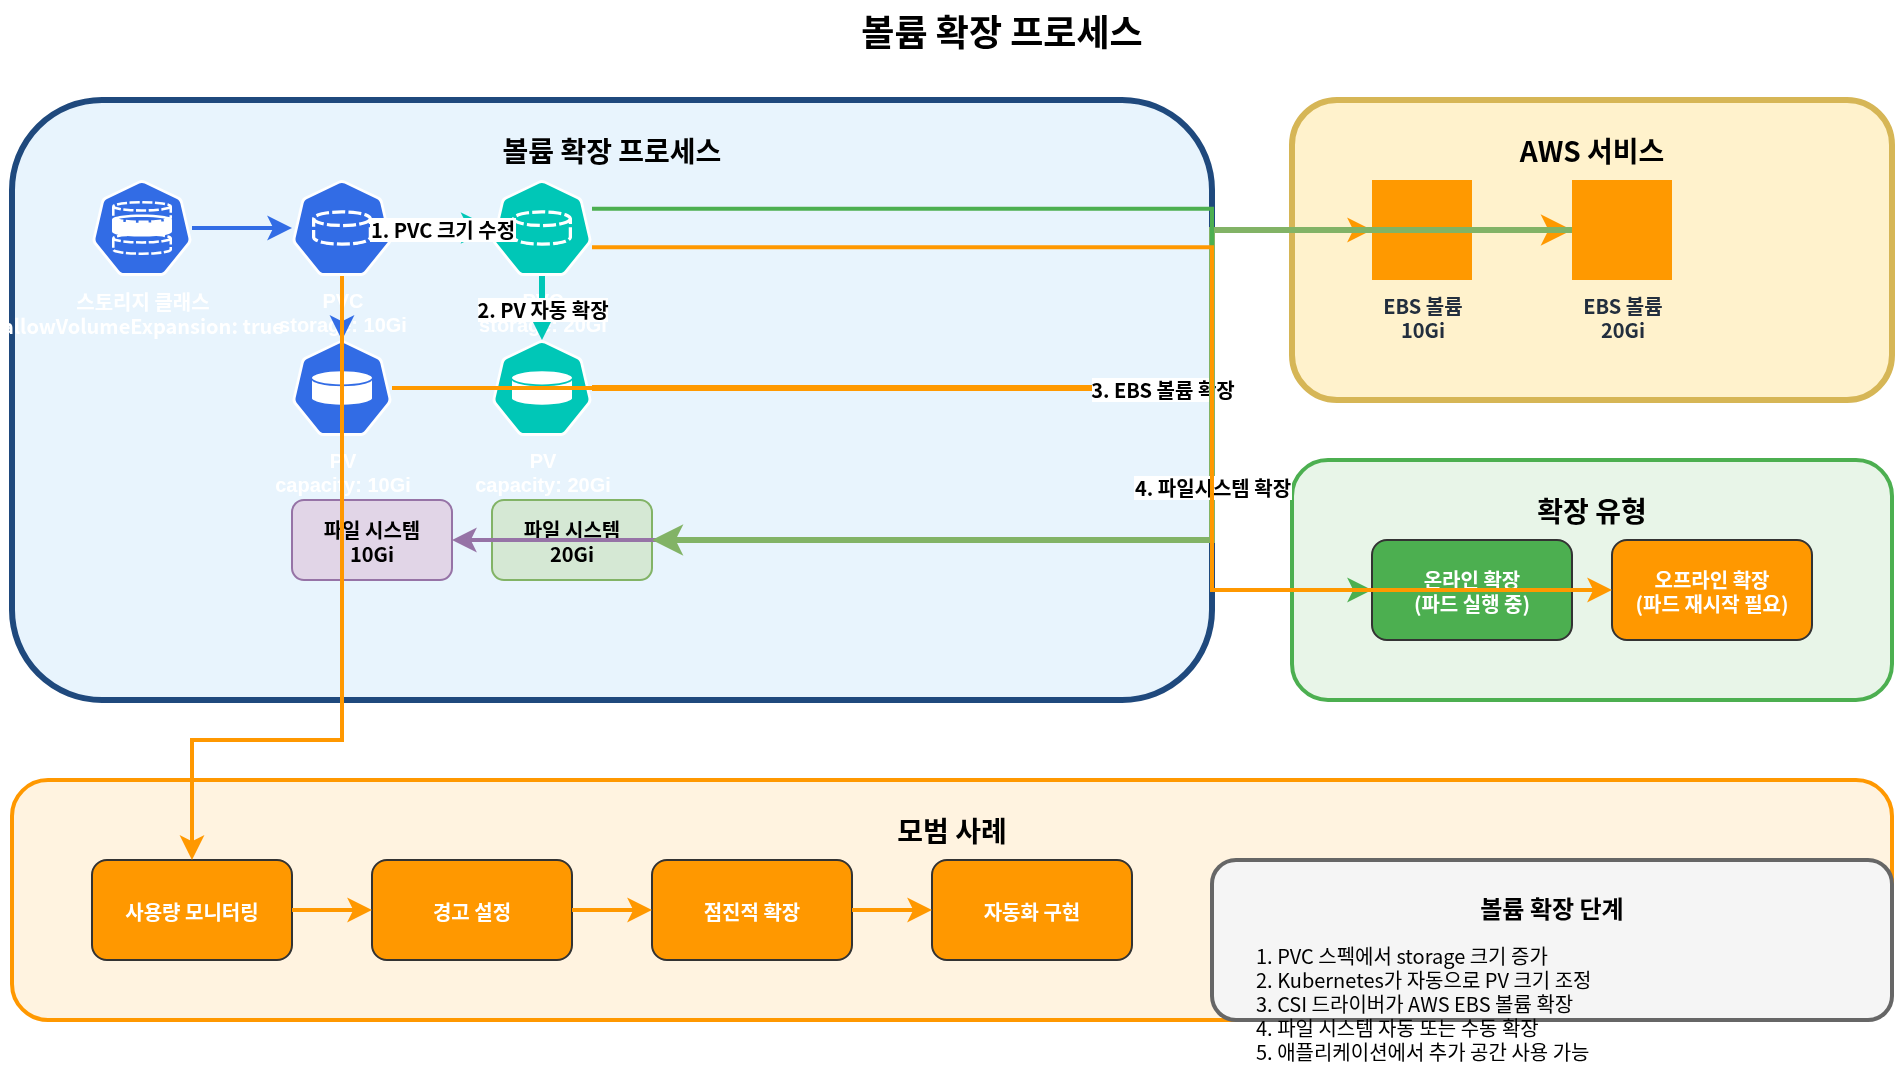
在 Kubernetes 中,你可以扩展 PVC 大小以增加存储容量。
启用 Volume Expansion
在 storage class 中启用 volume expansion:
apiVersion: storage.k8s.io/v1
kind: StorageClass
metadata:
  name: ebs-gp3-expandable
provisioner: ebs.csi.aws.com
parameters:
  type: gp3
allowVolumeExpansion: true
扩展 PVC 大小
扩展 PVC 大小:
apiVersion: v1
kind: PersistentVolumeClaim
metadata:
  name: ebs-claim
spec:
  accessModes:
    - ReadWriteOnce
  storageClassName: ebs-gp3-expandable
  resources:
    requests:
      storage: 20Gi  # Expanded from original 10Gi to 20Gi
File System Expansion
volume expansion 之后,你可能需要扩展 file system:
- 在线扩展(pod 正在运行时):
- EBS CSI driver 会自动扩展 file system。
- 离线扩展(需要手动扩展时):
- 连接到 pod 并运行 file system 扩展命令:
# For ext4 file system
resize2fs /dev/xvdf

# For xfs file system
xfs_growfs /data
Volume Resizing 最佳实践
- 设置合适的初始大小: 将初始 volume 大小设置为略大于所需容量
- 设置监控: 监控 volume 使用情况并设置告警
- 逐步扩展: 根据需要逐步扩展 volume 大小
- 规划停机时间: 某些 file system 扩展可能需要停机时间
- 考虑自动化: 实现自动扩展策略
Volume Cloning
Volume cloning 允许你从现有 PVC 创建新的 PVC,而无需经过 snapshot 流程。这对于创建测试环境、调试生产数据问题,或使用现有数据快速预置新工作负载非常有用。
EBS CSI Volume Cloning 概念
EBS CSI driver 支持使用 dataSource 字段进行 PVC cloning。克隆 volume 时,CSI driver 会从源 volume 的 snapshot 创建新的 EBS volume,但该过程对用户是抽象隐藏的。
Volume cloning 的关键特性:
- clone 独立于源 PVC
- 对 clone 的更改不会影响源
- 除非另有指定,否则 clone 会继承源的 storage class
- 源和 clone 必须位于同一 namespace
使用 dataSource 字段
要创建 clone,请在 dataSource 字段中指定源 PVC:
apiVersion: v1
kind: PersistentVolumeClaim
metadata:
  name: ebs-clone
spec:
  accessModes:
    - ReadWriteOnce
  storageClassName: ebs-gp3
  resources:
    requests:
      storage: 10Gi
  dataSource:
    kind: PersistentVolumeClaim
    name: ebs-source-pvc
Clone 与 Snapshot 对比
| Feature | Volume Clone | Volume Snapshot |
|---|---|---|
| 创建速度 | 快(单一步骤) | 两步(创建 snapshot,然后恢复) |
| 存储开销 | 立即完整复制 | 增量存储 |
| 跨 Namespace | 否 | 是(使用 VolumeSnapshotContent) |
| 时间点 | clone 创建时 | 任意已保存的 snapshot |
| 使用场景 | 快速复制 | 备份与恢复 |
Volume Clone YAML 示例
克隆数据库 volume 的完整示例:
# Source PVC (existing)
apiVersion: v1
kind: PersistentVolumeClaim
metadata:
  name: postgres-data
  namespace: production
spec:
  accessModes:
    - ReadWriteOnce
  storageClassName: ebs-gp3
  resources:
    requests:
      storage: 100Gi
---
# Clone for testing
apiVersion: v1
kind: PersistentVolumeClaim
metadata:
  name: postgres-data-test
  namespace: production
spec:
  accessModes:
    - ReadWriteOnce
  storageClassName: ebs-gp3
  resources:
    requests:
      storage: 100Gi
  dataSource:
    kind: PersistentVolumeClaim
    name: postgres-data
---
# Pod using the cloned volume
apiVersion: v1
kind: Pod
metadata:
  name: postgres-test
  namespace: production
spec:
  containers:
  - name: postgres
    image: postgres:15
    volumeMounts:
    - mountPath: /var/lib/postgresql/data
      name: postgres-storage
    env:
    - name: POSTGRES_PASSWORD
      value: testpassword
  volumes:
  - name: postgres-storage
    persistentVolumeClaim:
      claimName: postgres-data-test
Multi-Attach EBS
Multi-Attach 允许将单个 EBS volume 同时挂载到多个 EC2 instances。此功能适用于 io1 和 io2 Block Express volumes,对需要高性能共享存储的集群化应用程序很有用。
io1/io2 Block Express Multi-Attachment
Multi-Attach 仅支持 Provisioned IOPS SSD volumes:
- io1: 最多 16 个同时 attachment
- io2 Block Express: 最多 16 个同时 attachment,并提供更高性能
要求:
- Instances 必须与 volume 位于同一个 Availability Zone
- Instances 必须是基于 Nitro 的 EC2 instances
- Volume 必须使用 Block device mode(而不是 Filesystem mode)
为什么不使用 ReadWriteMany?
EBS Multi-Attach 并不支持传统意义上的 ReadWriteMany access mode,原因如下:
- 需要 Block Mode: Multi-Attach 仅适用于 raw block devices,而不是已挂载的 filesystems
- 没有 Filesystem 协调: EBS 不提供 filesystem 级别的协调
- 应用程序责任: 应用程序必须处理并发访问和数据完整性
Multi-Attach EBS 的 Kubernetes access mode 是 ReadWriteOncePod,或通过 Block volumeMode 配合应用层协调(如 clustered databases 或 OCFS2/GFS2)。
限制
- 仅限同一 AZ: 所有已挂载 instances 必须位于同一个 Availability Zone
- 仅限 Block Mode: 如果没有 cluster-aware filesystem,不能作为共享 filesystem 使用
- Nitro Instances: 仅支持基于 Nitro 的 instance types
- 不支持 Online Resize: 挂载到多个 instances 时无法 resize
- 应用程序协调: 应用程序必须实现自己的锁定/协调机制
Multi-Attach 使用场景和 YAML 示例
常见使用场景:
- Clustered databases(Oracle RAC、SQL Server FCI)
- 带有共享状态的高可用应用程序
- 分布式存储系统
apiVersion: storage.k8s.io/v1
kind: StorageClass
metadata:
  name: ebs-io2-multi-attach
provisioner: ebs.csi.aws.com
parameters:
  type: io2
  iops: "64000"
  multiAttachEnabled: "true"
volumeBindingMode: WaitForFirstConsumer
---
apiVersion: v1
kind: PersistentVolumeClaim
metadata:
  name: shared-block-pvc
spec:
  accessModes:
    - ReadWriteMany
  volumeMode: Block
  storageClassName: ebs-io2-multi-attach
  resources:
    requests:
      storage: 100Gi
---
apiVersion: apps/v1
kind: StatefulSet
metadata:
  name: clustered-app
spec:
  serviceName: clustered-app
  replicas: 2
  selector:
    matchLabels:
      app: clustered-app
  template:
    metadata:
      labels:
        app: clustered-app
    spec:
      affinity:
        podAntiAffinity:
          requiredDuringSchedulingIgnoredDuringExecution:
          - labelSelector:
              matchLabels:
                app: clustered-app
            topologyKey: kubernetes.io/hostname
      containers:
      - name: app
        image: my-clustered-app:latest
        volumeDevices:
        - name: shared-block
          devicePath: /dev/xvda
      volumes:
      - name: shared-block
        persistentVolumeClaim:
          claimName: shared-block-pvc
Mountpoint for S3 CSI 深入解析
Mountpoint for Amazon S3 是一种 file client,可将 file system 操作转换为 S3 object API 调用,使应用程序能够通过类似 POSIX 的接口访问 S3 buckets。Mountpoint for S3 CSI driver 将此能力与 Kubernetes 集成。
性能特征
Mountpoint for S3 针对特定访问模式进行了优化:
Sequential Read Optimization:
- 对大型顺序读取具有出色性能
- 针对可预测访问模式自动预取
- 吞吐量随 object 大小扩展
- 非常适合 data analytics 和 ML training 工作负载
Random Write Limitations:
- S3 是 object store,不是 block store
- Random writes 需要重写整个 object
- Append 操作会创建新的 object versions
- 不适合数据库工作负载或需要 random I/O 的应用程序
性能基准(近似值):
| Operation | Performance |
|---|---|
| Sequential Read(大文件) | 最高 100 Gbps 聚合吞吐量 |
| Sequential Write(新文件) | 最高 50 Gbps 聚合吞吐量 |
| Random Read(小文件) | 延迟更高,吞吐量更低 |
| Random Write | 不推荐 |
限制
Mountpoint for S3 有若干 POSIX 兼容性限制:
- No hard links: 不支持 hard links
- No symbolic links: 不支持 symbolic links
- No chmod/chown: 文件权限创建后无法更改
- No file locking: 不提供 advisory 和 mandatory locks
- No sparse files: 不支持 sparse file 操作
- No extended attributes: 不支持 xattr 操作
- Eventual consistency: List 操作可能不会立即反映最近的写入
- No rename across directories: 仅支持同一目录内的 rename
- No append to existing files: 必须重写整个 object
Cache 设置
Mountpoint for S3 提供 caching 选项以提升性能:
Metadata Cache:
parameters:
  mountOptions: "--metadata-ttl 60"  # Cache metadata for 60 seconds
Data Cache(适用于读取密集型工作负载):
parameters:
  mountOptions: "--cache /tmp/s3-cache --max-cache-size 10737418240"  # 10GB cache
完整 cache 配置示例:
apiVersion: storage.k8s.io/v1
kind: StorageClass
metadata:
  name: s3-cached
provisioner: s3.csi.aws.com
parameters:
  bucketName: my-ml-data-bucket
  mountOptions: |
    --metadata-ttl 300
    --cache /tmp/mountpoint-cache
    --max-cache-size 53687091200
    --read-part-size 8388608
    --prefetch-bytes 20971520
大型数据集训练场景示例
Mountpoint for S3 非常适合读取大型数据集的 ML training 工作负载:
apiVersion: storage.k8s.io/v1
kind: StorageClass
metadata:
  name: s3-ml-training
provisioner: s3.csi.aws.com
parameters:
  bucketName: ml-training-datasets
  mountOptions: |
    --read-part-size 8388608
    --prefetch-bytes 52428800
    --metadata-ttl 3600
    --cache /tmp/s3-cache
    --max-cache-size 107374182400
---
apiVersion: v1
kind: PersistentVolumeClaim
metadata:
  name: training-data
spec:
  accessModes:
    - ReadOnlyMany
  storageClassName: s3-ml-training
  resources:
    requests:
      storage: 1Ti
---
apiVersion: batch/v1
kind: Job
metadata:
  name: ml-training-job
spec:
  parallelism: 4
  template:
    spec:
      serviceAccountName: ml-training-sa
      containers:
      - name: trainer
        image: pytorch/pytorch:2.0.1-cuda11.7-cudnn8-runtime
        resources:
          limits:
            nvidia.com/gpu: 1
            memory: 64Gi
          requests:
            memory: 32Gi
        command:
        - python
        - /app/train.py
        - --data-dir=/data
        - --epochs=100
        volumeMounts:
        - name: training-data
          mountPath: /data
          readOnly: true
        - name: model-output
          mountPath: /models
      volumes:
      - name: training-data
        persistentVolumeClaim:
          claimName: training-data
      - name: model-output
        persistentVolumeClaim:
          claimName: model-output-pvc
      restartPolicy: Never
      nodeSelector:
        node.kubernetes.io/instance-type: p4d.24xlarge
此示例中的关键优化:
- ReadOnlyMany access: 多个 training pods 可以同时读取
- Large prefetch: 50MB 预取可降低读取延迟
- Local cache: 100GB cache 用于频繁访问的数据
- 合适的 instance type: 具有高网络带宽的 GPU instance
存储性能优化
下面探索在 EKS 中优化存储性能的多种策略。
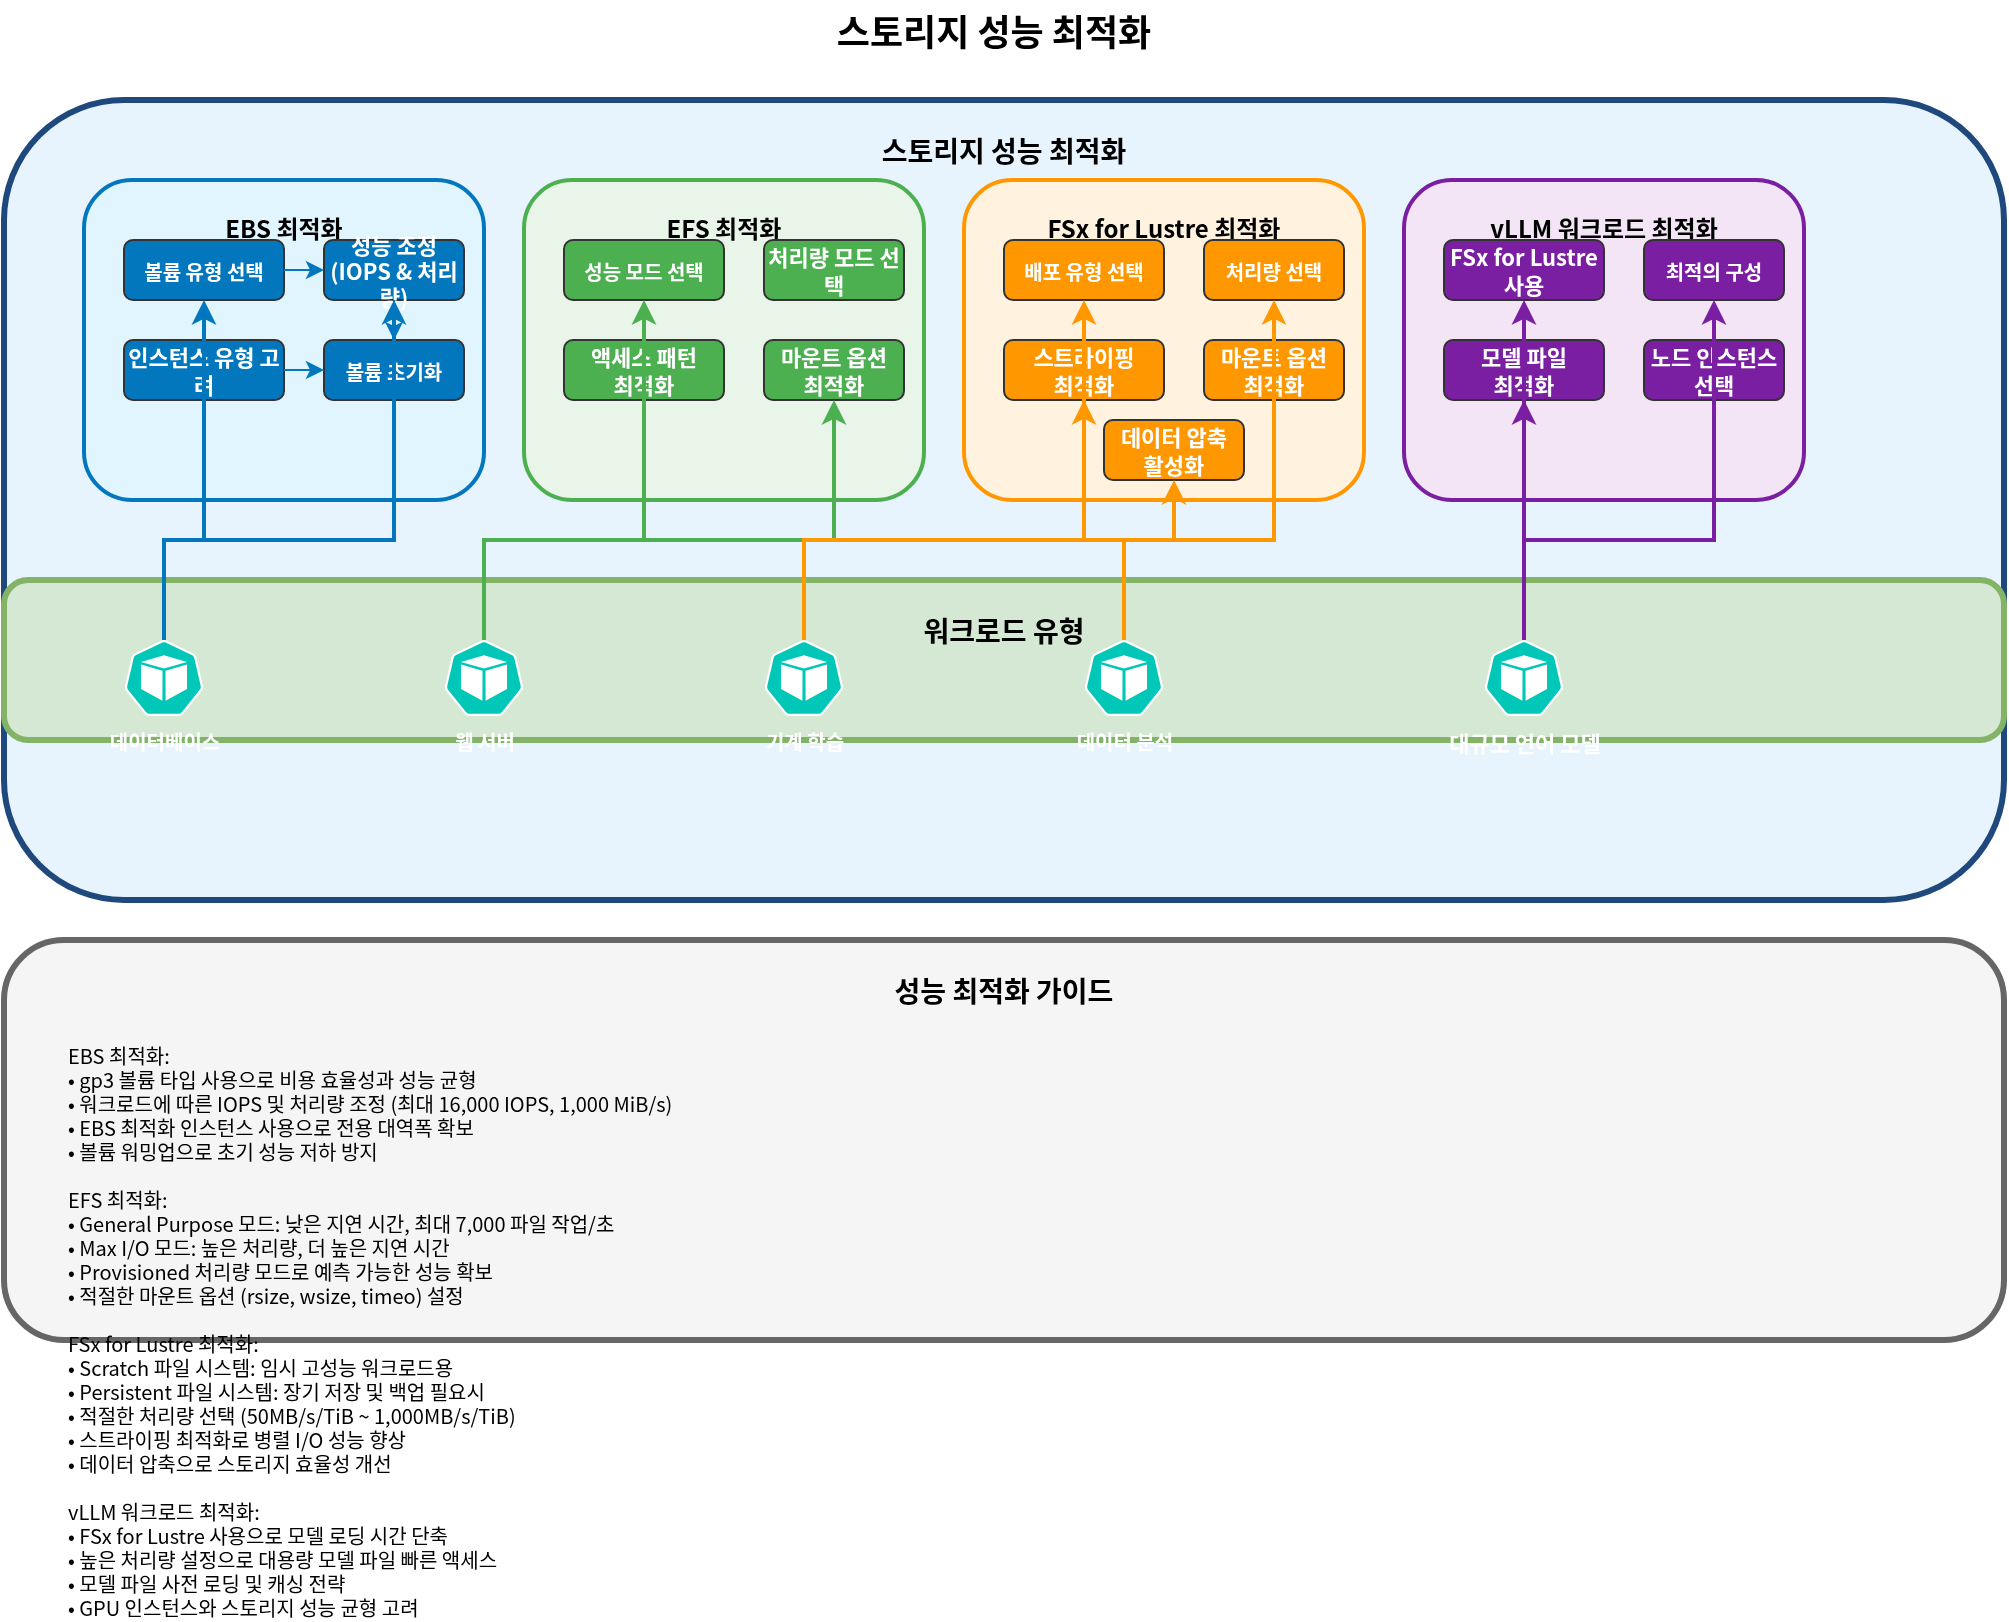
EBS 性能优化
- 选择合适的 volume type:
- 通用工作负载:gp3
- 高性能数据库:io2
- 以吞吐量为中心的工作负载:st1
- gp3 volume 性能调优:
apiVersion: storage.k8s.io/v1
kind: StorageClass
metadata:
  name: ebs-gp3-high-perf
provisioner: ebs.csi.aws.com
parameters:
  type: gp3
  iops: "16000"  # Up to 16,000 IOPS
throughput: "1000" # Up to 1,000 MiB/s- 考虑 instance type:
- 使用 EBS-optimized instances
- 选择具有足够网络带宽的 instances
- Volume initialization:
- 考虑在使用前初始化新 volumes:
dd if=/dev/zero of=/dev/xvdf bs=1M count=1000 oflag=directEFS 性能优化
- 选择合适的 performance mode:
- 大多数工作负载:General Purpose mode
- 高并发工作负载:Max I/O mode
- 选择 throughput mode:
- 可预测工作负载:Provisioned throughput
- 可变工作负载:Bursting 或 Elastic throughput
- 优化访问模式:
- 大文件操作:使用较大的 I/O sizes
- 并行访问:使用多个 threads 或 processes
- 优化 mount options:
apiVersion: v1
kind: Pod
metadata:
  name: efs-app
spec:
  containers:
  - name: app
    image: nginx
    volumeMounts:
    - mountPath: "/data"
      name: efs-volume
  volumes:
  - name: efs-volume
    persistentVolumeClaim:
      claimName: efs-claim
    mountOptions:
      - nfsvers=4.1
      - rsize=1048576
      - wsize=1048576
      - timeo=600
      - retrans=2
      - noresvport
FSx for Lustre 性能优化
- 选择合适的 deployment type 和 throughput:
- 高吞吐量需求:PERSISTENT_2 + 高吞吐量
- 成本高效的临时工作负载:SCRATCH_2
- 优化 striping:
- 大文件:跨多个 OSTs (Object Storage Targets) 进行 striping
- 小文件:存储在单个 OST 上
- Client mount options:
mountOptions:
  - flock
  - noatime
- relatime- 启用数据压缩:
parameters:
  dataCompressionType: "LZ4"
面向 vLLM 工作负载的存储优化
面向 vLLM 等大语言模型工作负载的存储优化:
- 使用 FSx for Lustre:
- 高吞吐量可减少模型加载时间
- 多个 Node 可同时访问相同的模型文件
- 最佳配置:
apiVersion: storage.k8s.io/v1
kind: StorageClass
metadata:
  name: fsx-lustre-vllm
provisioner: fsx.csi.aws.com
parameters:
  deploymentType: PERSISTENT_2
  storageCapacity: "4800"  # 4.8TB
  perUnitStorageThroughput: "1000"  # 1000 MB/s per TiB
dataCompressionType: "LZ4" # Enable data compression- 模型文件优化:
- 将模型文件预加载到内存中
- 考虑模型量化
- 实现模型分片
- Node instance type 选择:
- 选择具有足够内存和网络带宽的 instances
- 考虑 GPU instances 的 EFA (Elastic Fabric Adapter) 支持
结论
本文档介绍了 Amazon EKS 中的 FSx for Lustre、S3、snapshots、volume expansion 和性能优化。每种存储选项都有不同的特征和使用场景,因此必须根据应用程序需求选择并优化合适的存储解决方案。
下一部分将介绍 EKS 存储的监控、故障排查、成本优化和安全性。
参考资料
- Amazon FSx for Lustre CSI Driver
- Amazon S3 CSI Driver
- Kubernetes Volume Snapshots
- Velero Backup and Restore
- Amazon EKS Storage Best Practices
测验
要测试你在本章学到的内容,请尝试完成主题测验。