网络配置
< 上一页:先决条件 | 目录 | 下一页:Air-Gap 设置 >
支持的版本: EKS 1.31+, nodeadm 0.1+ 最后更新: February 23, 2026
本文档介绍 EKS Hybrid Nodes 所需的网络配置,包括 CIDR 要求、防火墙规则、AWS endpoint 访问、security group 配置以及 DNS 设置。
网络架构概览
下图展示了 EKS Hybrid Nodes 的完整网络拓扑,包括 VPC 配置、Transit Gateway 路由、远程 CIDR 和防火墙规则。
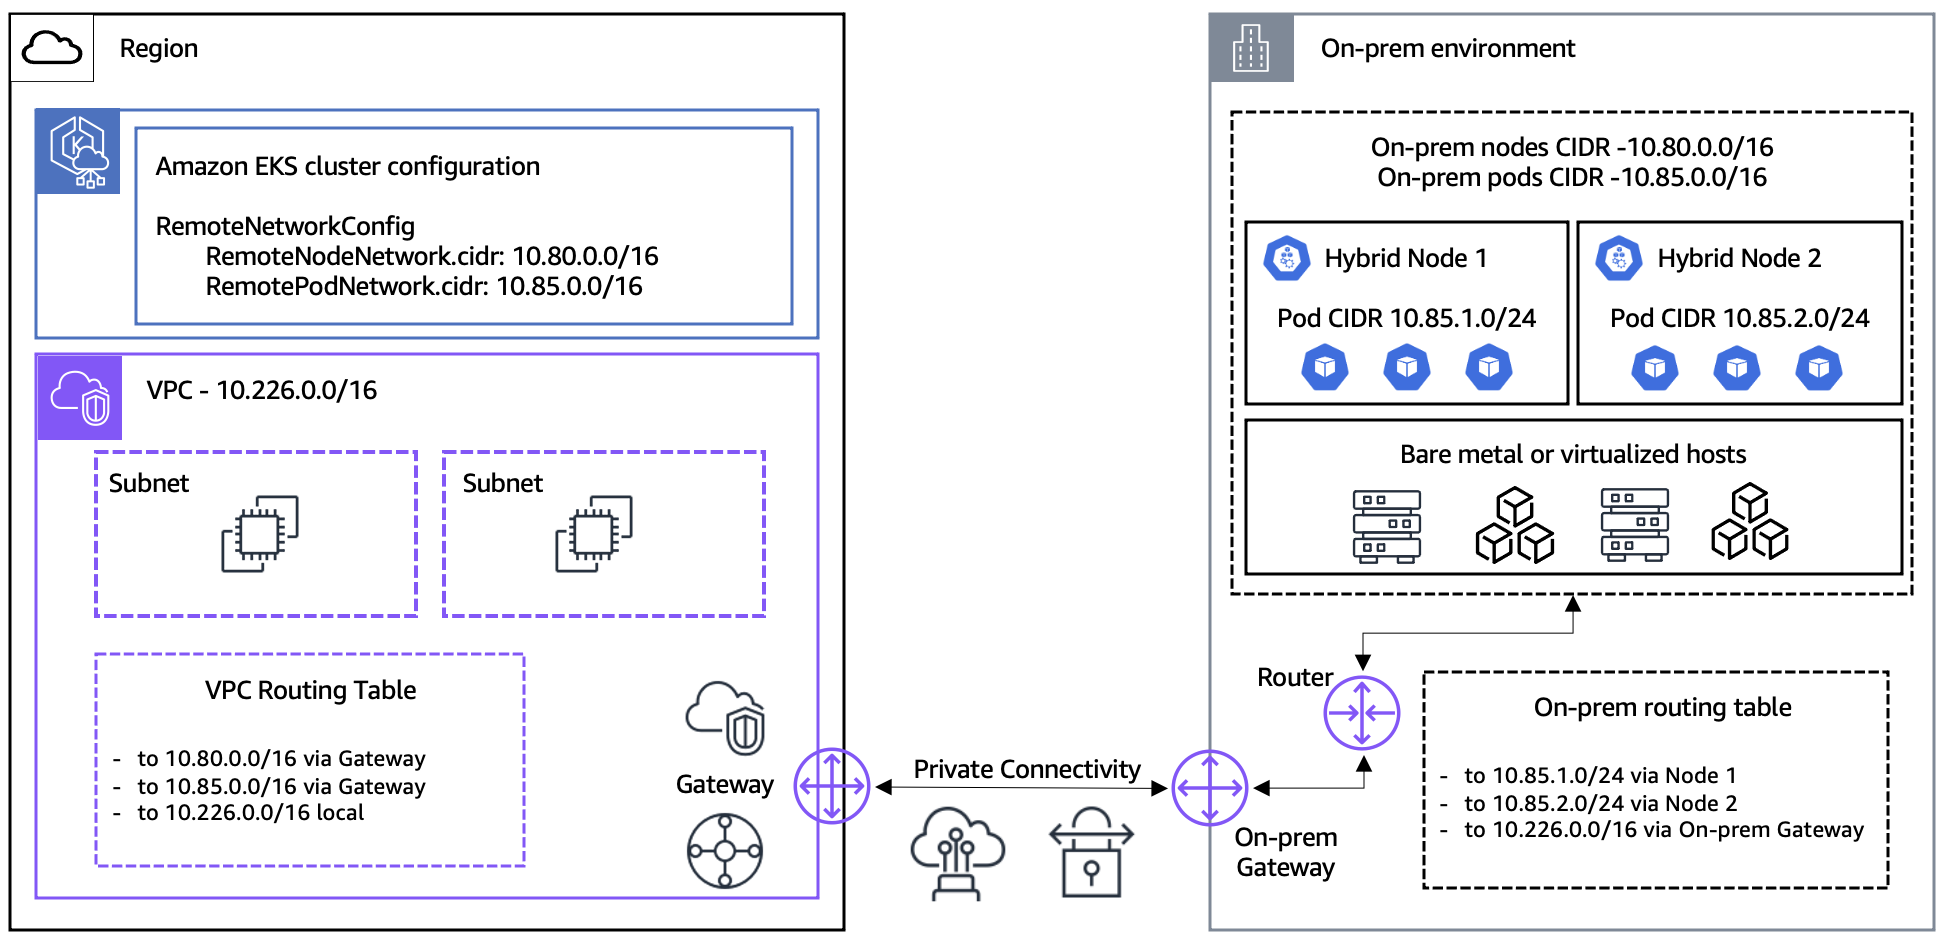
将 VPC 作为网络中心
在 EKS Hybrid Nodes 环境中,VPC 充当 hybrid nodes 与控制平面之间的 网络中心。
- ENI 放置:EKS 控制平面会在 VPC subnets 中放置 ENI (Elastic Network Interfaces)。这些 ENI 是控制平面与 hybrid nodes 之间的通信 endpoint。
- 流量路径:控制平面与 hybrid nodes 之间的所有流量都会通过这些 ENI。API server 请求、kubelet 通信、webhook 调用以及所有控制平面流量都会经过 VPC ENI。
- ENI IP 变更:在 cluster 更新期间(例如版本升级),ENI 可能会被删除并重新创建,这可能会改变其 IP 地址。在防火墙规则中使用 subnet CIDR 范围而不是单独的 IP,可为这些变更提供灵活性。
┌─────────────────────────────────────────────────────────────────┐
│                         AWS Cloud                                │
│  ┌──────────────────┐    ┌──────────────────────────────────┐   │
│  │  EKS Control     │    │              VPC                  │   │
│  │     Plane        │◄──►│  ┌────────┐  ┌────────┐          │   │
│  │                  │    │  │  ENI   │  │  ENI   │          │   │
│  └──────────────────┘    │  │10.0.1.x│  │10.0.2.x│          │   │
│                          │  └────┬───┘  └────┬───┘          │   │
│                          └───────┼───────────┼──────────────┘   │
└──────────────────────────────────┼───────────┼──────────────────┘
                                   │           │
                           VPN / Direct Connect
                                   │           │
┌──────────────────────────────────┼───────────┼──────────────────┐
│                          On-Premises                             │
│                    ┌─────────────┴───────────┴─────────────┐    │
│                    │         Hybrid Nodes                   │    │
│                    │   ┌─────────┐    ┌─────────┐          │    │
│                    │   │  Node   │    │  Node   │          │    │
│                    │   │ kubelet │    │ kubelet │          │    │
│                    │   └─────────┘    └─────────┘          │    │
│                    └───────────────────────────────────────┘    │
└─────────────────────────────────────────────────────────────────┘
CIDR 范围要求
本地 node 和 pod CIDR 必须满足以下要求:
- 必须位于 RFC-1918 ranges 内:
10.0.0.0/8、172.16.0.0/12、192.168.0.0/16 - 必须 不重叠:
- 彼此之间(node CIDR 和 pod CIDR)
- EKS cluster 的 VPC CIDR
- Kubernetes service IPv4 CIDR
创建 EKS cluster 时会指定 RemoteNodeNetwork 和 RemotePodNetwork 字段。
可路由与不可路由的 Pod 网络
| 配置 | 可路由(推荐) | 不可路由 |
|---|---|---|
| 设置 | BGP(推荐)、静态路由或自定义路由 | CNI egress masquerade/NAT |
| Webhooks | 可以在 hybrid nodes 上运行 | 必须仅在 cloud nodes 上运行 |
| Pod↔Pod 通信 | 直接 cloud↔本地通信 | 不可行 |
| AWS service 集成 | ALB、Prometheus 等可以访问 hybrid workloads | 无法访问 hybrid workloads |
建议:使用 Cilium BGP Control Plane 使 pod CIDR 可路由。
必需的防火墙端口
Cluster 通信端口
必须打开以下端口,以便本地与 AWS 之间通信:
| 端口 | 协议 | 方向 | 用途 |
|---|---|---|---|
| 443 | TCP | On-Prem → AWS | Kubelet 到 Kubernetes API server |
| 443 | TCP | On-Prem → AWS | Pods 到 Kubernetes API server |
| 10250 | TCP | AWS → On-Prem | API server 到 kubelet |
| Webhook ports | TCP | AWS → On-Prem | API server 到 webhooks(仅可路由 pod networks) |
| 53 | TCP/UDP | 双向 | CoreDNS(pod CIDR ↔ pod CIDR;如果 CoreDNS 在 cloud 中运行,则包含 VPC CIDR) |
| App ports | 用户定义 | 双向 | Pod-to-pod 应用通信 |
VPN 端口(使用 Site-to-Site VPN 时)
| 端口 | 协议 | 方向 | 用途 |
|---|---|---|---|
| 500 | UDP | 双向 | IKE (Internet Key Exchange) |
| 4500 | UDP | 双向 | IPSec NAT-T |
Cilium CNI 端口
使用 Cilium 作为 CNI 时需要额外端口:
| 端口 | 协议 | 方向 | 用途 |
|---|---|---|---|
| 8472 | UDP | 双向 | VXLAN overlay(默认 tunnel mode) |
| 4240 | TCP | 双向 | Health check |
注意:有关 Cilium 和 Calico 的详细防火墙要求,请参阅各项目的官方文档。
iptables 规则示例
# Allow Kubernetes API server communication
sudo iptables -A INPUT -p tcp --dport 443 -s 10.0.0.0/8 -j ACCEPT
sudo iptables -A OUTPUT -p tcp --dport 443 -d 10.0.0.0/8 -j ACCEPT

# Allow Kubelet API
sudo iptables -A INPUT -p tcp --dport 10250 -s 10.0.0.0/8 -j ACCEPT

# Allow Cilium VXLAN
sudo iptables -A INPUT -p udp --dport 8472 -j ACCEPT
sudo iptables -A OUTPUT -p udp --dport 8472 -j ACCEPT

# Allow Cilium health check
sudo iptables -A INPUT -p tcp --dport 4240 -j ACCEPT
sudo iptables -A OUTPUT -p tcp --dport 4240 -j ACCEPT

# Allow DNS
sudo iptables -A INPUT -p tcp --dport 53 -j ACCEPT
sudo iptables -A INPUT -p udp --dport 53 -j ACCEPT
sudo iptables -A OUTPUT -p tcp --dport 53 -j ACCEPT
sudo iptables -A OUTPUT -p udp --dport 53 -j ACCEPT

# Save rules
sudo iptables-save | sudo tee /etc/iptables/rules.v4
本地出站访问要求
安装和升级所需的 Endpoints
在 nodeadm 安装和升级期间,本地 nodes 必须能够通过 HTTPS (443) 访问以下 AWS endpoints:
| 组件 | URL | 备注 |
|---|---|---|
| EKS node artifacts (S3) | https://hybrid-assets.eks.amazonaws.com | nodeadm binary 和 dependencies |
| EKS service | https://eks.<region>.amazonaws.com | Cluster 信息查询 |
| ECR service | https://api.ecr.<region>.amazonaws.com | Container image pulls |
| SSM binary | https://amazon-ssm-<region>.s3.<region>.amazonaws.com | 使用 SSM credential provider 时 |
| SSM service | https://ssm.<region>.amazonaws.com | 使用 SSM credential provider 时 |
| IAM Roles Anywhere | https://rolesanywhere.<region>.amazonaws.com | 使用 IAM RA credential provider 时 |
| OS package manager | 区域特定 endpoints | System package 安装 |
持续运行所需的 Endpoints
| 用途 | 来源 | 目标 | 备注 |
|---|---|---|---|
| Kubelet → API server | Node CIDR | EKS cluster IPs | Port 443 |
| Pod → API server | Pod CIDR | EKS cluster IPs | Port 443 |
| SSM credential refresh | Node CIDR | SSM endpoint | 5 分钟 heartbeat interval |
| IAM RA credential refresh | Node CIDR | IAM Anywhere endpoint | 定期 refresh |
| EKS Pod Identity | Node CIDR | EKS Auth endpoint | 使用 Pod Identity 时 |
发现 EKS Cluster Network Interface IP
当防火墙规则需要 EKS cluster IP 时,使用以下命令:
aws ec2 describe-network-interfaces \
  --filters "Name=vpc-id,Values=<VPC_ID>" "Name=description,Values=Amazon EKS*" \
  --query 'NetworkInterfaces[].PrivateIpAddress' \
--output text注意:EKS network interfaces 可能会在 cluster 更新期间(例如版本升级)被删除并重新创建。使用受限的 subnet 大小可以让 IP 范围可预测,从而简化防火墙配置。
VPC Private Endpoints (Air-Gap / Private Connectivity)
当本地 nodes 通过 VPN 或 Direct Connect 连接到 AWS 且没有互联网访问时,必须配置 VPC Interface Endpoints (PrivateLink),以私有方式访问 AWS services。
为什么需要 VPC Endpoints
标准 AWS API 调用会经过公共互联网。在 air-gapped 或仅私有的环境中,没有互联网路径,因此无法访问 AWS services。VPC Interface Endpoints 会在你的 VPC 内创建带有私有 IP 地址的 ENI (Elastic Network Interfaces),允许本地 nodes 通过 VPN/Direct Connect 直接访问 AWS APIs。
On-premises node
  → VPN / Direct Connect
    → VPC Interface Endpoint ENI (private IP)
→ AWS Service (EKS, ECR, STS, SSM, etc.)关键点:Gateway endpoints(用于 S3 和 DynamoDB)只会向 VPC route tables 添加路由,且 无法从本地网络 通过 VPN/Direct Connect 访问。要从本地访问 S3,必须使用 Interface type S3 endpoint。
必需的 Interface VPC Endpoints
| Service | Endpoint Service Name | Private DNS | 用途 |
|---|---|---|---|
| EKS | com.amazonaws.<region>.eks | Yes | Kubernetes API server 通信 |
| EKS Auth | com.amazonaws.<region>.eks-auth | Yes | Pod Identity authentication |
| ECR API | com.amazonaws.<region>.ecr.api | Yes | Image metadata 查询 |
| ECR DKR | com.amazonaws.<region>.ecr.dkr | Yes | Image pull (Docker registry) |
| S3 | com.amazonaws.<region>.s3 | — | Image layers、nodeadm artifacts(Interface type) |
| STS | com.amazonaws.<region>.sts | Yes | IAM credential exchange |
| SSM | com.amazonaws.<region>.ssm | Yes | 使用 SSM credential provider 时 |
| SSM Messages | com.amazonaws.<region>.ssmmessages | Yes | SSM Session Manager 通信 |
注意:S3 Interface endpoints 不会自动支持
private_dns_enabled。如果你需要 S3 domains 的 private DNS resolution,必须配置单独的 Private Hosted Zone (PHZ)。有关hybrid-assets.eks.amazonaws.comprivate mirroring pattern,请参阅 Air-Gap Setup - hybrid-assets Private Mirroring。
使用 Terraform 创建 VPC Endpoints
Security Group
resource "aws_security_group" "vpc_endpoints" {
  name_prefix = "vpc-endpoints-"
  vpc_id      = var.vpc_id
  description = "Security group for VPC Interface Endpoints"

  ingress {
    description = "HTTPS from VPC and on-premises"
    from_port   = 443
    to_port     = 443
    protocol    = "tcp"
    cidr_blocks = [
      var.vpc_cidr,           # VPC internal traffic
      var.remote_node_cidr,   # On-premises node CIDR
      var.remote_pod_cidr     # On-premises pod CIDR
    ]
  }

  egress {
    from_port   = 0
    to_port     = 0
    protocol    = "-1"
    cidr_blocks = ["0.0.0.0/0"]
  }

  tags = {
    Name = "vpc-endpoints-sg"
  }
}
Interface VPC Endpoints
# List of Interface endpoints to create
locals {
  interface_endpoints = {
    eks          = "com.amazonaws.${var.region}.eks"
    eks-auth     = "com.amazonaws.${var.region}.eks-auth"
    ecr-api      = "com.amazonaws.${var.region}.ecr.api"
    ecr-dkr      = "com.amazonaws.${var.region}.ecr.dkr"
    sts          = "com.amazonaws.${var.region}.sts"
    ssm          = "com.amazonaws.${var.region}.ssm"
    ssmmessages  = "com.amazonaws.${var.region}.ssmmessages"
  }
}

resource "aws_vpc_endpoint" "interface" {
  for_each = local.interface_endpoints

  vpc_id              = var.vpc_id
  service_name        = each.value
  vpc_endpoint_type   = "Interface"
  private_dns_enabled = true

  subnet_ids         = var.private_subnet_ids
  security_group_ids = [aws_security_group.vpc_endpoints.id]

  tags = {
    Name = "vpce-${each.key}"
  }
}

# S3 Interface endpoint (Interface type, not Gateway)
resource "aws_vpc_endpoint" "s3_interface" {
  vpc_id              = var.vpc_id
  service_name        = "com.amazonaws.${var.region}.s3"
  vpc_endpoint_type   = "Interface"
  private_dns_enabled = false  # S3 does not support auto Private DNS for Interface type

  subnet_ids         = var.private_subnet_ids
  security_group_ids = [aws_security_group.vpc_endpoints.id]

  tags = {
    Name = "vpce-s3-interface"
  }
}
使用 AWS CLI 创建 VPC Endpoints
# 1. Create security group for VPC endpoints
SG_ID=$(aws ec2 create-security-group \
  --group-name vpc-endpoints-sg \
  --description "Security group for VPC Interface Endpoints" \
  --vpc-id <VPC_ID> \
  --query 'GroupId' --output text)

# Allow port 443 inbound
aws ec2 authorize-security-group-ingress \
  --group-id $SG_ID \
  --ip-permissions '[
    {"IpProtocol": "tcp", "FromPort": 443, "ToPort": 443,
     "IpRanges": [
       {"CidrIp": "<VPC_CIDR>", "Description": "VPC internal"},
       {"CidrIp": "<REMOTE_NODE_CIDR>", "Description": "On-prem nodes"},
       {"CidrIp": "<REMOTE_POD_CIDR>", "Description": "On-prem pods"}
     ]}
  ]'

# 2. Create Interface VPC endpoint (EKS example)
aws ec2 create-vpc-endpoint \
  --vpc-id <VPC_ID> \
  --vpc-endpoint-type Interface \
  --service-name com.amazonaws.<REGION>.eks \
  --subnet-ids <SUBNET_ID_1> <SUBNET_ID_2> \
  --security-group-ids $SG_ID \
  --private-dns-enabled

# 3. Create remaining service endpoints
for SERVICE in eks-auth ecr.api ecr.dkr sts ssm ssmmessages; do
  echo "Creating endpoint for: $SERVICE"
  aws ec2 create-vpc-endpoint \
    --vpc-id <VPC_ID> \
    --vpc-endpoint-type Interface \
    --service-name com.amazonaws.<REGION>.$SERVICE \
    --subnet-ids <SUBNET_ID_1> <SUBNET_ID_2> \
    --security-group-ids $SG_ID \
    --private-dns-enabled
done

# 4. S3 Interface endpoint (without private-dns-enabled)
aws ec2 create-vpc-endpoint \
  --vpc-id <VPC_ID> \
  --vpc-endpoint-type Interface \
  --service-name com.amazonaws.<REGION>.s3 \
  --subnet-ids <SUBNET_ID_1> <SUBNET_ID_2> \
  --security-group-ids $SG_ID

# 5. Verify created endpoints
aws ec2 describe-vpc-endpoints \
  --filters "Name=vpc-id,Values=<VPC_ID>" \
  --query 'VpcEndpoints[].{ID:VpcEndpointId, Service:ServiceName, State:State}' \
  --output table
本地 DNS 解析流程
VPC endpoints 上的 private_dns_enabled 选项仅在 VPC 内生效。要让本地 nodes 将 AWS service domains(例如 eks.ap-northeast-2.amazonaws.com)解析到 VPC endpoint 的私有 IP,必须通过 Route 53 Resolver Inbound Endpoint 路由 DNS 查询。
On-premises node
  → On-premises DNS server (conditional forwarding)
    → Route 53 Resolver Inbound Endpoint (in VPC)
      → Route 53 resolves via Private Hosted Zone / VPC DNS
        → Returns VPC Endpoint ENI private IP
          → On-premises node reaches ENI directly over VPN/DX
在本地 DNS 上配置条件转发
配置你的本地 DNS server(例如 BIND、Windows DNS、dnsmasq),将 AWS domains 转发到 Route 53 Inbound Endpoint。
# BIND example (/etc/named.conf)
zone "amazonaws.com" {
    type forward;
    forward only;
    forwarders {
        10.0.1.10;    # Route 53 Inbound Endpoint IP #1
        10.0.2.10;    # Route 53 Inbound Endpoint IP #2
    };
};

zone "eks.amazonaws.com" {
    type forward;
    forward only;
    forwarders {
        10.0.1.10;
        10.0.2.10;
    };
};注意:有关 Route 53 Resolver Inbound Endpoint 创建,请参阅本文档中的 DNS 配置 部分。配置 VPC endpoints 后,务必使用
nslookup eks.<region>.amazonaws.com验证返回的是私有 IP。
AWS Security Group 配置
EKS 会在创建 cluster 时自动配置 security group inbound rules,但不会自动创建 outbound rules(security groups 默认允许所有出站流量)。
自动创建的 Inbound Rules
| 协议 | 端口 | 来源 | 用途 |
|---|---|---|---|
| TCP | 443 | Remote node CIDR(s) | Kubelet 到 Kubernetes API |
| TCP | 443 | Remote pod CIDR(s) | Pods 到 Kubernetes API (non-NAT CNI) |
需要手动添加的 Outbound Rules
| 协议 | 端口 | 目标 | 用途 |
|---|---|---|---|
| TCP | 10250 | Remote node CIDR(s) | API server 到 kubelet |
| TCP | Webhook ports | Remote pod CIDR(s) | API server 到 webhooks |
# Example: Create a custom security group
aws ec2 create-security-group \
  --group-name hybrid-nodes-sg \
  --description "Security group for EKS Hybrid Nodes" \
  --vpc-id <VPC_ID>

# Add inbound rules
aws ec2 authorize-security-group-ingress \
  --group-id <SG_ID> \
  --ip-permissions '[
    {"IpProtocol": "tcp", "FromPort": 443, "ToPort": 443,
     "IpRanges": [{"CidrIp": "<REMOTE_NODE_CIDR>"}, {"CidrIp": "<REMOTE_POD_CIDR>"}]}
]'警告:默认限制是每个 security group 60 条 inbound rules。此外,当 remote networks 被移除时,EKS 不会自动删除规则 — 需要手动清理。
Pod CIDR 防火墙策略
你需要为整个 Pod CIDR 范围注册防火墙规则,以支持 Pod-to-Pod 通信。
# Pod CIDR range example: 10.244.0.0/16
# Check cluster's Pod CIDR
kubectl cluster-info dump | grep -m 1 cluster-cidr

# Add firewall rules for Pod CIDR
sudo iptables -A INPUT -s 10.244.0.0/16 -j ACCEPT
sudo iptables -A OUTPUT -d 10.244.0.0/16 -j ACCEPT
sudo iptables -A FORWARD -s 10.244.0.0/16 -j ACCEPT
sudo iptables -A FORWARD -d 10.244.0.0/16 -j ACCEPT

# Add Service CIDR as well (e.g., 172.20.0.0/16)
sudo iptables -A INPUT -s 172.20.0.0/16 -j ACCEPT
sudo iptables -A OUTPUT -d 172.20.0.0/16 -j ACCEPT
DNS 配置
Route 53 Resolver Inbound Endpoint
创建 Inbound Endpoint,允许本地查询 AWS domains。
# Create Inbound Endpoint
aws route53resolver create-resolver-endpoint \
  --creator-request-id "hybrid-inbound-$(date +%s)" \
  --name "hybrid-inbound-endpoint" \
  --security-group-ids sg-0123456789abcdef0 \
  --direction INBOUND \
  --ip-addresses SubnetId=subnet-111111111,Ip=10.0.1.10 SubnetId=subnet-222222222,Ip=10.0.2.10

# Check Endpoint IPs
aws route53resolver list-resolver-endpoint-ip-addresses \
  --resolver-endpoint-id rslvr-in-xxxxxxxxxxxxx
Route 53 Resolver Outbound Endpoint
创建 Outbound Endpoint 和 forwarding rules,允许 AWS 查询本地域名。
# Create Outbound Endpoint
aws route53resolver create-resolver-endpoint \
  --creator-request-id "hybrid-outbound-$(date +%s)" \
  --name "hybrid-outbound-endpoint" \
  --security-group-ids sg-0123456789abcdef0 \
  --direction OUTBOUND \
  --ip-addresses SubnetId=subnet-111111111 SubnetId=subnet-222222222

# Create forwarding rule (on-premises domain)
aws route53resolver create-resolver-rule \
  --creator-request-id "forward-onprem-$(date +%s)" \
  --name "forward-to-onprem" \
  --rule-type FORWARD \
  --domain-name "internal.company.io" \
  --resolver-endpoint-id rslvr-out-xxxxxxxxxxxxx \
  --target-ips "Ip=192.168.1.10,Port=53" "Ip=192.168.1.11,Port=53"

# Associate rule with VPC
aws route53resolver associate-resolver-rule \
  --resolver-rule-id rslvr-rr-xxxxxxxxxxxxx \
  --vpc-id vpc-0123456789abcdef0
CoreDNS 自定义域配置
将本地域名的 DNS 查询转发到本地 DNS servers。
apiVersion: v1
kind: ConfigMap
metadata:
  name: coredns
  namespace: kube-system
data:
  Corefile: |
    .:53 {
        errors
        health {
            lameduck 5s
        }
        ready
        kubernetes cluster.local in-addr.arpa ip6.arpa {
            pods insecure
            fallthrough in-addr.arpa ip6.arpa
        }
        prometheus :9153
        forward . /etc/resolv.conf {
            max_concurrent 1000
        }
        cache 30
        loop
        reload
        loadbalance
    }
    internal.company.io:53 {
        errors
        cache 30
        forward . 192.168.1.10 192.168.1.11 {
            max_concurrent 1000
        }
}# Apply CoreDNS ConfigMap
kubectl apply -f coredns-configmap.yaml
# Restart CoreDNS
kubectl rollout restart deployment coredns -n kube-system
# Test DNS resolution
kubectl run dns-test --rm -it --image=busybox --restart=Never -- nslookup internal.company.ioCoreDNS 双位置 Deployment(本地 + Cloud)
为什么需要双位置 Deployment?
在 EKS Hybrid Nodes 环境中,如果 CoreDNS 仅在 cloud nodes 上运行,来自本地 Pods 的 DNS 查询必须经过 VPN/Direct Connect 链路到达 cloud 再返回。反过来,如果 CoreDNS 仅在本地 nodes 上运行,来自 cloud Pods 的 DNS 查询也必须进行反向往返。
CoreDNS Pods 必须同时存在于两侧,以最大限度降低 DNS 延迟,并在一侧发生网络故障时仍保持 DNS service 可用性。
推荐 Replica 数量
建议至少使用 4 replicas(2 个 cloud + 2 个本地)。在每个位置至少放置 2 个 replicas 可确保高可用性。
CoreDNS Deployment Patch
使用 topologySpreadConstraints 和 tolerations 将 CoreDNS Pods 均匀分布到 cloud 和本地 nodes。
apiVersion: apps/v1
kind: Deployment
metadata:
  name: coredns
  namespace: kube-system
spec:
  replicas: 4
  template:
    spec:
      tolerations:
        - key: "eks.amazonaws.com/compute-type"
          value: "hybrid"
          effect: "NoSchedule"
      topologySpreadConstraints:
        - maxSkew: 1
          topologyKey: "eks.amazonaws.com/compute-type"
          whenUnsatisfiable: ScheduleAnyway
          labelSelector:
            matchLabels:
              k8s-app: kube-dns
kubectl patch 命令
kubectl patch deployment coredns -n kube-system --type=strategic -p '{
  "spec": {
    "replicas": 4,
    "template": {
      "spec": {
        "tolerations": [
          {
            "key": "eks.amazonaws.com/compute-type",
            "value": "hybrid",
            "effect": "NoSchedule"
          }
        ],
        "topologySpreadConstraints": [
          {
            "maxSkew": 1,
            "topologyKey": "eks.amazonaws.com/compute-type",
            "whenUnsatisfiable": "ScheduleAnyway",
            "labelSelector": {
              "matchLabels": {
                "k8s-app": "kube-dns"
              }
            }
          }
        ]
      }
    }
  }
}'
验证放置位置
# Verify CoreDNS Pods are distributed across both node types
kubectl get pods -n kube-system -l k8s-app=kube-dns -o wide

# Check compute-type labels on nodes
kubectl get nodes -L eks.amazonaws.com/compute-type注意:
- 使用 EKS managed CoreDNS add-on 时,可以通过 add-on 的
configurationValues应用相同配置。- 使用
whenUnsatisfiable: ScheduleAnyway可确保即使 nodes 只存在于一侧,也不会阻塞调度。这保证 CoreDNS 在初始 cluster bootstrap 期间正常启动。
流量模式
理解 AWS 与本地之间的流量模式对于防火墙配置和故障排查至关重要。以下各节使用官方 AWS 架构图详细说明每种流量模式。
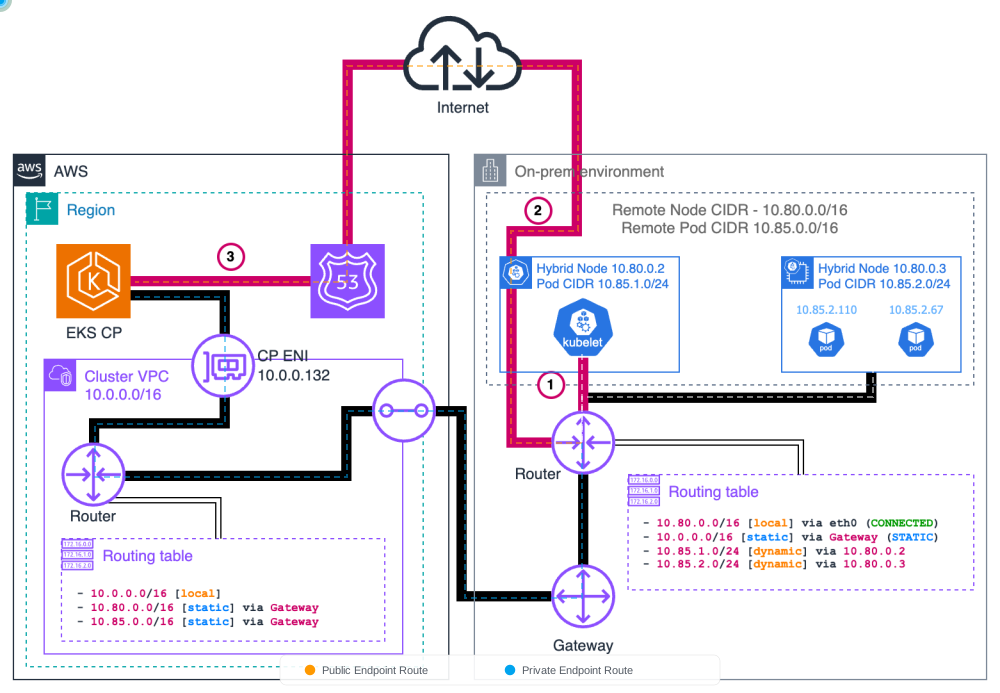
模式 1:Kubelet → EKS 控制平面
Kubelet 通过 DNS lookup 向 API server endpoint 发起 HTTPS 请求。在 public access mode 中,流量经过公共互联网。在 private mode 中,流量通过 VPN/DX 流向 VPC ENI。
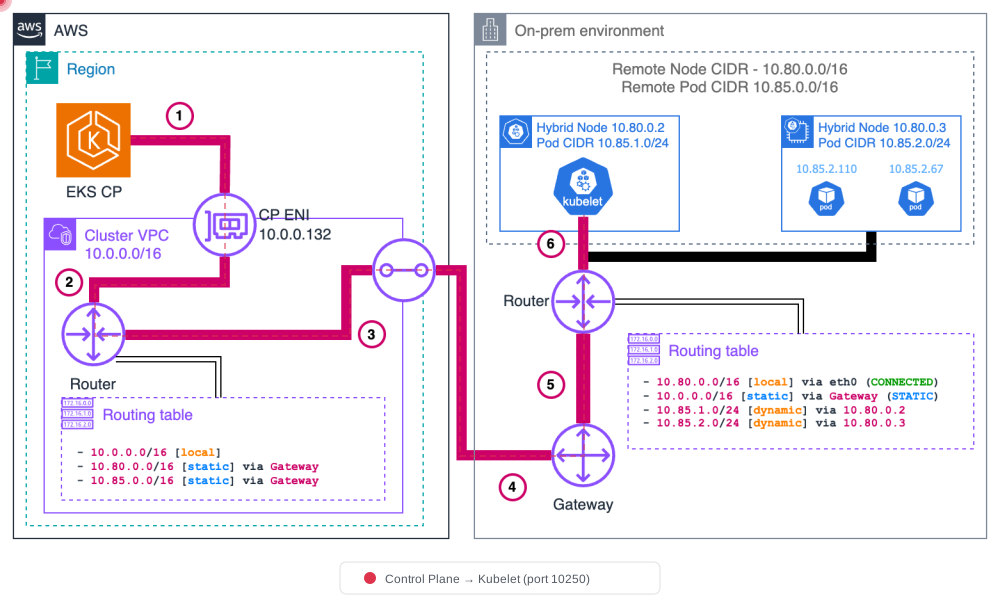
模式 2:EKS 控制平面 → Kubelet
API server 从 node status object 获取 node IP。流量通过 VPC 路由,然后经 Direct Connect 或 VPN 跨越 cloud 边界,到达端口 10250 上的 kubelet。这用于 kubectl logs、kubectl exec、kubectl port-forward 等。
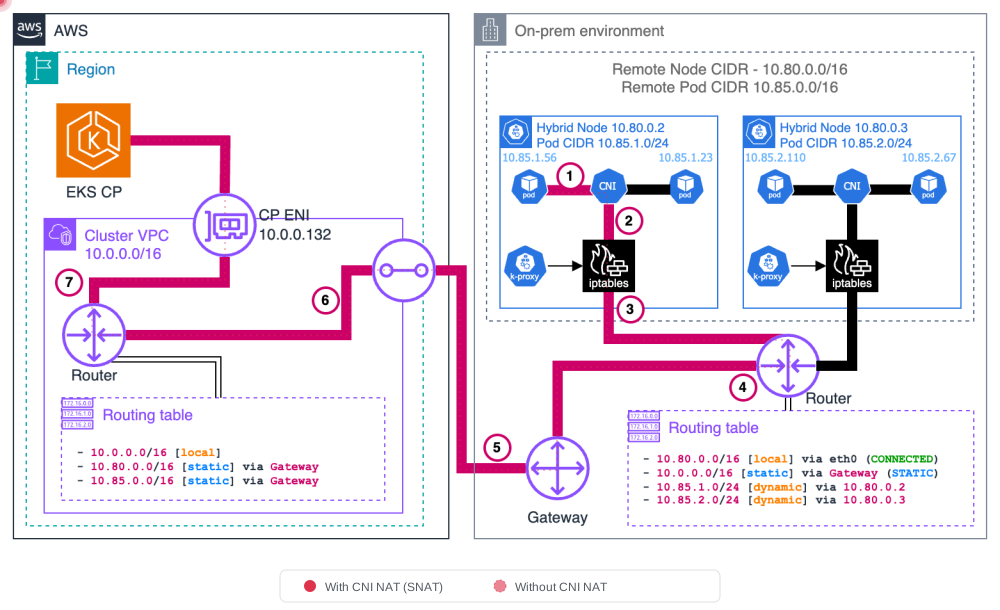
模式 3:Pod → EKS 控制平面
Pods 通过 kubernetes Service (ClusterIP) 与 Kubernetes API 通信。kube-proxy 应用 DNAT,将 service IP 转换为控制平面 ENI IP,然后数据包通过 VPN/DX 路由到 VPC。
- 不使用 CNI NAT:Pod 发送到 kubernetes service IP(例如 172.16.0.1),kube-proxy 应用 DNAT 到控制平面 ENI IP。返回流量需要通过 pod CIDR 进行反向路由。
- 使用 CNI NAT:CNI 在 node 处理之前应用 SNAT,简化返回路由(无需额外 pod CIDR 路由)。
模式 4:EKS 控制平面 → Pod (Webhooks)
API server 会直接连接到运行在 hybrid nodes 上的 webhook pods。流量通过 VPC 路由到 remote pod CIDR,并通过 gateway 跨越边界。这 需要可路由的 pod CIDR。
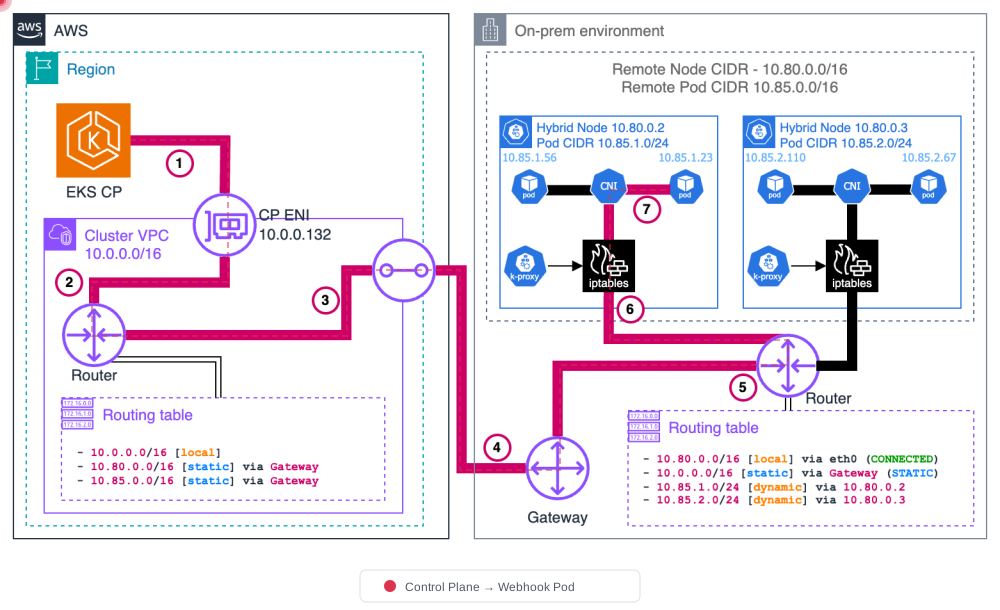
重要:如果你的本地 pod CIDR 不可路由,你 必须将所有 webhooks 运行在 cloud nodes 上。请参阅下面的 Webhook 配置。
模式 5:Hybrid Nodes 上的 Pod ↔ Pod
不同 hybrid nodes 上的 Pods 使用 VXLAN encapsulation(或 Geneve、IP-in-IP 等类似 overlay protocols)通信。CNI 使用源/目标 node IP 作为外层 header,对原始 pod-to-pod 数据包进行封装。接收 node 的 CNI 会解封装并交付给目标 pod。
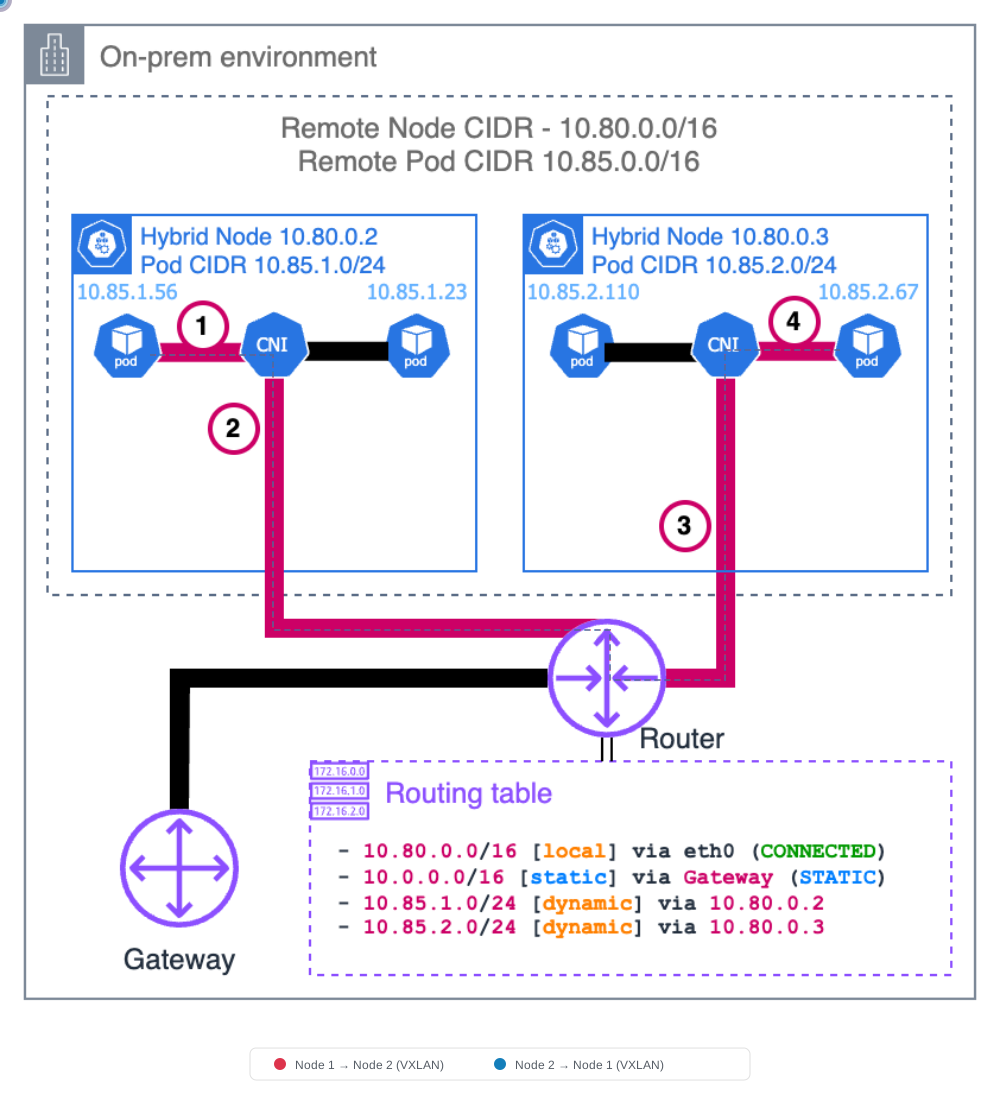
VXLAN 封装详细信息
VXLAN (Virtual Extensible LAN) 将 L2 frames 封装到 L3 packets 中,以创建 overlay network。下面展示在 hybrid nodes 之间进行 Pod 通信时,packet structure 如何转换。
原始数据包(封装前)
┌────────────────────────────────────────────────┐
│  Pod-A IP (src) → Pod-B IP (dst) │   Payload   │
│    10.85.0.10       10.85.1.20   │   (data)    │
└────────────────────────────────────────────────┘
VXLAN 封装后
┌──────────────────────────────────────────────────────────────────────────────┐
│ Outer IP Header │ UDP Header │ VXLAN Header │      Original Packet          │
│ Node-A → Node-B │ Port 8472  │    (VNI)     │ Pod-A IP → Pod-B IP │ Payload │
│ 10.80.1.10      │            │              │ 10.85.0.10  10.85.1.20        │
│   → 10.80.1.11  │            │              │                               │
└──────────────────────────────────────────────────────────────────────────────┘
封装过程(源 Node)
- Pod-A 向 Pod-B 发送数据包
- 源 node 的 CNI (Cilium) 查找目标 Pod IP,并识别目标 node
- CNI 使用 VXLAN header 和 outer IP header 包装原始数据包
- 外层 header 使用 node IP 作为源/目标
- 封装后的数据包通过 UDP 端口 8472 发送
解封装过程(目标 Node)
- 目标 node 在 UDP 端口 8472 接收 VXLAN packet
- CNI 移除 VXLAN header 和 outer IP header
- 原始数据包被交付给目标 Pod
关键组件
| 组件 | 描述 |
|---|---|
| VNI (VXLAN Network Identifier) | 24-bit identifier,用于隔离 pod network traffic(默认:auto-assigned) |
| UDP Port | Cilium default: 8472, Standard VXLAN: 4789 |
| MTU | 必须考虑 VXLAN overhead(50 bytes),例如 1500 → 1450 |
注意:除 VXLAN 外,Cilium 还支持 Geneve 和 IP-in-IP 等其他 tunnel protocols。使用
--tunnel选项选择 tunnel mode。
模式 6:Cloud Pod ↔ Hybrid Pod (East-West)
VPC pods(使用 VPC CNI)直接发送到 hybrid pods;VPC routing 将流量导向本地 gateway。数据包跨越边界并到达 hybrid node。这 需要可路由的 pod CIDR 和正确的 VPC route table entries。
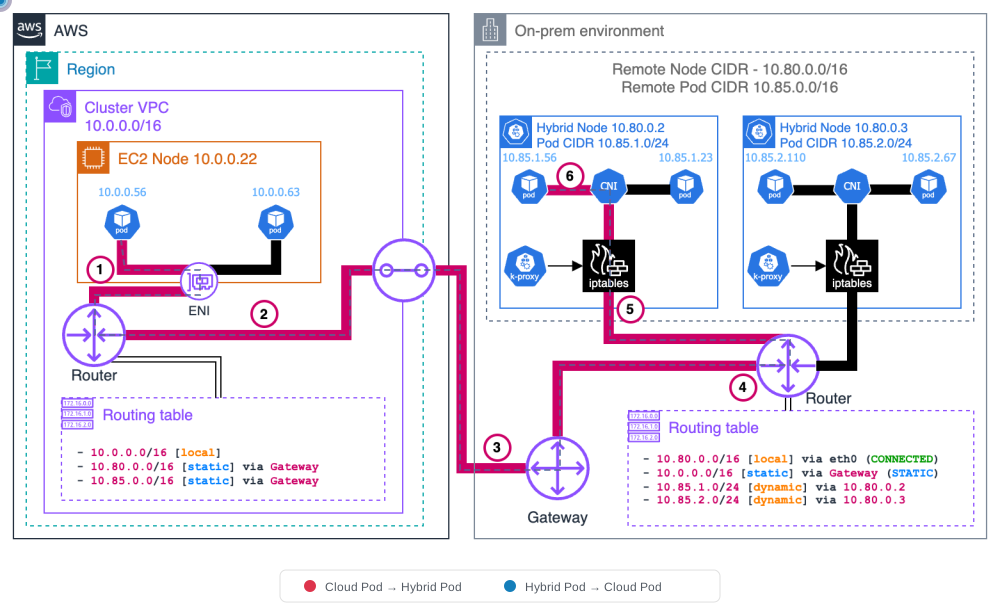
流量摘要
| # | 流向 | 方向 | 端口 | 要求 |
|---|---|---|---|---|
| 1 | Kubelet → API Server | On-Prem → AWS | TCP 443 | VPN/DX 或 internet |
| 2 | API Server → Kubelet | AWS → On-Prem | TCP 10250 | SG outbound rule |
| 3 | Pod → API Server | On-Prem → AWS | TCP 443 | kube-proxy DNAT |
| 4 | API Server → Webhook Pod | AWS → On-Prem | TCP 8443+ | 可路由 pod CIDR |
| 5 | Hybrid Pod ↔ Hybrid Pod | On-Prem internal | UDP 8472 | Cilium VXLAN |
| 6 | Cloud Pod ↔ Hybrid Pod | AWS ↔ On-Prem | VPC route | 可路由 pod CIDR + VPC routes |
kube-proxy iptables Chain 结构
kube-proxy 使用 iptables rules 将 Kubernetes Service 流量路由到实际 Pods。相同的 3 层 chain 结构也适用于 hybrid nodes。
KUBE-SERVICES (entry point)
  └─→ KUBE-SVC-xxxx (per-service chain, load balancing)
        └─→ KUBE-SEP-xxxx (per-endpoint chain, DNAT to pod IP)
Chain 角色
| Chain | 角色 | 示例 |
|---|---|---|
| KUBE-SERVICES | 将目标 IP:Port 与所有 ClusterIP services 匹配 | 172.20.0.1:443 → KUBE-SVC-NPX... |
| KUBE-SVC-xxxx | 使用基于概率的 load balancing 选择 endpoint | 3 Pods → 每个 33% 概率 |
| KUBE-SEP-xxxx | 对特定 Pod IP:Port 执行 DNAT | DNAT 到 10.85.0.15:8080 |
实际 iptables Rules 示例
# KUBE-SERVICES chain (nat table)
-A KUBE-SERVICES -d 172.20.0.10/32 -p tcp -m tcp --dport 80 -j KUBE-SVC-XXXXXX

# KUBE-SVC chain (load balancing)
-A KUBE-SVC-XXXXXX -m statistic --mode random --probability 0.33333 -j KUBE-SEP-AAAAAA
-A KUBE-SVC-XXXXXX -m statistic --mode random --probability 0.50000 -j KUBE-SEP-BBBBBB
-A KUBE-SVC-XXXXXX -j KUBE-SEP-CCCCCC

# KUBE-SEP chain (DNAT)
-A KUBE-SEP-AAAAAA -p tcp -j DNAT --to-destination 10.85.0.15:8080
-A KUBE-SEP-BBBBBB -p tcp -j DNAT --to-destination 10.85.0.16:8080
-A KUBE-SEP-CCCCCC -p tcp -j DNAT --to-destination 10.85.1.20:8080
Hybrid Environment 影响:在上面的示例中,如果
10.85.1.20是位于不同 hybrid node 上的 Pod,则 DNAT 后的数据包将被 VXLAN 封装并发送到该 node。kube-proxy 将 Service 流量转换为 Pod IP,CNI 负责实际的网络路由。
kubelet Endpoints
kubelet 运行在每个 node 上,并公开用于 API server 通信的 REST endpoints。
kubelet API 端口和 Endpoints
| 端口 | Endpoint | 用途 |
|---|---|---|
| 10250 | /pods | 列出在该 node 上运行的 pods |
| 10250 | /exec/{namespace}/{pod}/{container} | 在 containers 中执行命令(kubectl exec) |
| 10250 | /logs/{namespace}/{pod}/{container} | 流式传输 container logs(kubectl logs) |
| 10250 | /metrics | 暴露 kubelet metrics(用于 Prometheus scraping) |
| 10250 | /healthz | kubelet health check |
Node 注册和地址报告
当 kubelet 向 cluster 注册 node 时,它会在 Node.status.addresses 中报告地址信息:
status:
  addresses:
  - address: 10.80.1.10        # Actual on-premises IP
    type: InternalIP
  - address: hybrid-node-001   # Node hostname
type: Hostname- InternalIP:node 的实际本地 IP 地址。API server 使用此地址连接到 kubelet。
- Hostname:node 的 hostname。
防火墙规则要求:由于 API server 使用
InternalIP连接到 kubelet,必须从 AWS → On-Prem 打开 TCP 端口 10250。如果此连接被阻止,kubectl exec、kubectl logs和kubectl port-forward等命令将失败。
可路由 Pod CIDR 配置
使本地 pod CIDR 可路由对于 webhooks、east-west traffic 和 AWS service integration(ALB、Prometheus 等)至关重要。
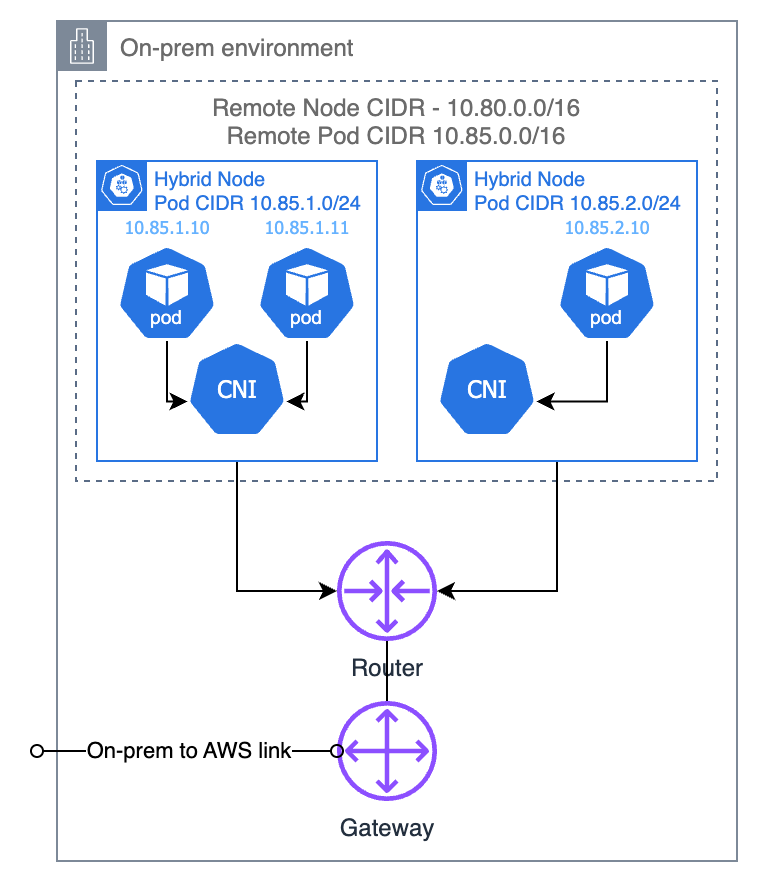
选项 1:BGP(推荐)
CNI 充当虚拟 router,并将每个 node 的 pod CIDR routes 传播到本地 router。这是最动态、最易维护的方法。
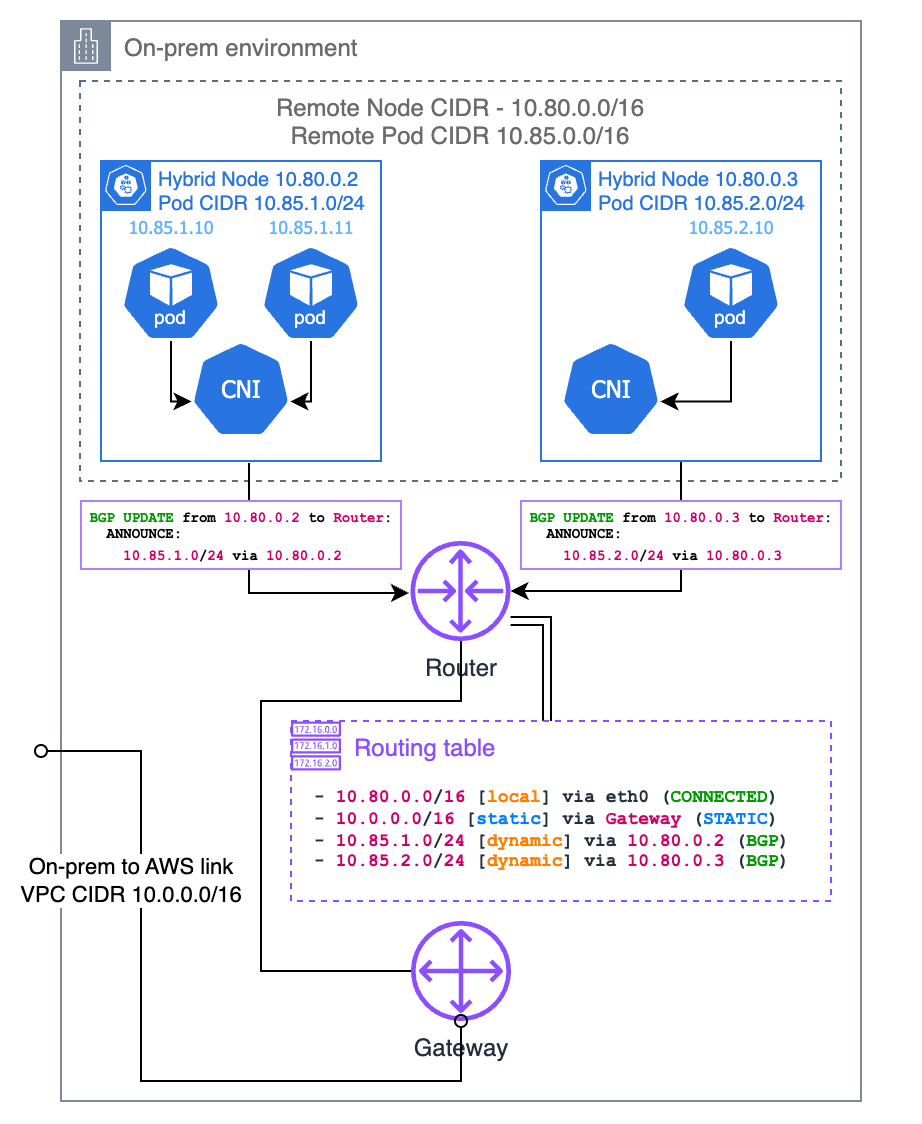
Cilium BGP Control Plane 配置
apiVersion: cilium.io/v2alpha1
kind: CiliumBGPClusterConfig
metadata:
  name: hybrid-bgp-config
spec:
  bgpInstances:
  - name: hybrid-instance
    localASN: 65001
    peers:
    - name: on-prem-router
      peerASN: 65000
      peerAddress: 10.80.0.1
      peerConfigRef:
        name: on-prem-peer
---
apiVersion: cilium.io/v2alpha1
kind: CiliumBGPPeerConfig
metadata:
  name: on-prem-peer
spec:
  families:
  - afi: ipv4
    safi: unicast
  gracefulRestart:
    enabled: true
---
apiVersion: cilium.io/v2alpha1
kind: CiliumBGPAdvertisement
metadata:
  name: pod-cidr-advert
spec:
  advertisements:
  - advertisementType: PodCIDR
  - advertisementType: Service
    service:
      addresses:
      - ClusterIP
理解 ASN (Autonomous System Number)
在上面的 Cilium BGP 配置中,localASN 和 peerASN 是 Autonomous System Numbers — 分配给每个 BGP participant 的唯一标识符。每个 BGP speaker(router、switch,或者这里的每个 node 上的 Cilium)都必须有 ASN,它连接的 peer 也必须有 ASN。
Private 与 Public ASN 范围
| 范围 | 类型 | 使用场景 |
|---|---|---|
| 64512 – 65534 | 16-bit Private | Internal networks、data centers、lab environments。EKS Hybrid Nodes 使用此范围。 |
| 4200000000 – 4294967294 | 32-bit Private | 需要许多唯一 ASN 的大规模内部部署 |
| 1 – 64511 | 16-bit Public | 向 RIR(ARIN、RIPE、APNIC)注册的 Internet-facing networks |
对于 EKS Hybrid Nodes:始终使用 private ASN ranges (64512–65534)。你不需要 public ASN — 这里的 BGP 只用于 Cilium nodes 与本地 routers 之间的内部网络。
如何选择 ASN 值
localASN(例如65001):分配给运行在 hybrid nodes 上的 Cilium 的 ASN。同一 cluster 中的所有 Cilium nodes 通常共享一个 ASN。peerASN(例如65000):与 Cilium 对等连接的本地 router 的 ASN。检查你的 router 的 BGP 配置以找到此值。
如果当前环境中未配置 BGP,只需从 private range 中选择两个不同的数字(例如 router 使用 65000,Cilium 使用 65001)。如果你的网络团队已在内部使用 BGP,请与他们协调以避免 ASN 冲突。
本地 Router BGP 配置示例
下面是配置 BGP peering 的 router 侧 以匹配上述 Cilium 配置的示例。在每个示例中,router 使用 ASN 65000,并与位于 10.80.1.10 的 Cilium node(ASN 65001)建立 peer。
Cisco IOS / IOS-XE
router bgp 65000
 neighbor 10.80.1.10 remote-as 65001
 neighbor 10.80.1.10 description "EKS Hybrid Node - Cilium BGP"
 !
 address-family ipv4 unicast
  neighbor 10.80.1.10 activate
  neighbor 10.80.1.10 soft-reconfiguration inbound
 exit-address-family
Cisco NX-OS (Nexus)
router bgp 65000
  address-family ipv4 unicast
  neighbor 10.80.1.10
    remote-as 65001
    description EKS-Hybrid-Cilium
    address-family ipv4 unicast
      soft-reconfiguration inbound
Juniper Junos (MX / QFX / SRX)
set protocols bgp group eks-hybrid type external
set protocols bgp group eks-hybrid peer-as 65001
set protocols bgp group eks-hybrid neighbor 10.80.1.10 description "EKS Hybrid Node"
set protocols bgp group eks-hybrid family inet unicast
set routing-options autonomous-system 65000
Arista EOS
router bgp 65000
   neighbor 10.80.1.10 remote-as 65001
   neighbor 10.80.1.10 description EKS-Hybrid-Cilium
   !
   address-family ipv4
      neighbor 10.80.1.10 activate
MikroTik RouterOS
/routing bgp connection
add name=eks-hybrid remote.address=10.80.1.10 remote.as=65001 \
    local.role=ebgp as=65000 address-families=ip
FRRouting (FRR) — Software Router (Linux)
FRRouting 通常用作 Linux servers 和 VMs 上的软件 BGP router:
router bgp 65000
 neighbor 10.80.1.10 remote-as 65001
 neighbor 10.80.1.10 description EKS-Hybrid-Cilium
 !
 address-family ipv4 unicast
  neighbor 10.80.1.10 activate
 exit-address-family
AWS Transit Gateway (TGW)
使用 AWS Transit Gateway 与 Site-to-Site VPN 时,TGW 侧 ASN 在 TGW 创建期间配置:
# TGW creation with custom ASN
aws ec2 create-transit-gateway \
  --options AmazonSideAsn=65000

# The VPN tunnel automatically establishes BGP with the TGW ASN
# On-premises router (or Cilium) uses its own ASN to peer with TGW注意:AWS TGW 默认 ASN 是
64512。如果你的 Cilium nodes 使用65001,则 Cilium config 中的 TGW(或 VGW)peer ASN 应与 TGW 的 ASN 匹配。
多个 Hybrid Nodes
当你有多个 hybrid nodes 时,每个 node 都运行自己的 Cilium BGP speaker,并使用 相同的 localASN。本地 router 会分别与每个 node 建立 peer:
# Router config — peer with each hybrid node
router bgp 65000
 neighbor 10.80.1.10 remote-as 65001   ! hybrid-node-001
 neighbor 10.80.1.11 remote-as 65001   ! hybrid-node-002
 neighbor 10.80.1.12 remote-as 65001   ! hybrid-node-003
每个 node 都通告自己的 pod CIDR slice(例如 node-001 通告 10.85.0.0/25,node-002 通告 10.85.0.128/25),因此 router 会构建包含所有 pod CIDR 的完整 routing table。
验证 BGP Peering
cilium bgp peers
cilium bgp routes
Hybrid nodes 应显示 Session State established。
选项 2:静态路由
使用 pod CIDR 手动配置 router。最简单,但容易出错,并且在 nodes 变更时需要手动更新。
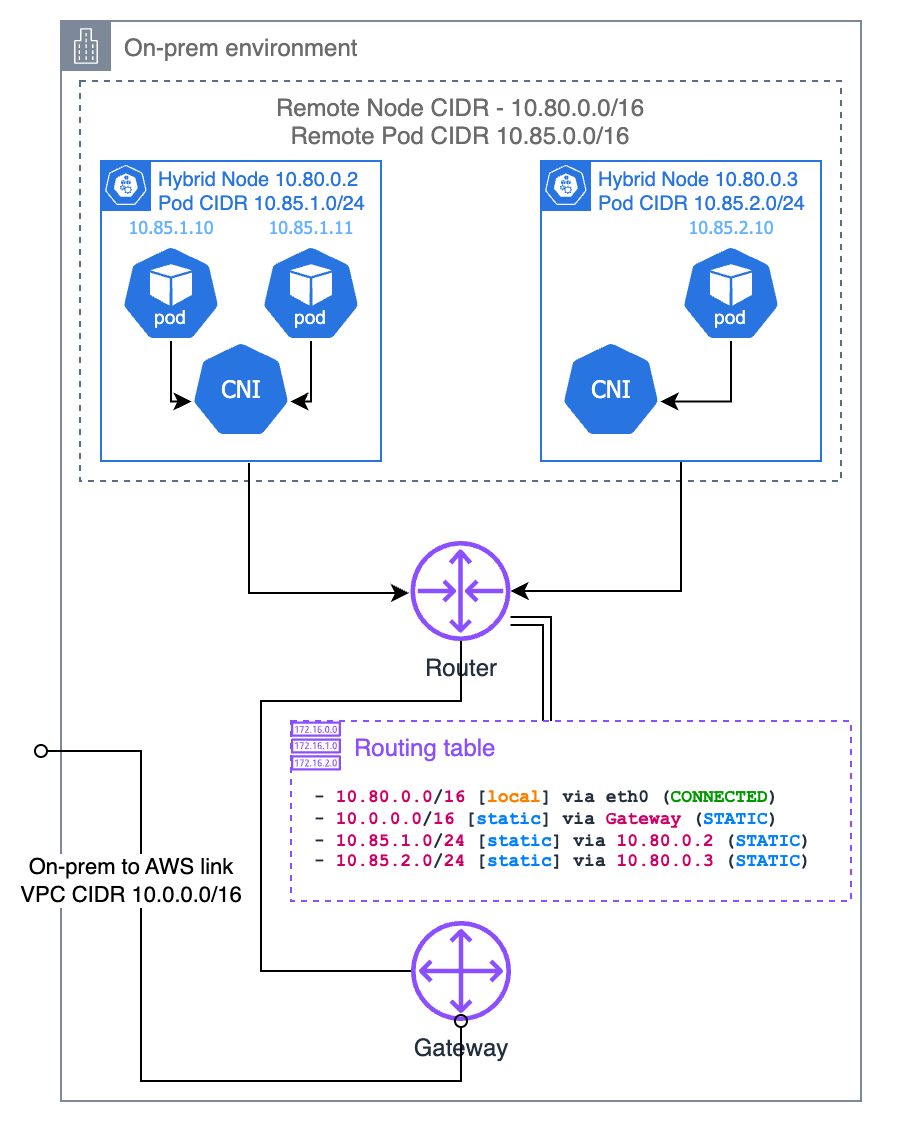
理解 Cluster-Pool IPAM 分配
在 Cilium 的 cluster-pool IPAM mode 中,整个 pod CIDR pool 会被划分为每个 node 的固定大小块。在 04-node-bootstrap.md 的 Cilium values 中配置两个关键参数:
| 参数 | 示例值 | 描述 |
|---|---|---|
clusterPoolIPv4PodCIDRList | 10.85.0.0/16 | 整个 pod CIDR pool |
clusterPoolIPv4MaskSize | 25 | 每个 node 分配的 subnet size(/25 = 128 IPs) |
例如,使用 10.85.0.0/16 的 pool 和 /25 的 mask size 时,最多 512 nodes 可以各自分配 128 个 pod IP。Cilium Operator 会按 node 注册顺序分配块:
| Node | 分配的 PodCIDR | 可用 Pod IPs |
|---|---|---|
| hybrid-node-001 | 10.85.0.0/25 | 10.85.0.1 – 10.85.0.126 |
| hybrid-node-002 | 10.85.0.128/25 | 10.85.0.129 – 10.85.0.254 |
| hybrid-node-003 | 10.85.1.0/25 | 10.85.1.1 – 10.85.1.126 |
重要:此分配信息记录在 CiliumNode CR 中。它可能不同于 Kubernetes Node object 的
spec.podCIDR,因此配置静态路由时始终参考 CiliumNode CR。
查询每个 Node 的 PodCIDR
要配置静态路由,需要识别每个 node 分配的 PodCIDR 和 node IP(next hop)。查询方法因 CNI 而异:
Cilium — CiliumNode CR 的 spec.ipam.podCIDRs 是权威来源:
kubectl get ciliumnodes -o custom-columns='\
NAME:.metadata.name,\
NODE_IP:.spec.addresses[0].ip,\
POD_CIDR:.spec.ipam.podCIDRs[0]'
NAME NODE_IP POD_CIDR
hybrid-node-001 10.80.1.10 10.85.0.0/25
hybrid-node-002 10.80.1.11 10.85.0.128/25
hybrid-node-003 10.80.1.12 10.85.1.0/25有关 CiliumNode CR 结构、脚本用法和更多详细信息,请参阅 Cilium IPAM — Querying Per-Node PodCIDRs via CiliumNode CR。
Calico — BlockAffinity CRs 跟踪每个 node 的 CIDR blocks:
kubectl get blockaffinities -o custom-columns='\
NAME:.metadata.name,\
CIDR:.spec.cidr,\
NODE:.spec.node'
⚠ 弃用:Calico 不再在 EKS Hybrid Nodes 上获得官方支持。新部署请使用 Cilium。有关详细的 BlockAffinity 查询,请参阅 Calico Advanced Topics — Querying Per-Node PodCIDRs via BlockAffinity。
配置静态路由
基于 CiliumNode(或 Calico BlockAffinity)CRs 中的信息,将静态路由添加到你的 router。常见模式是:
Destination = Node's PodCIDR
Next Hop    = Node's InternalIP
Linux (ip route)
# Add routes for each node's pod CIDR
ip route add 10.85.0.0/25 via 10.80.1.10    # hybrid-node-001
ip route add 10.85.0.128/25 via 10.80.1.11  # hybrid-node-002
ip route add 10.85.1.0/25 via 10.80.1.12    # hybrid-node-003
用于在重启后保持持久:
# /etc/network/interfaces.d/hybrid-routes (Debian/Ubuntu)
up ip route add 10.85.0.0/25 via 10.80.1.10
up ip route add 10.85.0.128/25 via 10.80.1.11
up ip route add 10.85.1.0/25 via 10.80.1.12

# Or for NetworkManager (RHEL/Rocky)
# /etc/NetworkManager/dispatcher.d/99-hybrid-routes
Cisco IOS / IOS-XE
ip route 10.85.0.0 255.255.255.128 10.80.1.10 name hybrid-node-001-pods
ip route 10.85.0.128 255.255.255.128 10.80.1.11 name hybrid-node-002-pods
ip route 10.85.1.0 255.255.255.128 10.80.1.12 name hybrid-node-003-pods
FRRouting (FRR)
ip route 10.85.0.0/25 10.80.1.10
ip route 10.85.0.128/25 10.80.1.11
ip route 10.85.1.0/25 10.80.1.12
AWS VPC Route Table
当 pods 需要从通过 VPN/Direct Connect 连接的 AWS VPC 访问时,使用聚合 CIDR:
# Add VPC route with aggregate CIDR (VPN Gateway or TGW as next hop)
aws ec2 create-route \
  --route-table-id rtb-0123456789abcdef0 \
  --destination-cidr-block 10.85.0.0/16 \
--gateway-id vgw-0123456789abcdef0# Terraform
resource "aws_route" "hybrid_pod_cidr" {
route_table_id = aws_route_table.main.id
destination_cidr_block = "10.85.0.0/16"
gateway_id = aws_vpn_gateway.main.id
}自动化和 BGP 对比
从 CiliumNode CRs 自动生成 ip route 命令的示例脚本:
#!/bin/bash
# generate-static-routes.sh — Generate static route commands from CiliumNode CRs
kubectl get ciliumnodes -o json | jq -r \
  '.items[] | "ip route add \(.spec.ipam.podCIDRs[0]) via \(.spec.addresses[0].ip)"'
示例输出:
ip route add 10.85.0.0/25 via 10.80.1.10
ip route add 10.85.0.128/25 via 10.80.1.11
ip route add 10.85.1.0/25 via 10.80.1.12
静态路由与 BGP 对比
| 方面 | 静态路由 | BGP(选项 1) |
|---|---|---|
| Node addition | 需要手动向 router 添加路由 | Routes propagated automatically |
| Node removal | 需要从 router 手动删除路由 | Routes withdrawn automatically |
| Node IP change | 所有 routes 必须手动更新 | Updates propagated automatically |
| Failure detection | 无(stale routes 保留) | 通过 BGP keepalives 自动检测 |
| Configuration complexity | 低 | 中等(需要 BGP peering setup) |
| Scalability | 适合 1–5 个 nodes | 可扩展到数十/数百个 nodes |
建议:
- PoC / 小型环境(1–5 nodes):静态路由提供快速入门
- Production / 5+ nodes:使用 BGP(选项 1)。它会自动响应 node 变更,并显著降低运维开销
- 策略不允许使用 BGP 的环境:使用静态路由,并配合上面的自动化脚本管理路由变更
选项 3:ARP Proxying
Nodes 会响应其托管 pod IP 的 ARP requests。需要与本地 router 具有 Layer 2 network proximity。Cilium 内置支持 proxy ARP。无需 router BGP 或静态路由配置,但 pod CIDR 不得与其他网络重叠。
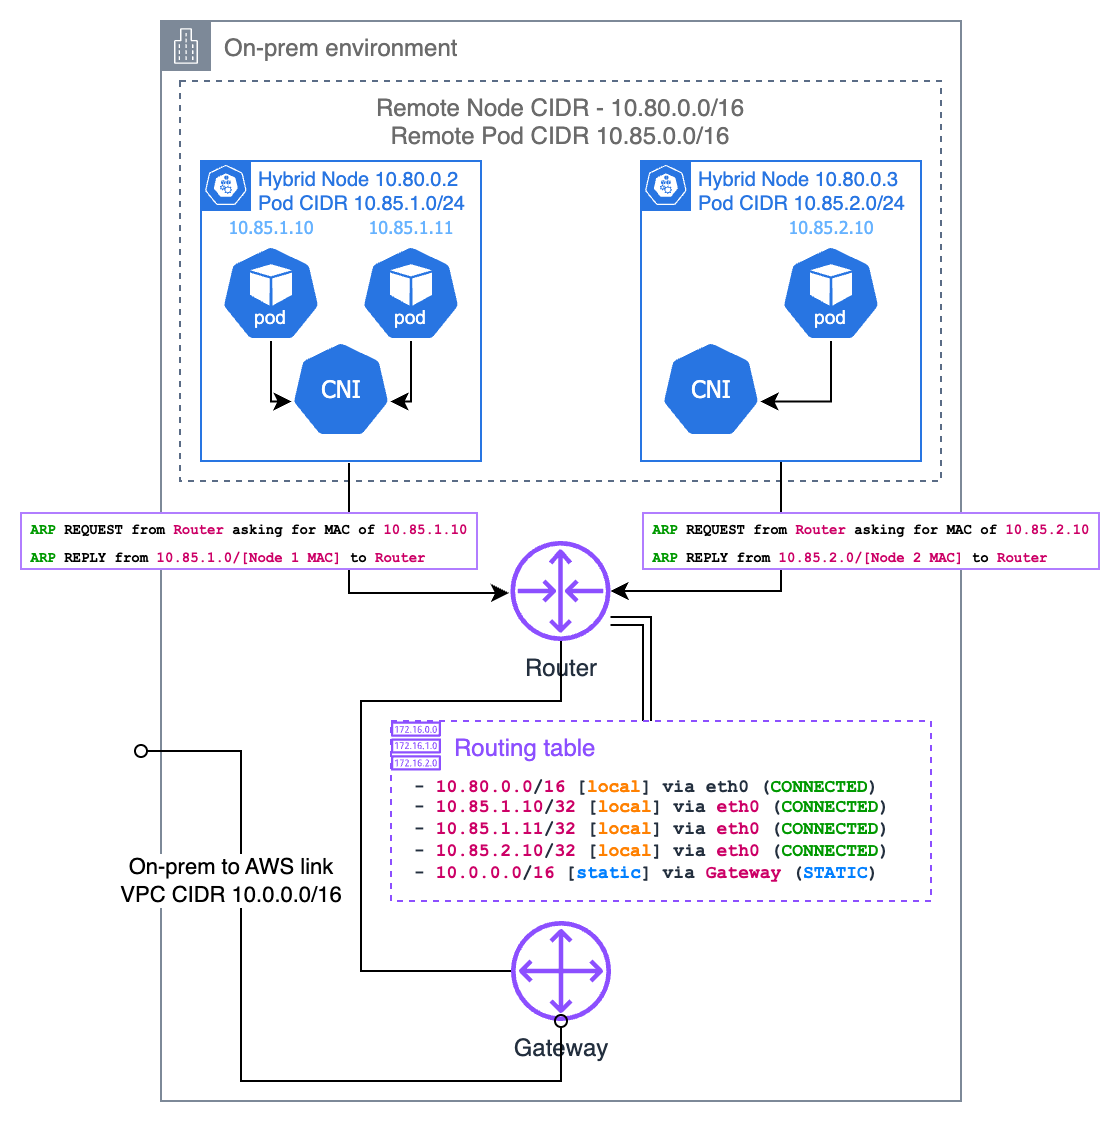
Network Policies
Network policies 可用于在 hybrid node 环境中控制 Pod-to-Pod 流量。使用 Cilium CNI 时,同时支持标准 Kubernetes NetworkPolicy 和扩展的 CiliumNetworkPolicy。
Kubernetes NetworkPolicy
标准 Kubernetes NetworkPolicy 提供基本的 L3/L4 traffic filtering。
apiVersion: networking.k8s.io/v1
kind: NetworkPolicy
metadata:
  name: allow-frontend-to-backend
  namespace: bookinfo
spec:
  podSelector:
    matchLabels:
      app: reviews
  policyTypes:
  - Ingress
  ingress:
  - from:
    - podSelector:
        matchLabels:
          app: productpage
    ports:
    - protocol: TCP
      port: 9080
此 policy 仅允许 bookinfo namespace 中带有 app: productpage label 的 Pods 访问 app: reviews Pods 上的端口 9080。
CiliumNetworkPolicy
CiliumNetworkPolicy 通过 L7 filtering、DNS-aware policies 和 identity-based matching 扩展 Kubernetes NetworkPolicy。
apiVersion: cilium.io/v2
kind: CiliumNetworkPolicy
metadata:
  name: allow-frontend-to-backend
  namespace: bookinfo
spec:
  endpointSelector:
    matchLabels:
      app: reviews
  ingress:
  - fromEndpoints:
    - matchLabels:
        app: productpage
    toPorts:
    - ports:
      - port: "9080"
        protocol: TCP
CiliumNetworkPolicy 高级功能
L7 HTTP Filtering
apiVersion: cilium.io/v2
kind: CiliumNetworkPolicy
metadata:
  name: l7-rule
  namespace: bookinfo
spec:
  endpointSelector:
    matchLabels:
      app: reviews
  ingress:
  - fromEndpoints:
    - matchLabels:
        app: productpage
    toPorts:
    - ports:
      - port: "9080"
        protocol: TCP
      rules:
        http:
        - method: "GET"
          path: "/api/v1/.*"
DNS-Based Egress Policy
apiVersion: cilium.io/v2
kind: CiliumNetworkPolicy
metadata:
  name: allow-external-api
  namespace: bookinfo
spec:
  endpointSelector:
    matchLabels:
      app: productpage
  egress:
  - toFQDNs:
    - matchName: "api.example.com"
    toPorts:
    - ports:
      - port: "443"
        protocol: TCP
Hybrid 环境中的 Network Policy 注意事项
| 注意事项 | 描述 |
|---|---|
| Default Behavior | 没有 network policies 时,允许所有流量。应用 NetworkPolicy 后,只有明确允许的流量可以通过。 |
| Cross-Boundary Traffic | Policies 必须考虑 cloud nodes 上的 Pods 与 hybrid nodes 上的 Pods 之间的通信。 |
| CNI Requirement | 当 Cilium 被配置为 CNI 时,两种 policy 类型都可以工作。 |
| Policy Scope | CiliumNetworkPolicy 仅适用于其 namespace。使用 CiliumClusterwideNetworkPolicy 可实现 cluster-wide policies。 |
建议:在 hybrid 环境中,定义明确的 network policies,以防止意外的 cross-boundary traffic。敏感 workloads 应使用严格的 Ingress/Egress policies 保护。
Webhook 配置
Webhooks 由 Kubernetes applications 和 open source projects(AWS Load Balancer Controller、CloudWatch Observability Agent)用于 mutating 和 validation 能力。
使用可路由 Pod 网络
如果你的本地 pod CIDR 可路由(通过 BGP、静态路由或 ARP proxy),webhooks 可以在 hybrid nodes 上运行。
使用不可路由 Pod 网络
如果你的本地 pod CIDR 不可 路由,请使用 node affinity 将所有 webhooks 运行在 cloud nodes 上:
affinity:
  nodeAffinity:
    requiredDuringSchedulingIgnoredDuringExecution:
      nodeSelectorTerms:
      - matchExpressions:
        - key: eks.amazonaws.com/compute-type
          operator: NotIn
          values:
          - hybrid
使用 Webhooks 的 Add-ons
以下 add-ons 需要考虑 webhook 放置位置:
| Add-on | Webhook 放置位置(不可路由 Pod CIDR) |
|---|---|
| AWS Load Balancer Controller | 仅 cloud nodes |
| CloudWatch Observability Agent | 仅 cloud nodes |
| ADOT (OpenTelemetry) | 仅 cloud nodes |
| cert-manager | 仅 cloud nodes |
| Kubernetes Metrics Server | 需要可路由 pod CIDR |
< 上一页:先决条件 | 目录 | 下一页:Air-Gap 设置 >